A vegan nail polish blog. A celebration of colour and light, as well as of justice for nonhuman animals.

Posts tagged ‘black’

Happy Halloween!


Here are some Halloween nails featuring two Pretty and Polished dusty cremes! I started with two coats plus top coat of In The Buff, a mustard yellow with the tiny dusty speckles characteristic of this collection. This first Ott lite photo is the most colour accurate; in the other flash photos it appears more orangey than in real life.

prettyandpolished_inthebuff_ott

With flash:

prettyandpolished_inthebuff_flash

I then sponged on a gradient using the orange polish from the dusty cremes collection, called CD 255,165.

prettyandpolished_inthebuff_cd255165_flash2

prettyandpolished_inthebuff_cd255165_flash

Finally I added some Halloween stamping using Kleancolor Metallic Black and Bundle Monster plate BM-H08. They went on a little patchy, but I’ll just say they’re ghostly bats and cats and eyes!

prettyandpolished_inthebuff_cd255165_stamping4

prettyandpolished_inthebuff_cd255165_stamping3

prettyandpolished_inthebuff_cd255165_stamping2

prettyandpolished_inthebuff_cd255165_stamping

Advertisement

Badger Mushroom Snake!

If you don’t know what I’m talking about, see here. You may now either thank me or curse me. 🙂

While there are many great images on Vivid Lacquer plate VL-004, it’s three particular images that made it so that I *needed* to get this plate as soon as I saw it. 

vividlacquer_vl004 

Here is the badger, mushroom, snake mani that I did. 

vividlacquer_badgermushroomsnake2_vl004 

The base is two coats of Milani White On The Spot (plus top coat). 

 badgermushroomsnake_vl004 

I stamped using Kleancolor polishes in Black, Blood and Dark Brown (together on the plate for the mushroom image), and Military Green. 

badgermushroomsnake_vl004_5 

I added white dots to the mushroom with a dotting tool, and some colour details on the snake’s hood (with Kleancolor Neon Yellow) and tongue (with Kleancolor Blood) using a straightened-out paper clip (didn’t have any thin nail art brushes at the time, though I’ve since ordered some). 

badgermushroomsnake_vl004_4 

I had a bit of trouble with the badger image; I’m wondering if Kleancolor Metallic Black might have been a better choice since I’ve found that sometimes metallics work better than cremes for stamping images I’ve had trouble getting crisp/full. I used HK Girl topcoat by Glisten & Glow overtop, which I’m really liking since it dries quickly and stands up to its claims of not smudging nail art. 

badgermushroomsnake_vl004_3 

Anyway, my life feels a little more complete having done this mani, haha.  Thank you Vivid Lacquer for putting these images together on a plate! 😀

badgermushroomsnake_vl004_2

Some Cult Nails Swatches

How about a few random Cult Nails swatches?

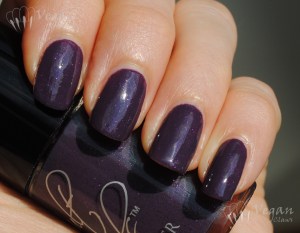
Spontaneous, a dusty purple creme with small purple glitter. The formula was a little thinner and runnier than I expected; I used three coats for coverage and to even it out. Shown with Wicked Fast topcoat.

Cult Nails Spontaneous

Cult Nails Spontaneous

Cult Nails Spontaneous

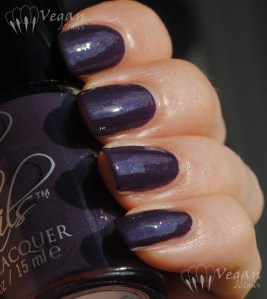
Before topcoat, it dries a little matte and slightly textured:

Cult Nails Spontaneous

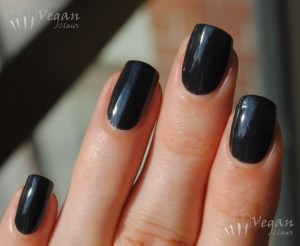
Blackout. It isn’t black, but a dark charcoal grey. If you look at it from up close in real life, you can see that it’s actually got a sheer jellyish base packed full of tiny little specks of pigment giving it a soft, smoky finish. It does look pretty much black in some lighting situations, although not quite as much as it does here in my photos.

Cult Nails Blackout

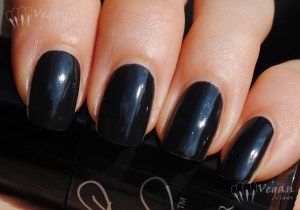
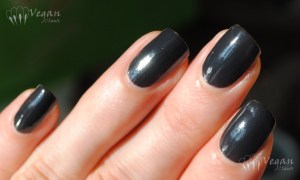
I used two coats although it was still just slightly patchy with its jelly base so I could have used a third.

Cult Nails Blackout

This photo is more true to colour, where you can tell that it’s grey and not black:

Cult Nails Blackout

Comparison with a couple of medium-dark greys to show how much darker it is: Kleancolor Concrete (1 thick coat), Blackout (2 coats), Misa Office Polish-tics (3 coats, it was a bit thin). I should have also compared it to a true black, ah well…

Cult Nails Blackout, Kleancolor Black, Kleancolor Concrete

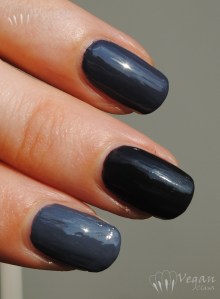
Top to bottom: Kleancolor Concrete, Cult Nails Blackout, Misa Office Polish-tics

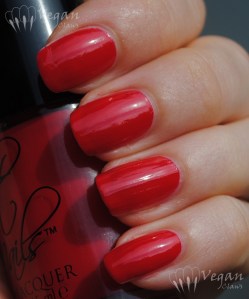
Evil Queen, a pink-toned red semi-jelly. I don’t usually like cool toned reds on me, but I really like this one!

Cult Nails Evil Queen

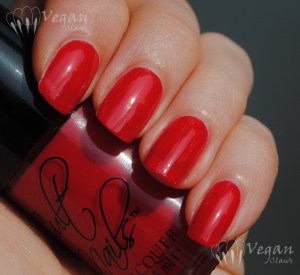
It was almost a one-coater, but I did two coats for the photos.

Cult Nails Evil Queen

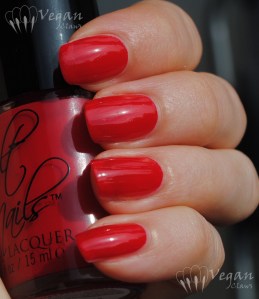
Great formula, shiny and smooth!

Cult Nails Evil Queen

Cult Nails Evil Queen

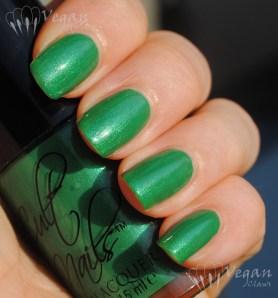
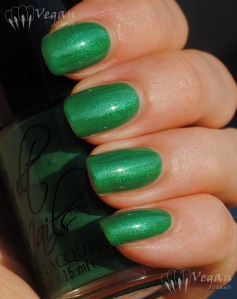
Feelin’ Froggy, a cool/neutral green with green shimmer. This one is sheer to let the shimmer shine through and I needed three coats. It’s a little cooler toned in real life; I’d say the first photo is the most colour accurate.

Cult Nails Feelin' Froggy

Cult Nails Feelin' Froggy

Cult Nails Feelin' Froggy

Orly Synchro

This is a very picture heavy post, because this polish is quite the chameleon! Orly Synchro is from the Electronica collection released for early fall 2012.

Orly Synchro

It’s a duochrome shimmer that is kind of frosty. The colour ranges from coral to pink to purple to nearly blue, depending on the angle.

Orly Synchro

The formula was a bit thick and sticky; not the easiest to work with. Care also has to be taken to get the brush strokes straight.

Orly Synchro

It’s also pretty sheer, and this was three coats, the last one thick.

Orly Synchro

Totally worth it though! The colours are amazing! It makes me think of a sunset.

Orly Synchro

Orly Synchro

Orly Synchro

Orly Synchro

In the shade:

Orly Synchro

I also swatched it using one fairly thick coat over black (one coat of Kleancolor Black). The layer on my ring finger somehow ended up being thicker than the others, and it shows in the photos; the ring finger has more of a pinkish-purple tone while the other fingers show off the more blue side of the polish.

Orly Synchro over black

Orly Synchro over black

I found the trick to applying Synchro to be using a thick enough final coat that you have time to straighten out the brush strokes before it starts to get sticky.

Orly Synchro over black

I just love all the colours in this! And how it looks quite different over black versus on its own!

Orly Synchro over black

Orly Synchro over black

Orly Synchro over black

In the shade:

Orly Synchro over black

On my thumb in this last photo is one coat of Synchro over a light pink (Joe Fresh in the shade Blush):

Orly Synchro over black and pink (thumb)

Soulstice Spa Troy

I have another Soulstice Spa polish to show you today! This one is called Troy.

Soulstice Spa Troy

It’s a charcoal shimmery polish with a weak scattered holo effect.

Soulstice Spa Troy

It has a quick-drying formula that applies best with a light touch, using somewhat thick coats and not going over the same spot more than once. Using that technique, I didn’t really have any problems with the application (although the photos are showing a bit of a bald spot on the side of my index that I didn’t notice in real life!).

Soulstice Spa Troy

The photos show two coats of Troy. These are true holo particles, not glitter, so it’s smooth even without topcoat.

Soulstice Spa Troy

The next two photos are in the shade.

Soulstice Spa Troy

Soulstice Spa Troy

And this last photo is under the Ott light. Subtle in terms of holo, but a really nice quick-drying charcoal!

Soulstice Spa Troy

Edit: Prompted by the comment from Derya, here’s a comparison of Troy to OPI My Private Jet (most recent version that is still available in stores) and Color Club Revvvolution. 🙂 (Photos taken under my Ott light this morning.)

Color Club Revvvolution, Soulstice Troy, OPI My Private Jet (scattered holo with reddish-brown flash version)

Color Club Revvvolution, Soulstice Troy, OPI My Private Jet (scattered holo with reddish-brown flash version)

As you can see My Private Jet, the brownish-charcoal scattered holo version, that is, is darker than Troy and has a reddish-brown shimmer flash to it. Revvvolution is more of a true grey charcoal with none of the brown that the other two have.

Color Club Revvvolution, Soulstice Troy, OPI My Private Jet (scattered holo with reddish-brown flash version)

Color Club Revvvolution, Soulstice Troy, OPI My Private Jet (scattered holo with reddish-brown flash version)

These swatches have two coats of each polish. In addition to being the lightest in colour, Troy was also the sheerest of the three. Revvvolution is the most opaque; it’s nearly a one-coater. It’s also different in that its holo is more linear rather than scattered. My Private Jet’s scattered holo is a bit more apparent than Troy’s.

Color Club Revvvolution, Soulstice Troy, OPI My Private Jet (scattered holo with reddish-brown flash version)

Color Club Revvvolution, Soulstice Troy, OPI My Private Jet (scattered holo with reddish-brown flash version)

China Glaze Want my Bawdy

Today I have another of the China Glaze New Bohemian polishes to show you. This is Want My Bawdy – groan-worthy name that looks like something OPI would come up with, but beautiful indigo blue shimmer with slight purple duochrome!

China Glaze Want My Bawdy

The duochrome on this one is very mild; it’s the least duochrome in the collection, but there is a bit of a purple flash at an angle in the right light, as seen in the above photo.

China Glaze Want My Bawdy

The formula was thin and sheer, and I got some bald spots in my application from not waiting long enough between coats (as often happens, I was rushing to get my swatching done before the sunset!). These swatches show three coats of the polish, no top coat.

China Glaze Want My Bawdy

In the next two photos I swatched it over black as I usually do with duochromes (one coat of Want My Bawdy over one coat of Kleancolor Black), but it didn’t really change the look of this one much. It mostly just makes it appear more blackened around the edges. This next photo is with flash (all the others are in sunlight).

China Glaze Want My Bawdy over black, with flash

Despite the very subtle nature of the duochrome in this polish, I’m personally not disappointed with it! It’s a beautiful glowy blue, and that hint of purple flash that comes out occasionally is just an added bonus. 🙂

China Glaze Want My Bawdy over black

Gosh Fossil Grey and SpaRitual Conglomerate

Today I have a rock-like mani to show you: Gosh Fossil Grey with an accent nail of Sparitual Conglomerate.

Gosh Fossil Grey and SpaRitual Conglomerate

This is two coats of Fossil Grey, which had a slightly thick but good formula. It’s a warm/yellow leaning grey pearl base with silvery shimmer that gives an almost speckled effect.

Gosh Fossil Grey and SpaRitual Conglomerate

On the ring finger I applied one generous coat of Sparitual Conglomerate, from their recent fall collection, over Fossil Grey. It also had a nice formula, and it wasn’t too difficult to get a good density of the black and white hex glitters on the nail.

Gosh Fossil Grey and SpaRitual Conglomerate

I love Conglomerate; it’s quite unique with its deep charcoal grey base, its dense, fine gold shimmer throughout, and its scattered black and white hexes!

Gosh Fossil Grey and SpaRitual Conglomerate

On its own, Conglomerate is opaque in two coats. Glad I picked this one up, it’s really interesting and the gold shimmer makes it very wearable for me!

Gosh Fossil Grey and SpaRitual Conglomerate

China Glaze Fast Track

China Glaze Fast Track is a taupey-beige nude with heavy golden shimmer flakes. It was released last spring in the Hunger Games collection.

China Glaze Fast Track

Shown are two thick coats. In the sun photos, there’s also a layer of topcoat. As evidenced by the sideways watermark, these pics were also taken using my phone, haha!

China Glaze Fast Track

I found the formula a little thick but didn’t have any problems with application.

China Glaze Fast Track

The sun photos didn’t quite catch all the tiny sparks of different colours, little flashes of orange and green, that are often reflected in the sparkle of this awesome polish!

Here it is in the shade:

China Glaze Fast Track

China Glaze Fast Track

As a bonus here is what I ended up doing to this mani after a couple of days, mainly because I didn’t want to take the time to remove Fast Track first, and then I just kept adding things, haha…

China Glaze Fast Track with

Over Fast Track is a coat of Orly Nite Owl, an opaque taupe with silver shimmer, then two layers of Glitter Gal Buckled Bronze, Nubar Petunia glitter on the tips, and Spoiled by Wet n Wild’s Trust Fund Baby over it all!

China Glaze Fast Track with

China Glaze Unpredictable

Today I have another duochrome from China Glaze’s New Bohemian collection to show you! The first two polishes I reviewed from the collection are here.

China Glaze Unpredictable

This is Unpredictable, a metallic green/teal duochrome. Like the other polishes in the collection, the metallic finish is slightly brushstrokey but not so much that it really qualifies as “frost”.

China Glaze Unpredictable

Shown are three coats, but I probably could have gotten away with two. No issues with application other than taking a bit of care to get the brushstrokes straight. Here you can see that head-on, the leaf-green aspect is prominent, whereas the above photos at a bit more of an angle show off the teal side of the polish.

China Glaze Unpredictable

In the shade:

China Glaze Unpredictable

The rest of the photos show one coat of Unpredictable over one coat of Kleancolor Black, deepening the overall effect. As usual lately, please disregard any lumps in the too-thick base polish!

China Glaze Unpredictable over black

China Glaze Unpredictable over black

China Glaze Unpredictable over black

China Glaze Unpredictable over black

China Glaze Unpredictable over black

China Glaze Unpredictable over black

In the shade:

China Glaze Unpredictable over black

This polish didn’t disappoint; I think the duochrome is quite apparent and the two green tones are really nice!

Cult Nails I Got Distracted

Today I’ve got another polish from Coco’s Untamed collection by Cult Nails. The polishes in this collection were all designed by Coco, the daughter of Cult Nails’ founder!

Cult Nails I Got Distracted

I Got Distracted is a black jelly with small holo glitter and medium green glitter. Maria of Cult Nails shared the family joke behind the name of this shade – “I got distracted” is Coco’s classic excuse for anything she was supposed to do but didn’t, used so often that it just had to make an appearance among the polish names.

Cult Nails I Got Distracted

Shown are two coats; the formula was fairly thick but I found it easy to apply using thick coats. I almost didn’t need the second coat, as this polish is quite pigmented. It dries gritty from all the glitter so a good thick topcoat is in order. In these sun photos, I had on two layers of Cult Nails topcoat: one that I applied right after the polish, and another the following morning. The sun photos were also taken with my phone, which probably has something to do with the reason that the watermark ended up going on sideways! haha!

Cult Nails I Got Distracted

The rest of the photos only have one layer of topcoat and were taken just after finishing the mani. In the shade:

Cult Nails I Got Distracted

And finally, a couple of photos that show off the glitter a bit better! Under the Ott Lite:

Cult Nails I Got Distracted

With flash:

Cult Nails I Got Distracted