A vegan nail polish blog. A celebration of colour and light, as well as of justice for nonhuman animals.

Posts tagged ‘press sample’

Deep Blue Holo Comparison featuring Glitter Gal and NCLA

I meant to post this comparison ages ago. Better late than never? 🙂

Left to right: Glitter Gal Teal Blue, Glitter Gal Navy I Will Navy I Won't, Glitter Gal Marine Blue, NCLA Spaced Out

Left to right: Glitter Gal Teal Blue, Glitter Gal Navy I Will Navy I Won’t, Glitter Gal Marine Blue, NCLA Spaced Out

Here are three blue Glitter Gals and one NCLA for the sake of contrast; NCLA Spaced Out is a creme-based scattered holo unlike the linear holo Glitter Gals. Two coats each.

Left to right: Glitter Gal Teal Blue, Glitter Gal Navy I Will Navy I Won't, Glitter Gal Marine Blue, NCLA Spaced Out

Left to right: Glitter Gal Teal Blue, Glitter Gal Navy I Will Navy I Won’t, Glitter Gal Marine Blue, NCLA Spaced Out

Teal Blue is more teal obviously, and Navy I will Navy I Won’t and Marine Blue are similar to one another.

Left to right: Glitter Gal Teal Blue, Glitter Gal Navy I Will Navy I Won't, Glitter Gal Marine Blue, NCLA Spaced Out

Left to right: Glitter Gal Teal Blue, Glitter Gal Navy I Will Navy I Won’t, Glitter Gal Marine Blue, NCLA Spaced Out

Marine Blue is just a bit darker than Navy I Will, and the metallic shimmer flash of Navy I Will leans a little bit teal while Marine Blue’s is more of a royal blue (the shimmer and its contrast is most obvious in the photo directly above).

Left to right: Glitter Gal Teal Blue, Glitter Gal Navy I Will Navy I Won't, Glitter Gal Marine Blue, NCLA Spaced Out

Left to right: Glitter Gal Teal Blue, Glitter Gal Navy I Will Navy I Won’t, Glitter Gal Marine Blue, NCLA Spaced Out

Hope this might be helpful to someone out there!

Left to right: Glitter Gal Teal Blue, Glitter Gal Navy I Will Navy I Won't, Glitter Gal Marine Blue, NCLA Spaced Out

Left to right: Glitter Gal Teal Blue, Glitter Gal Navy I Will Navy I Won’t, Glitter Gal Marine Blue, NCLA Spaced Out

Disclosure: Glitter Gal Navy I Will, Navy I Won’t was previously provided by the company for review.

Advertisement

Vegan Cuts Beauty Box

I’ve got something a little different on the blog today! I was contacted not long ago by Vegan Cuts, a vegan business that has an online marketplace and two different kinds of monthly subscription boxes, and asked if I’d like to review one of the monthly beauty boxes. (The other subscription box is a vegan snack box! cool!)

Here’s how they describe the beauty box: “The easiest way to discover cruelty-free brands without committing to full-size products or prices. Each month you’ll receive a delivery of 4-7 new products to try, ranging from unique cosmetics to luxurious skincare.”

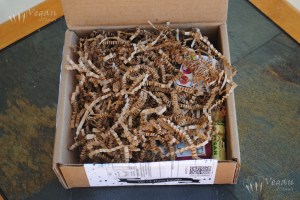
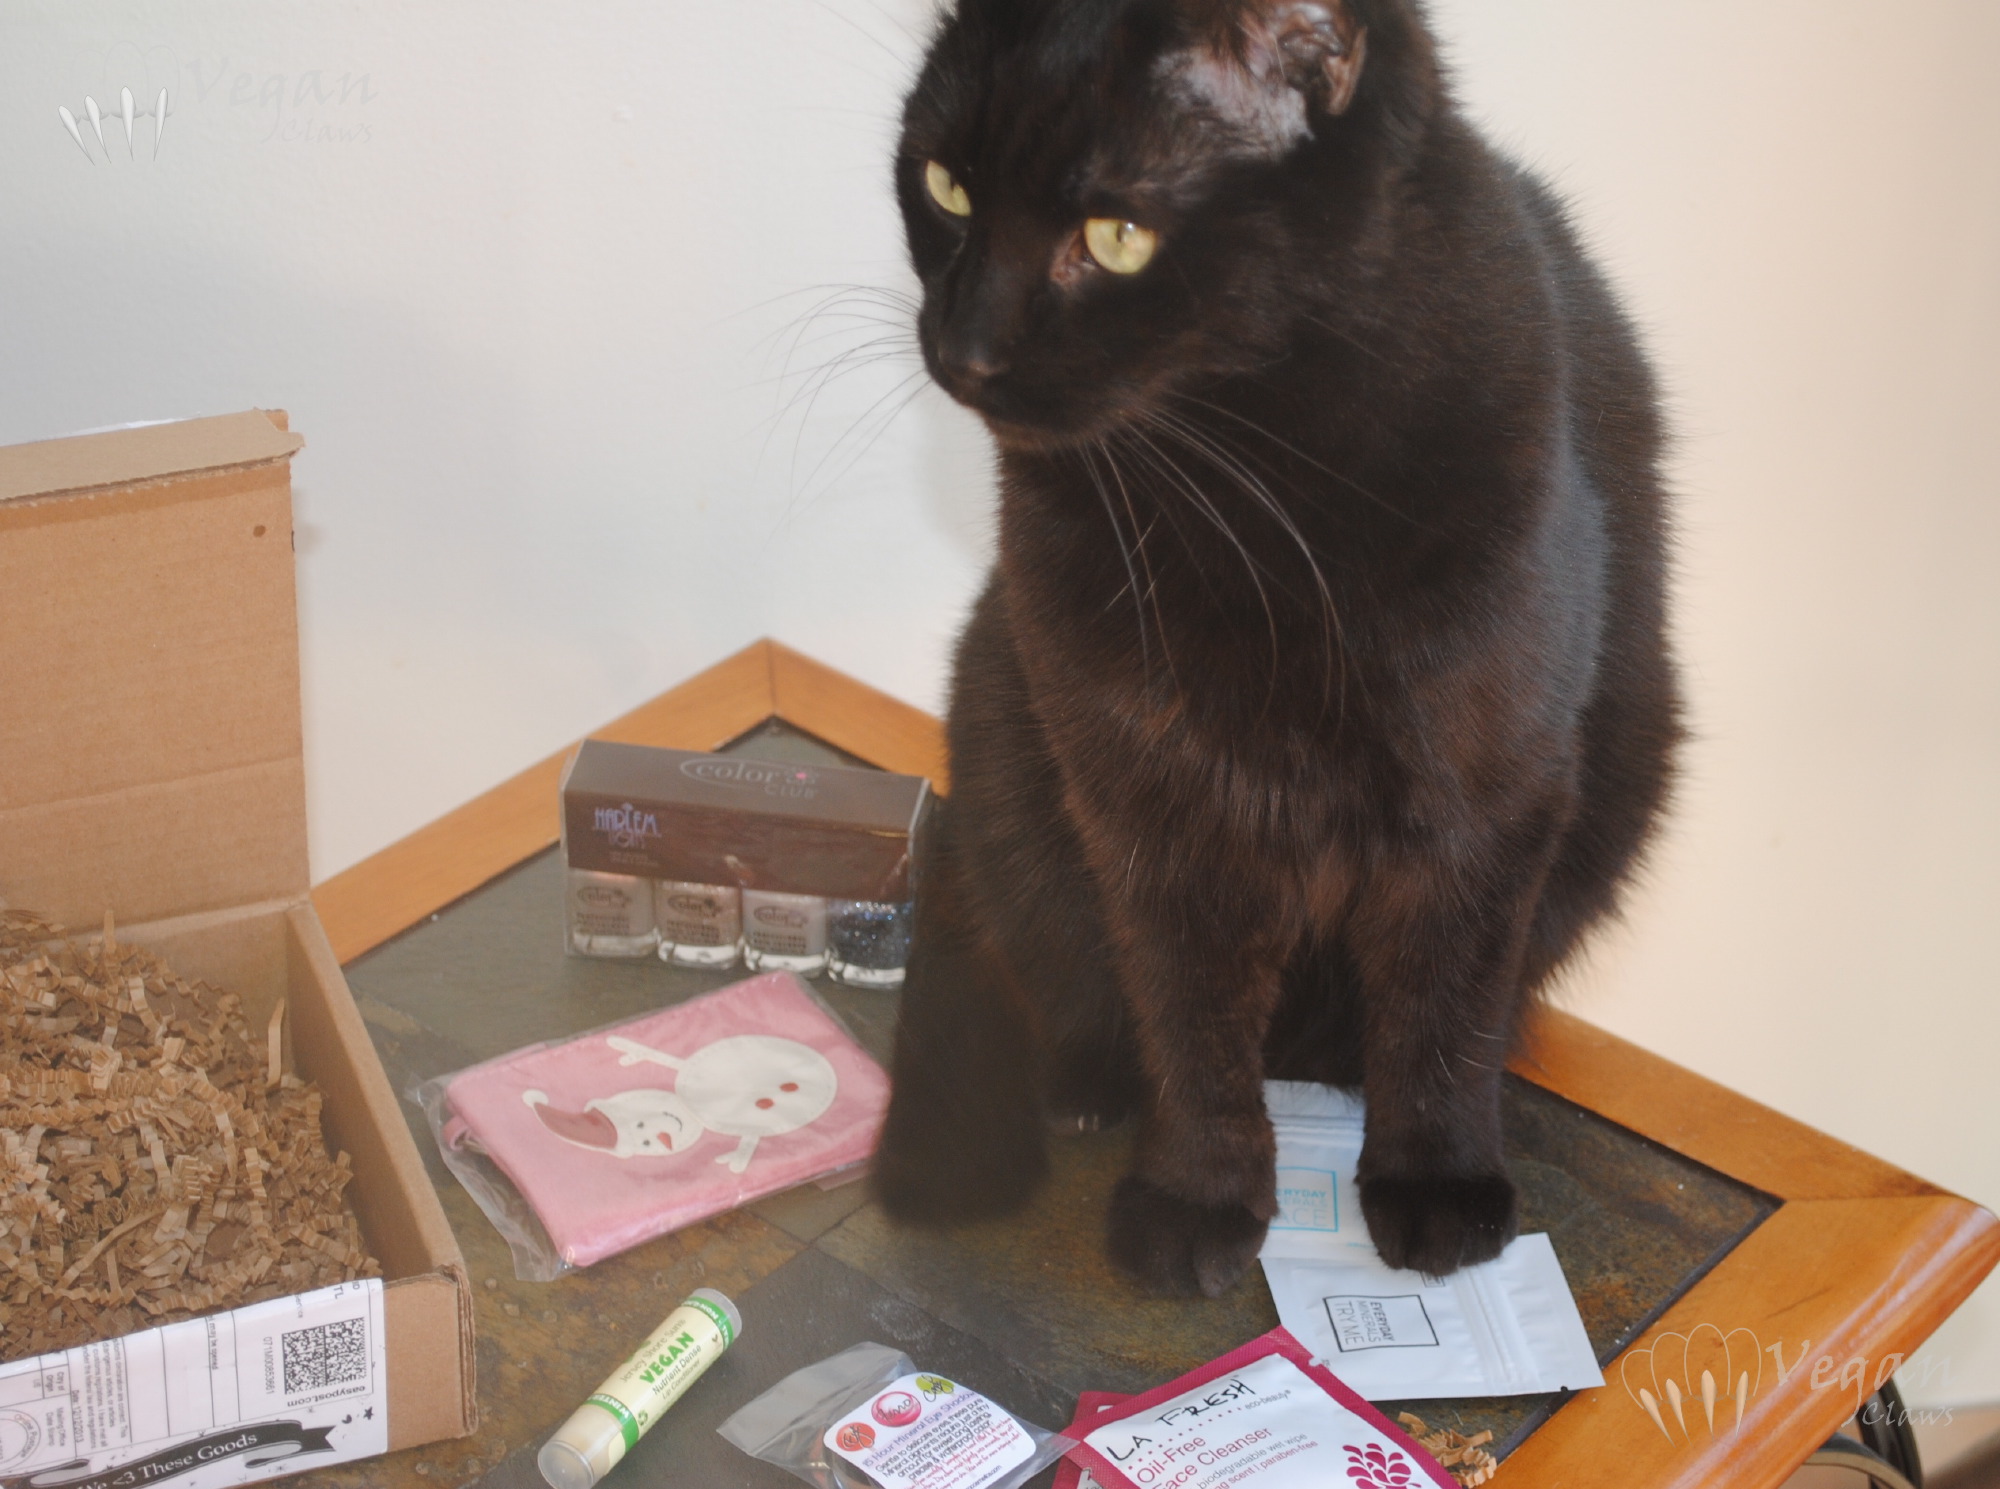
I received the December box to review, and here it is!

vegancuts_box

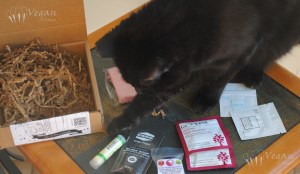
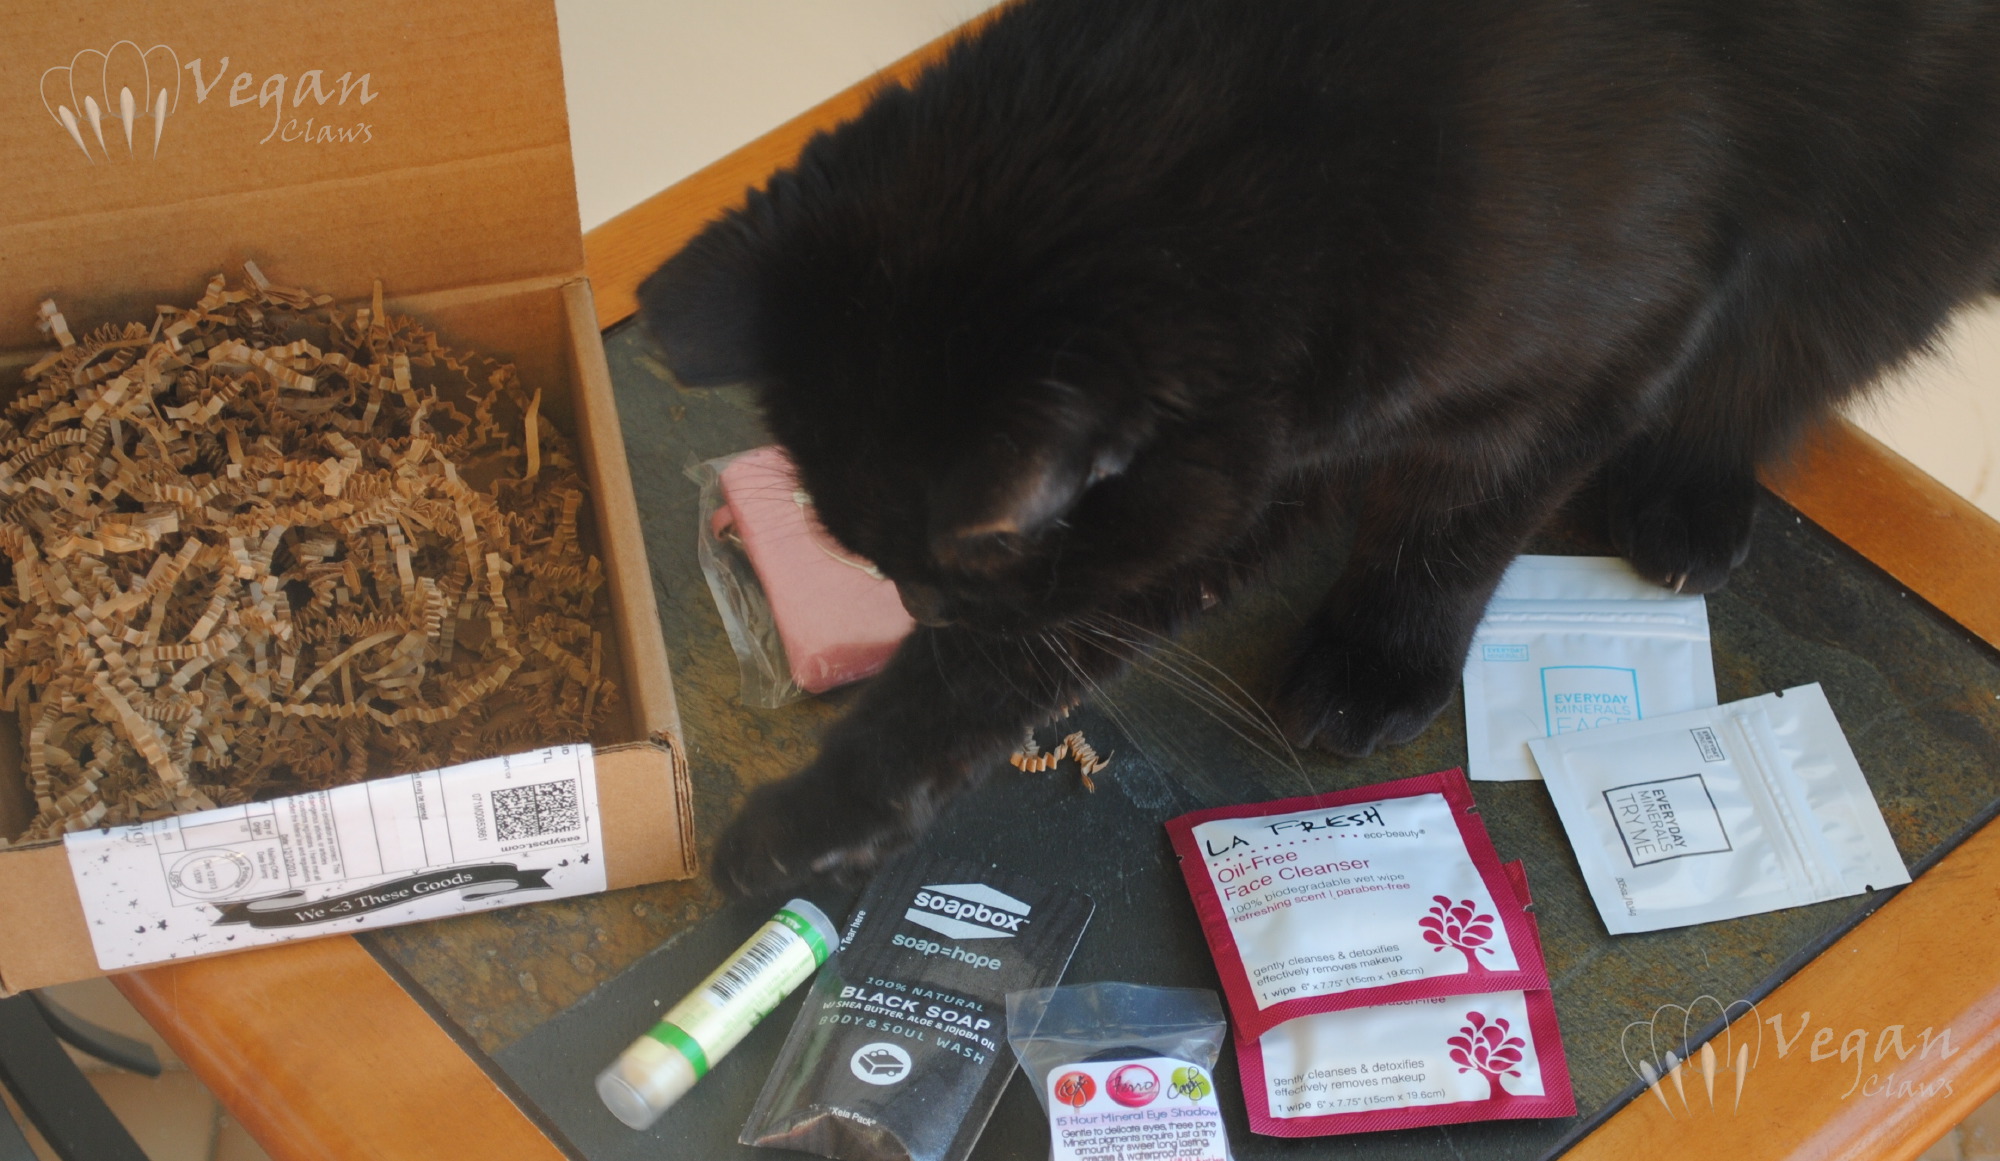
I had a little helper when I was trying to take items out of the box and photograph them. Fred Hampton!

helper

Fred says that his personal favourite items from the box are the little crinkly packing paper strips, and the tube of lip balm! 😉

helper2

Anyway, let’s see everything that was in the box, shall we? 😀

colorclub_harlemlights

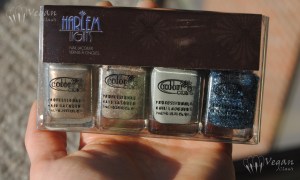
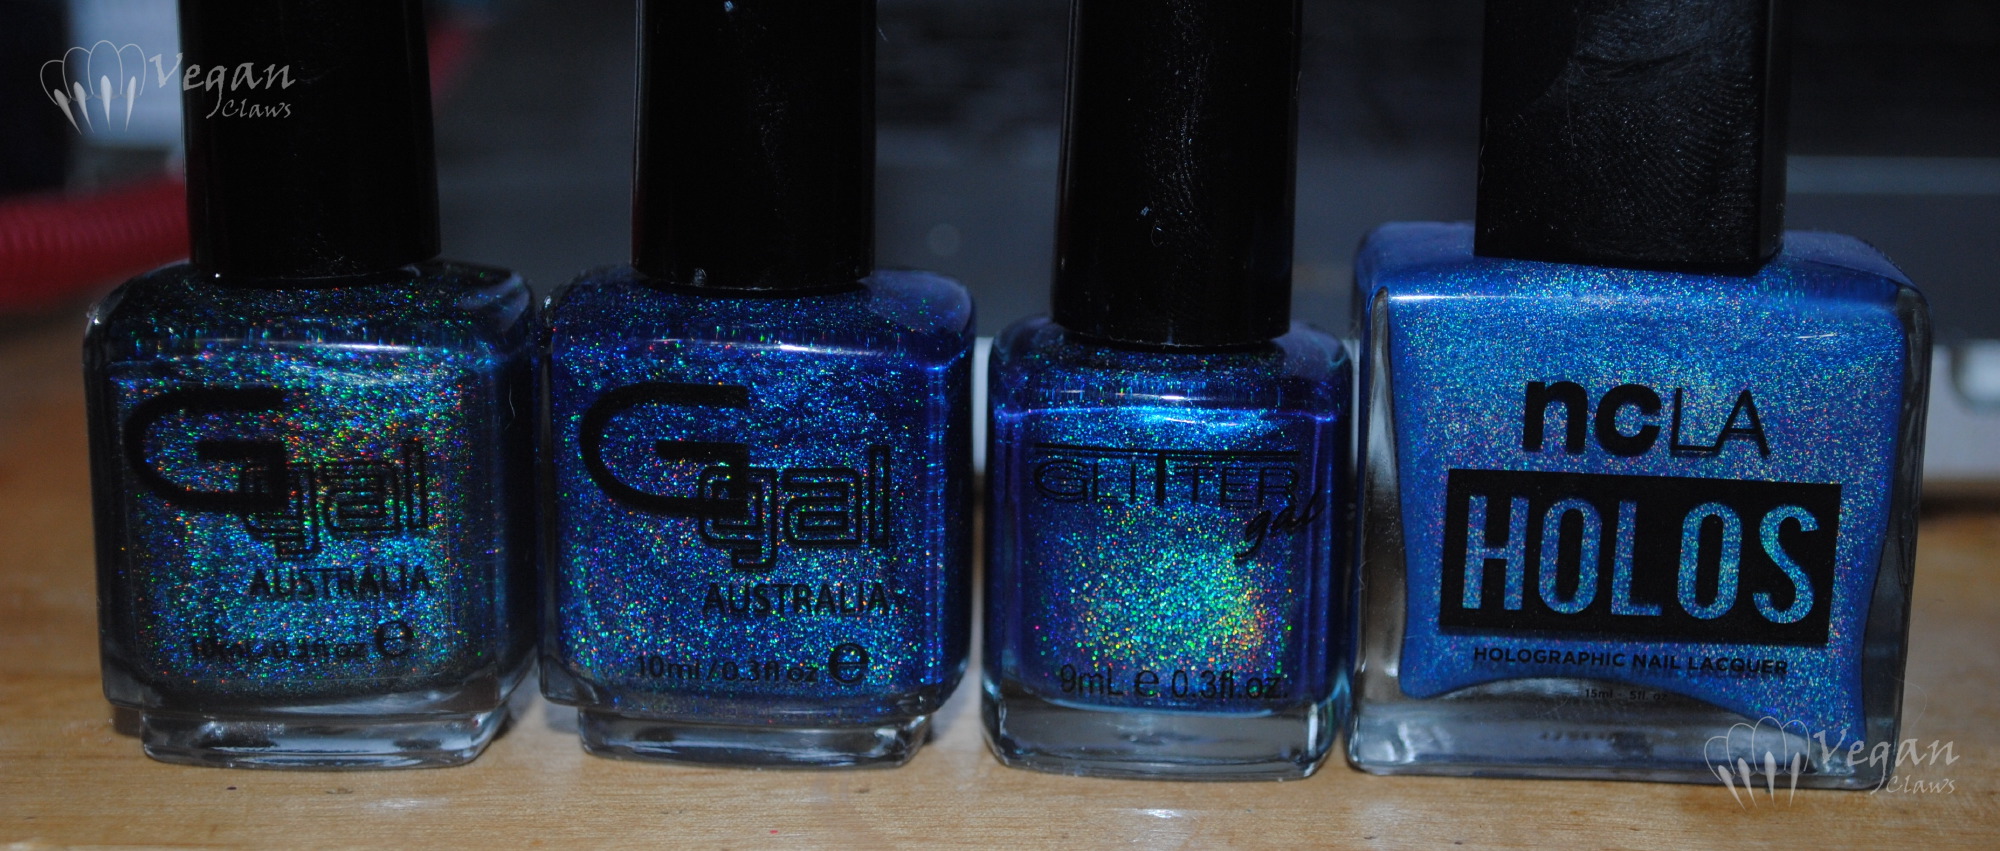
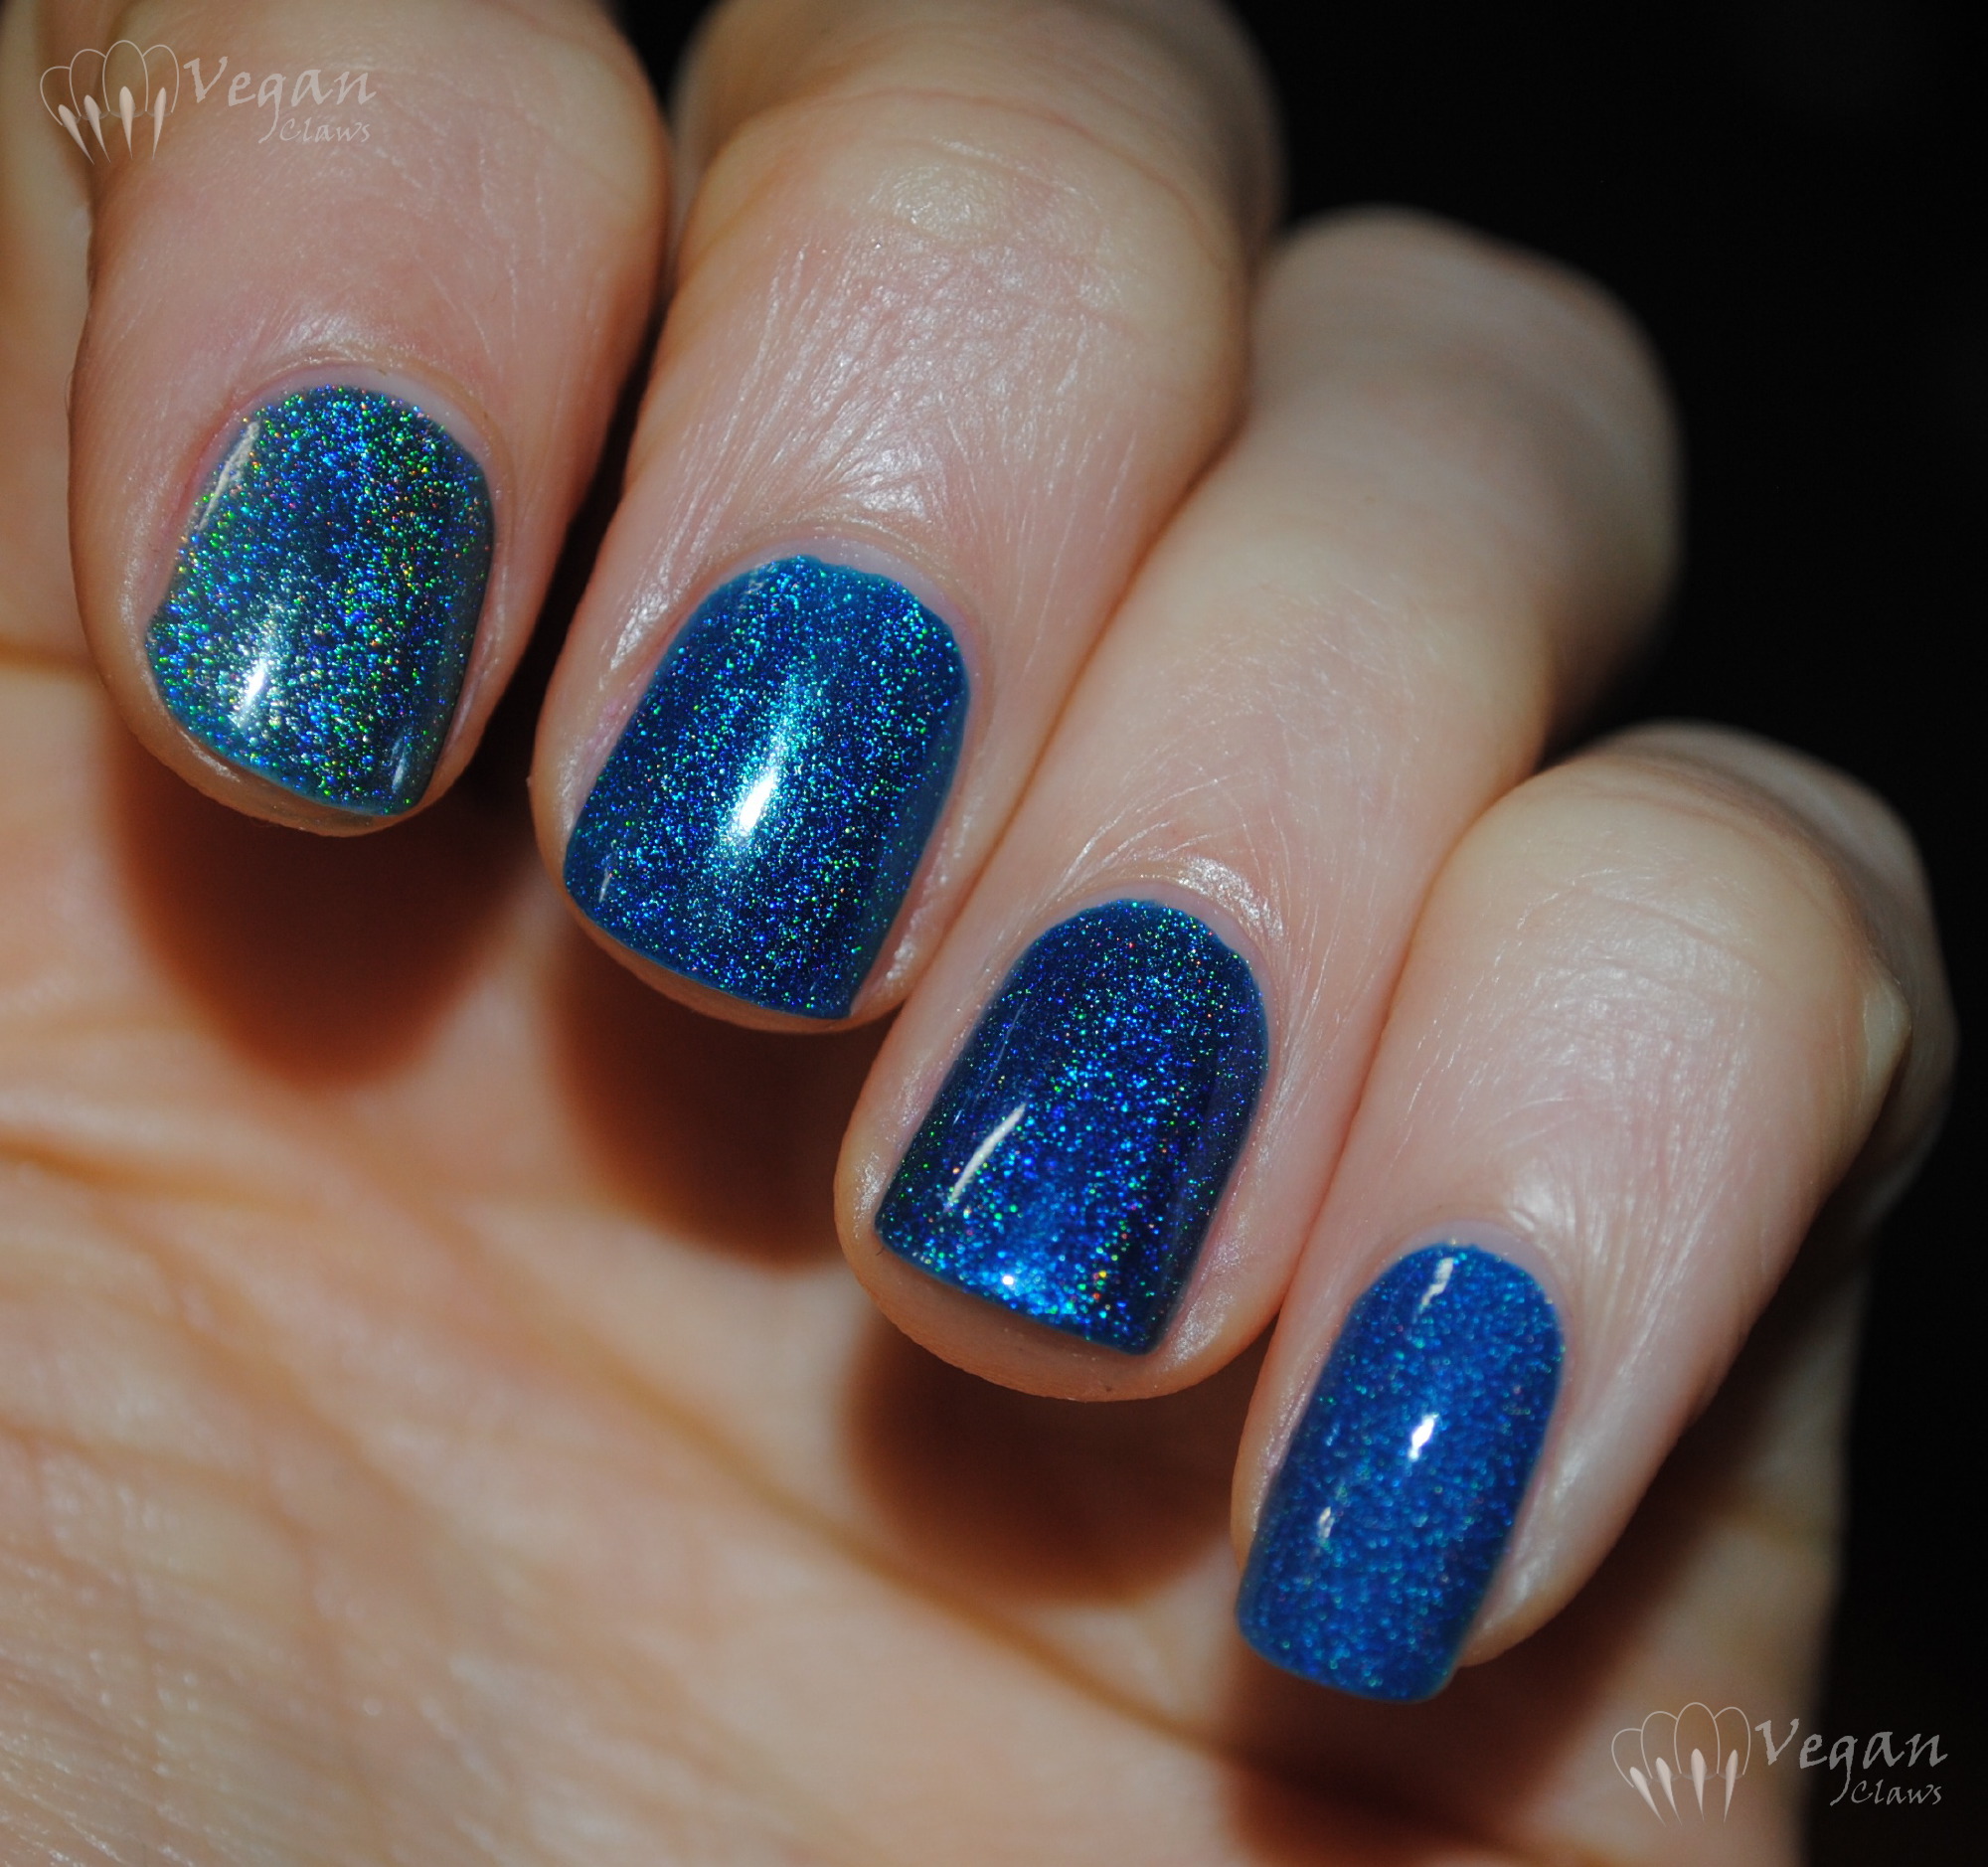
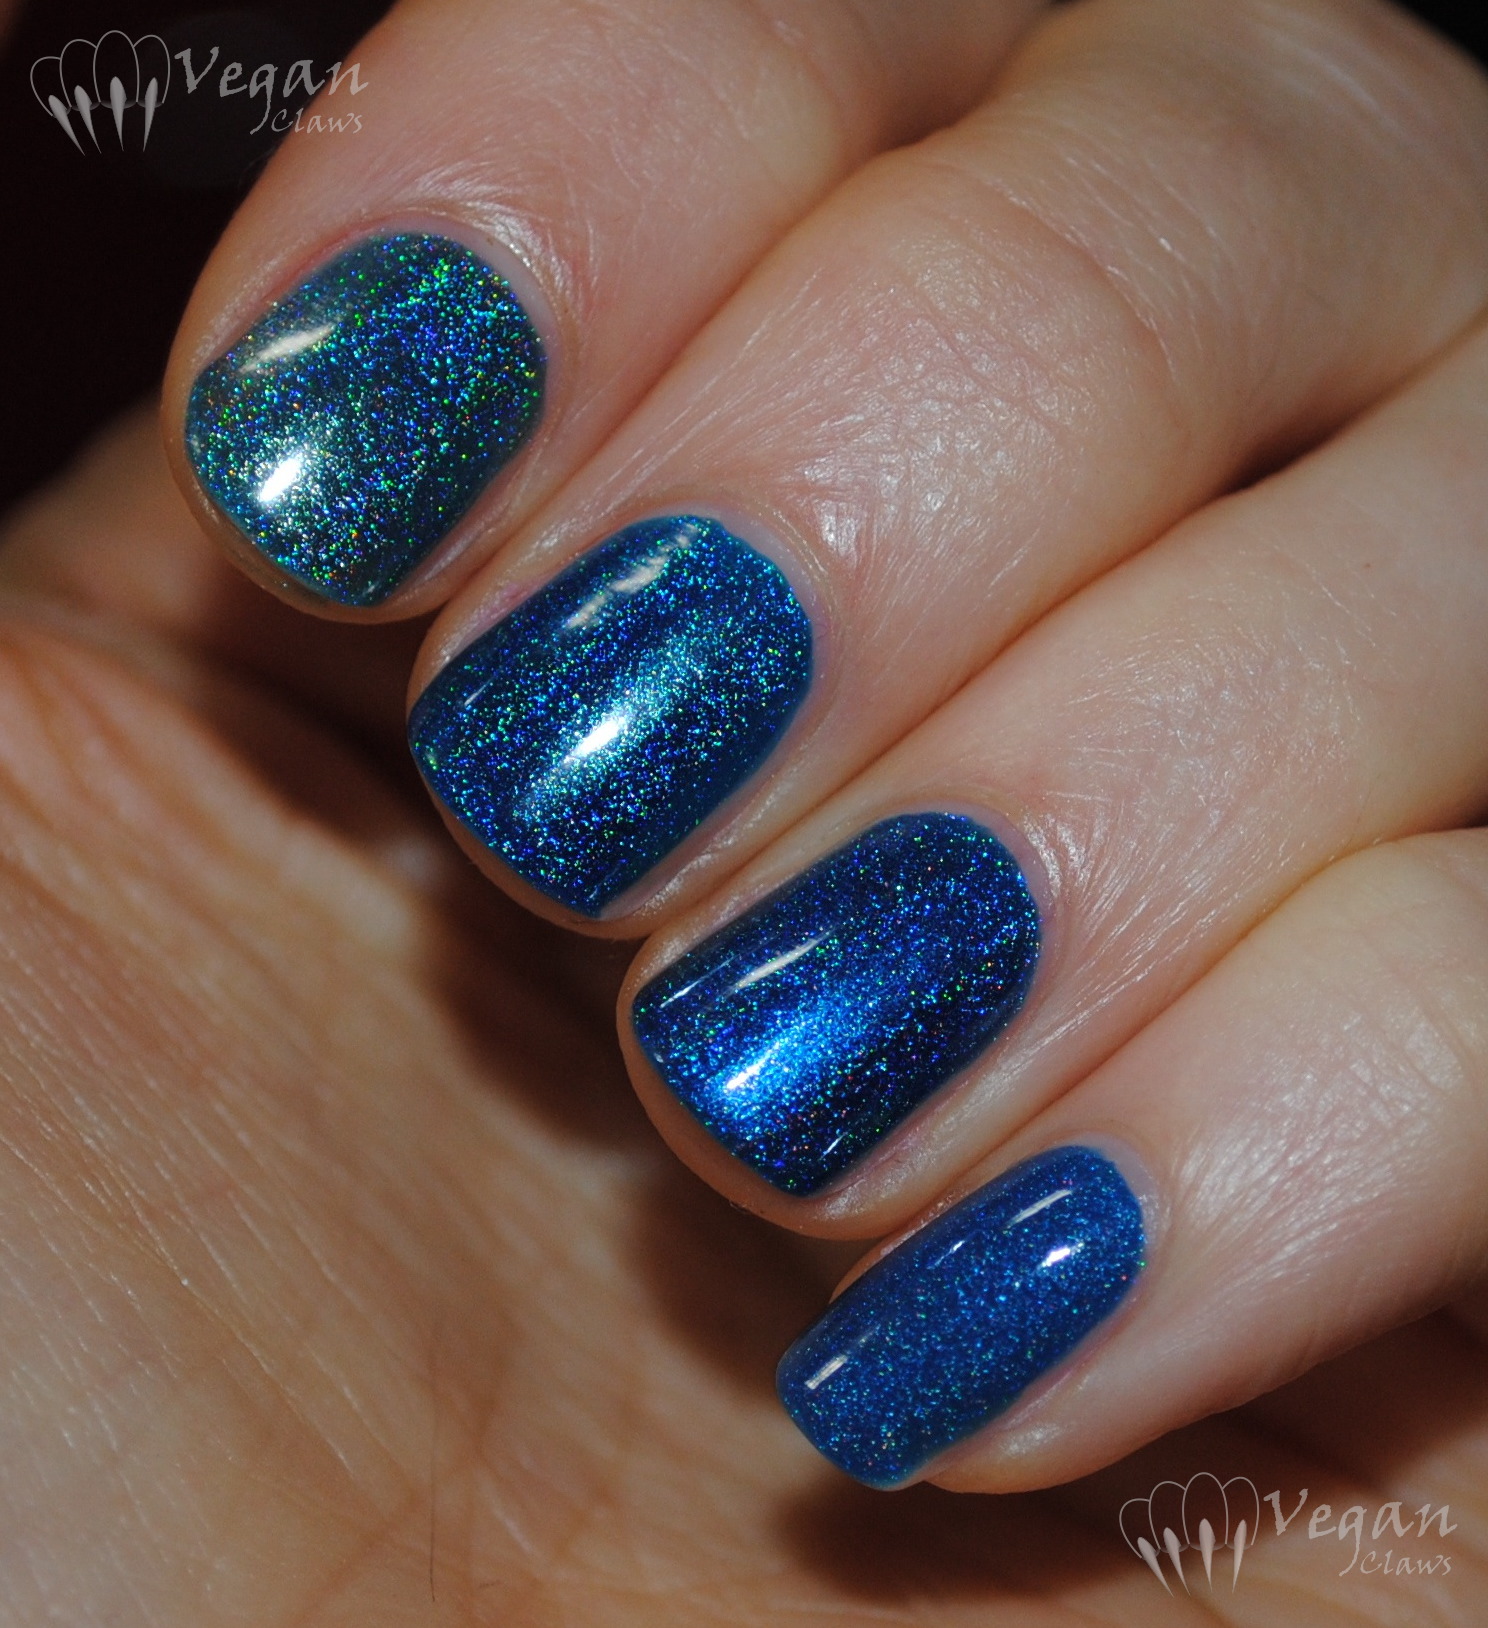
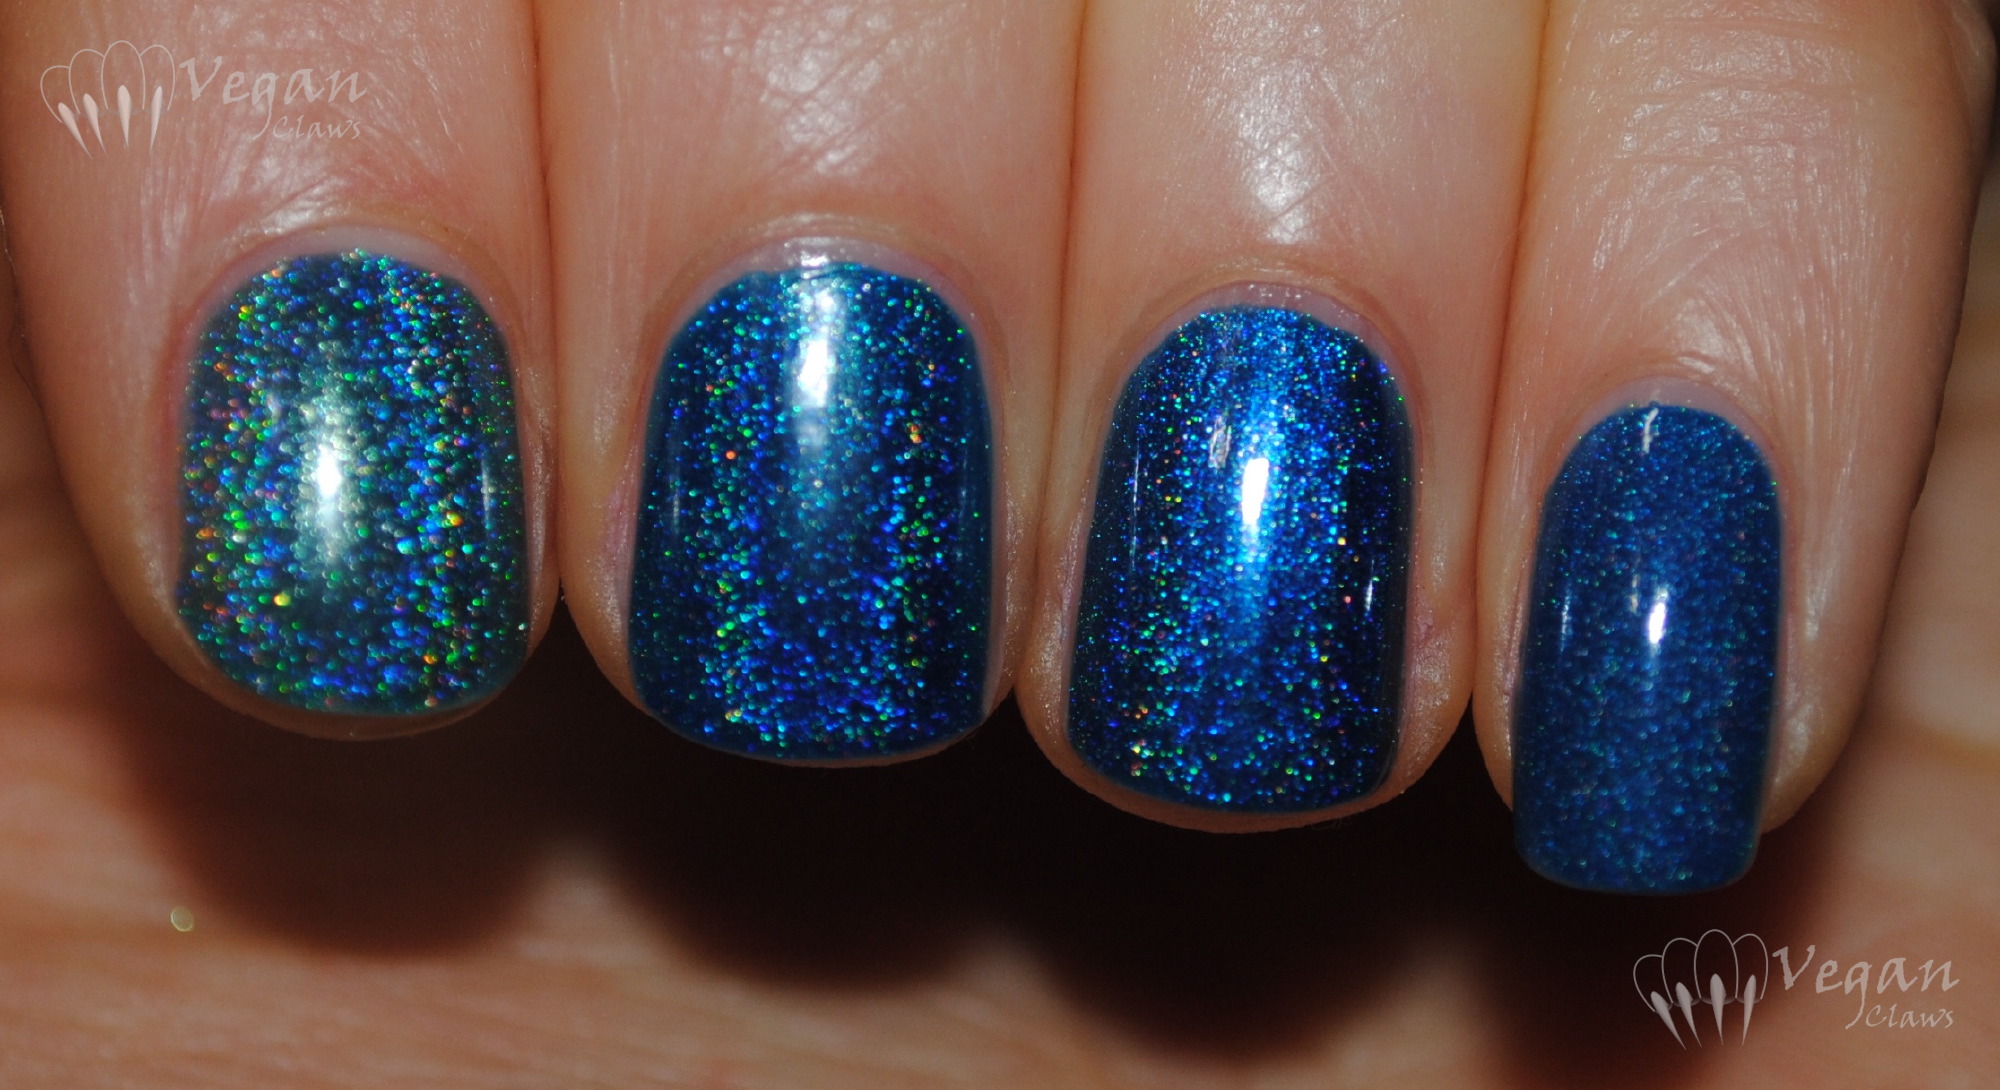
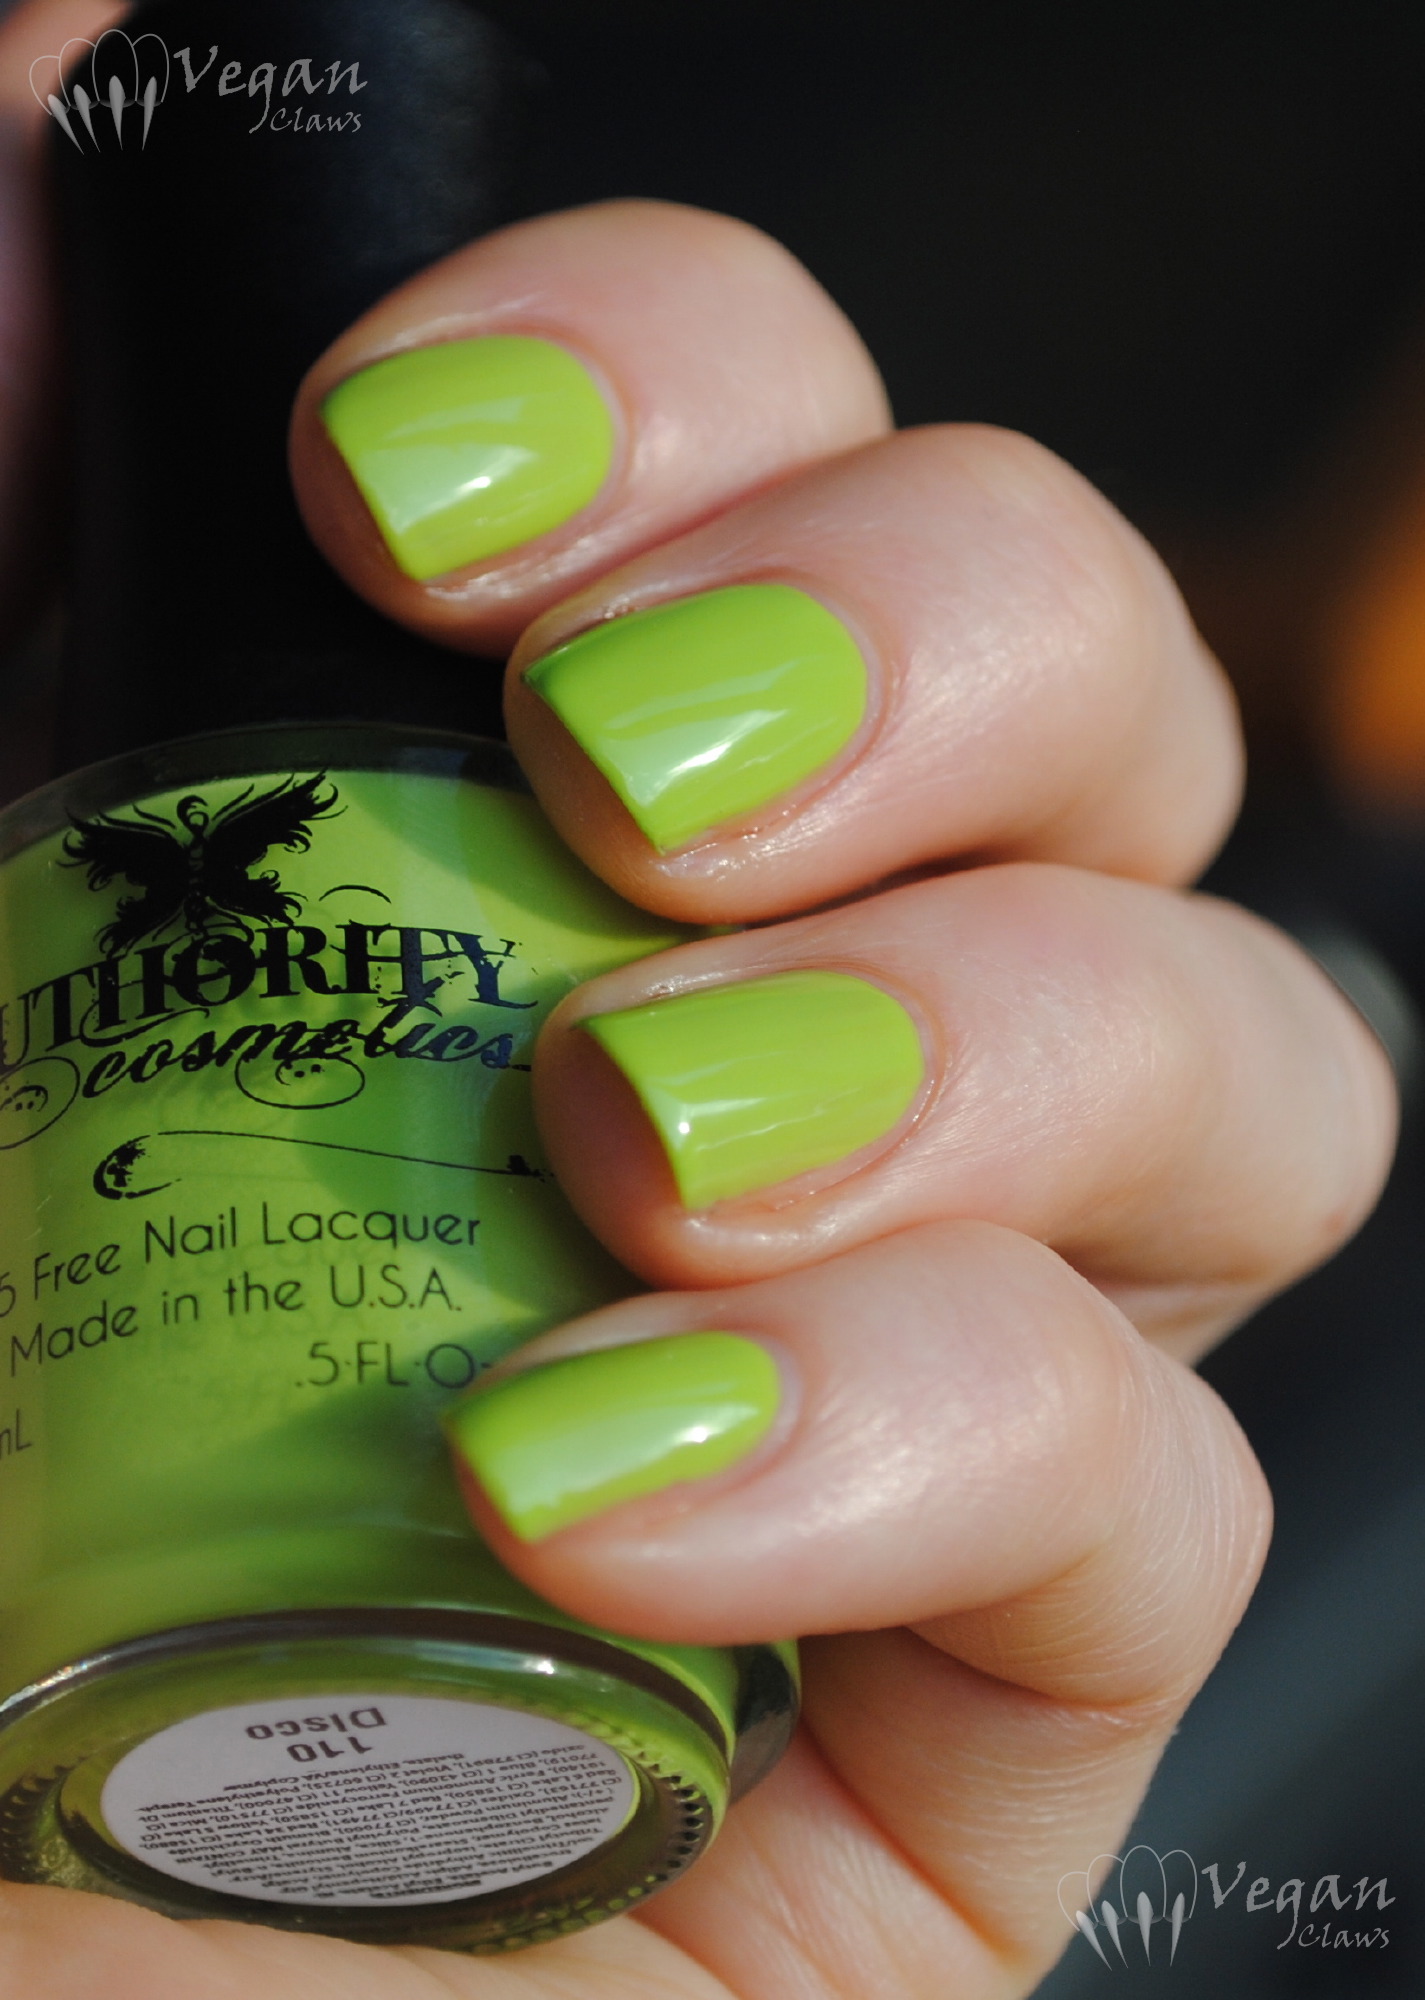
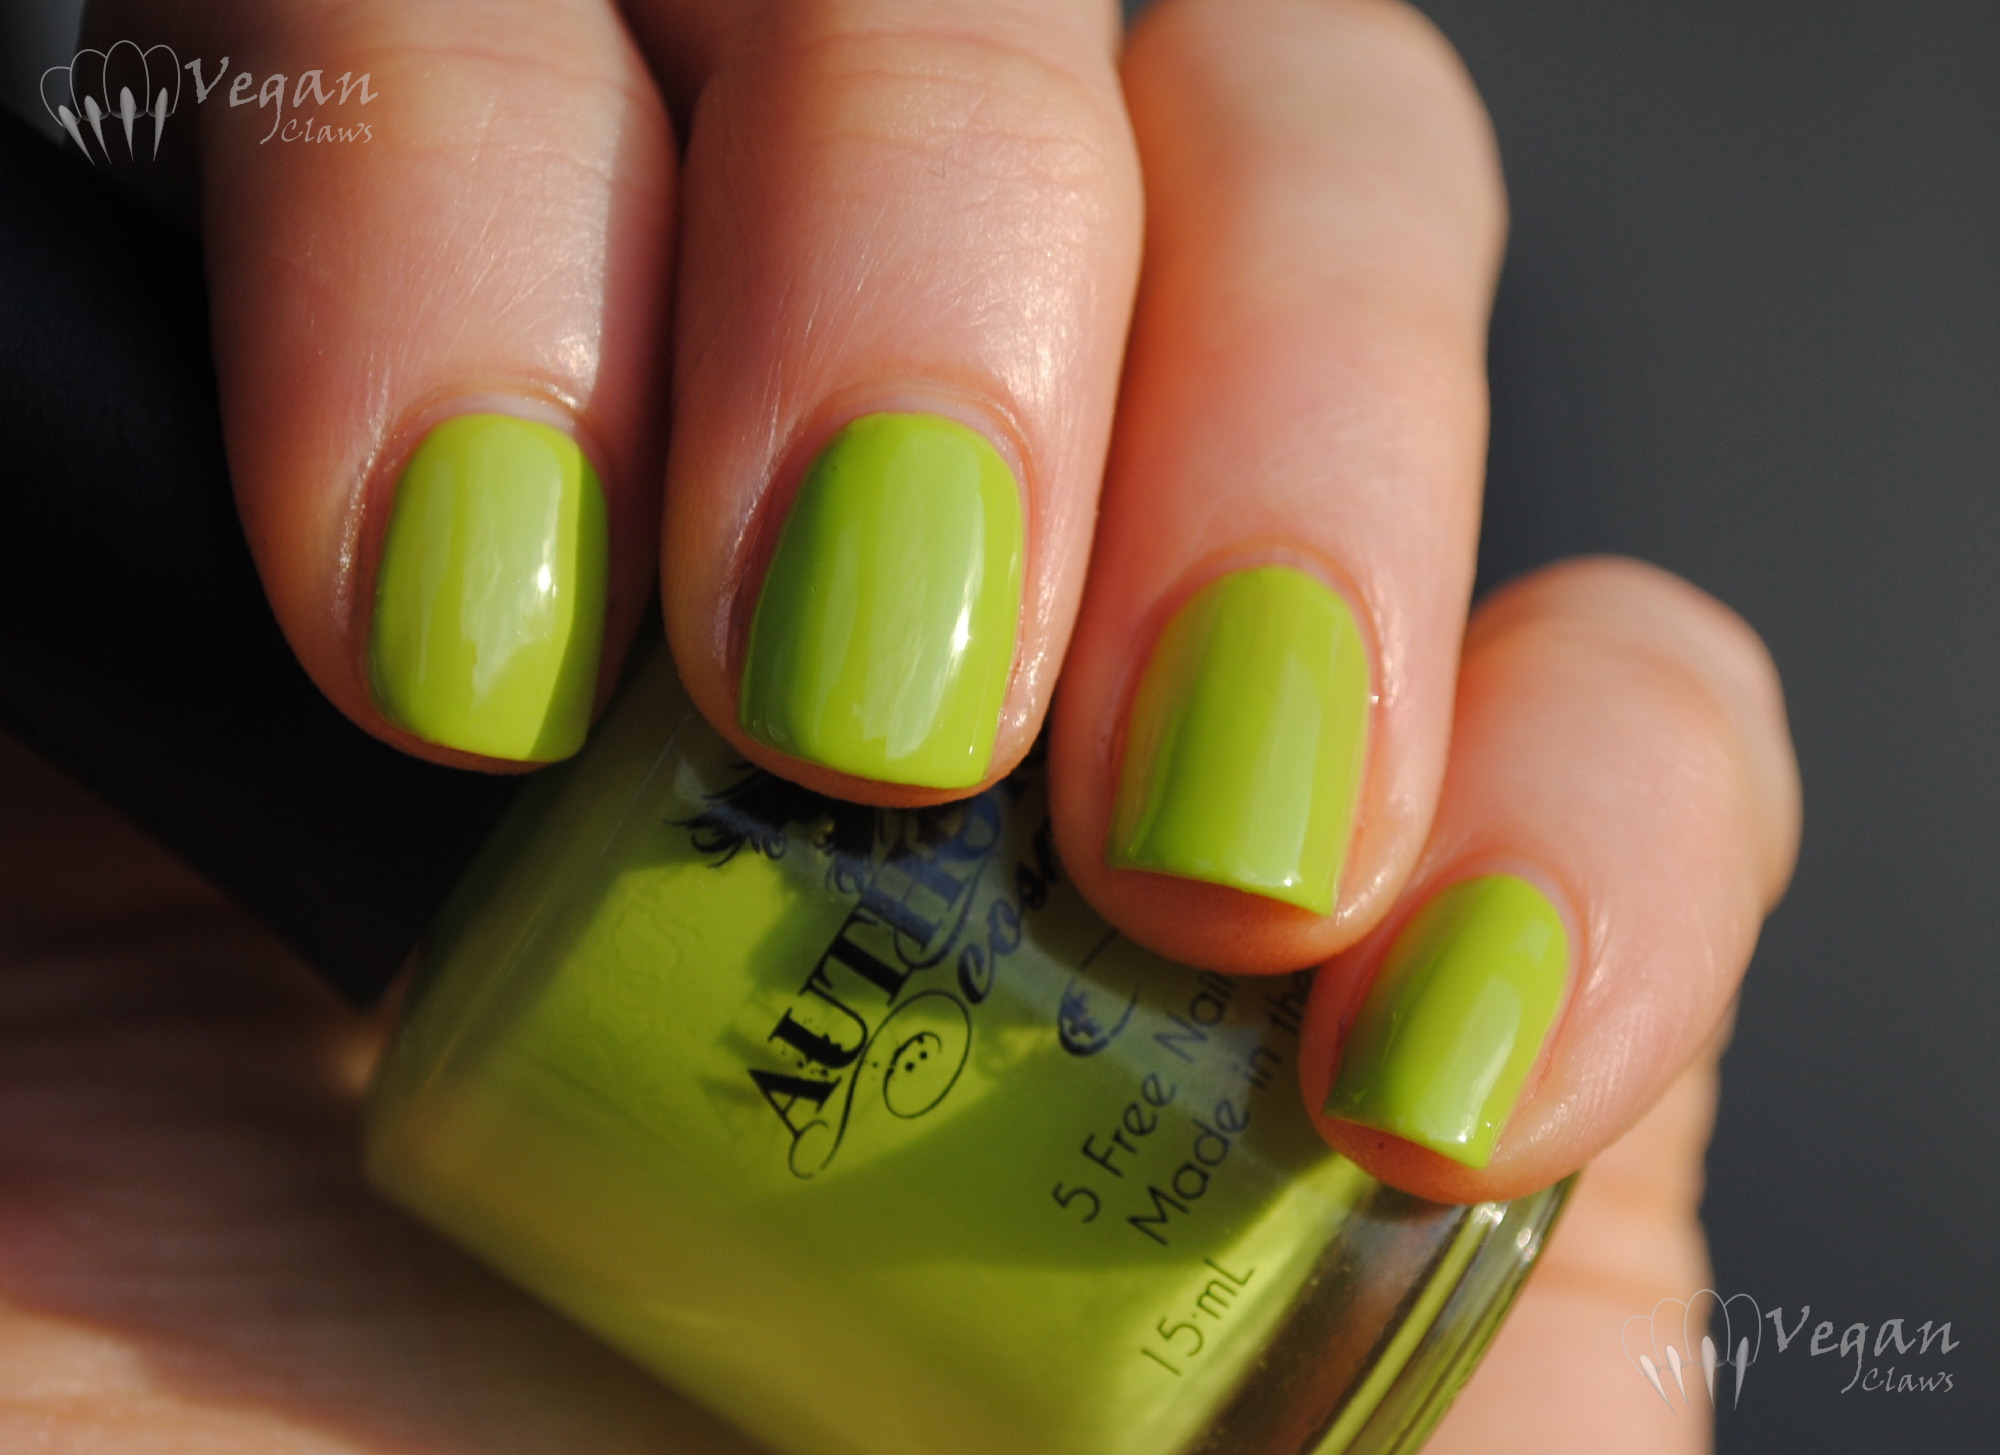
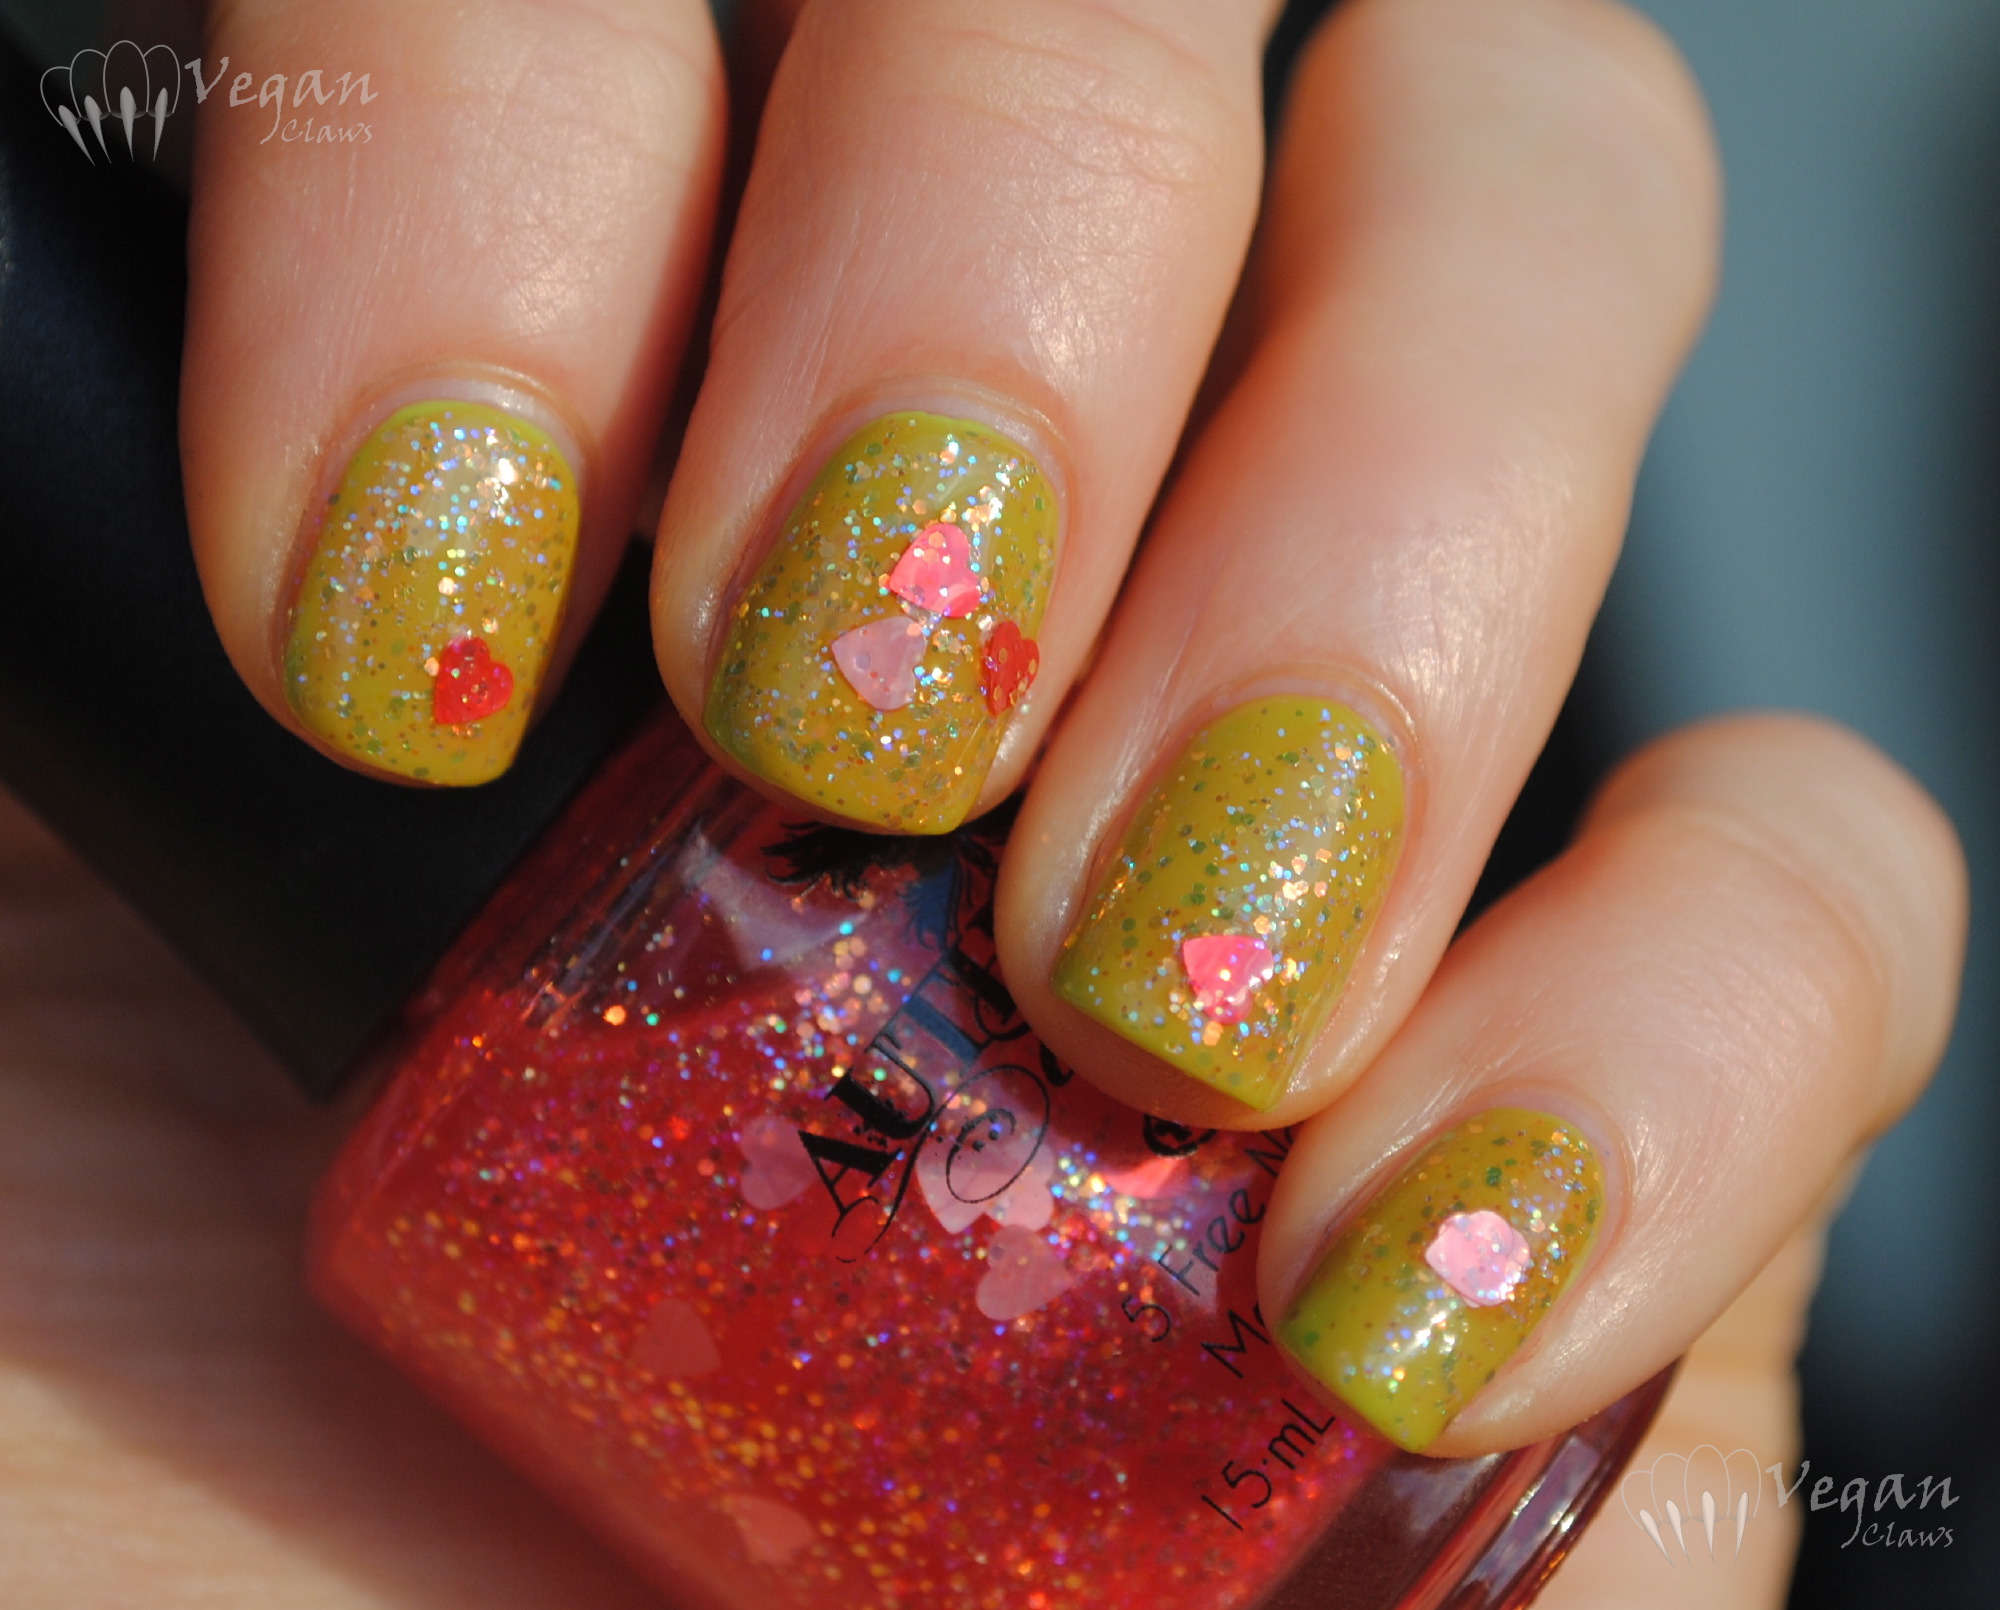
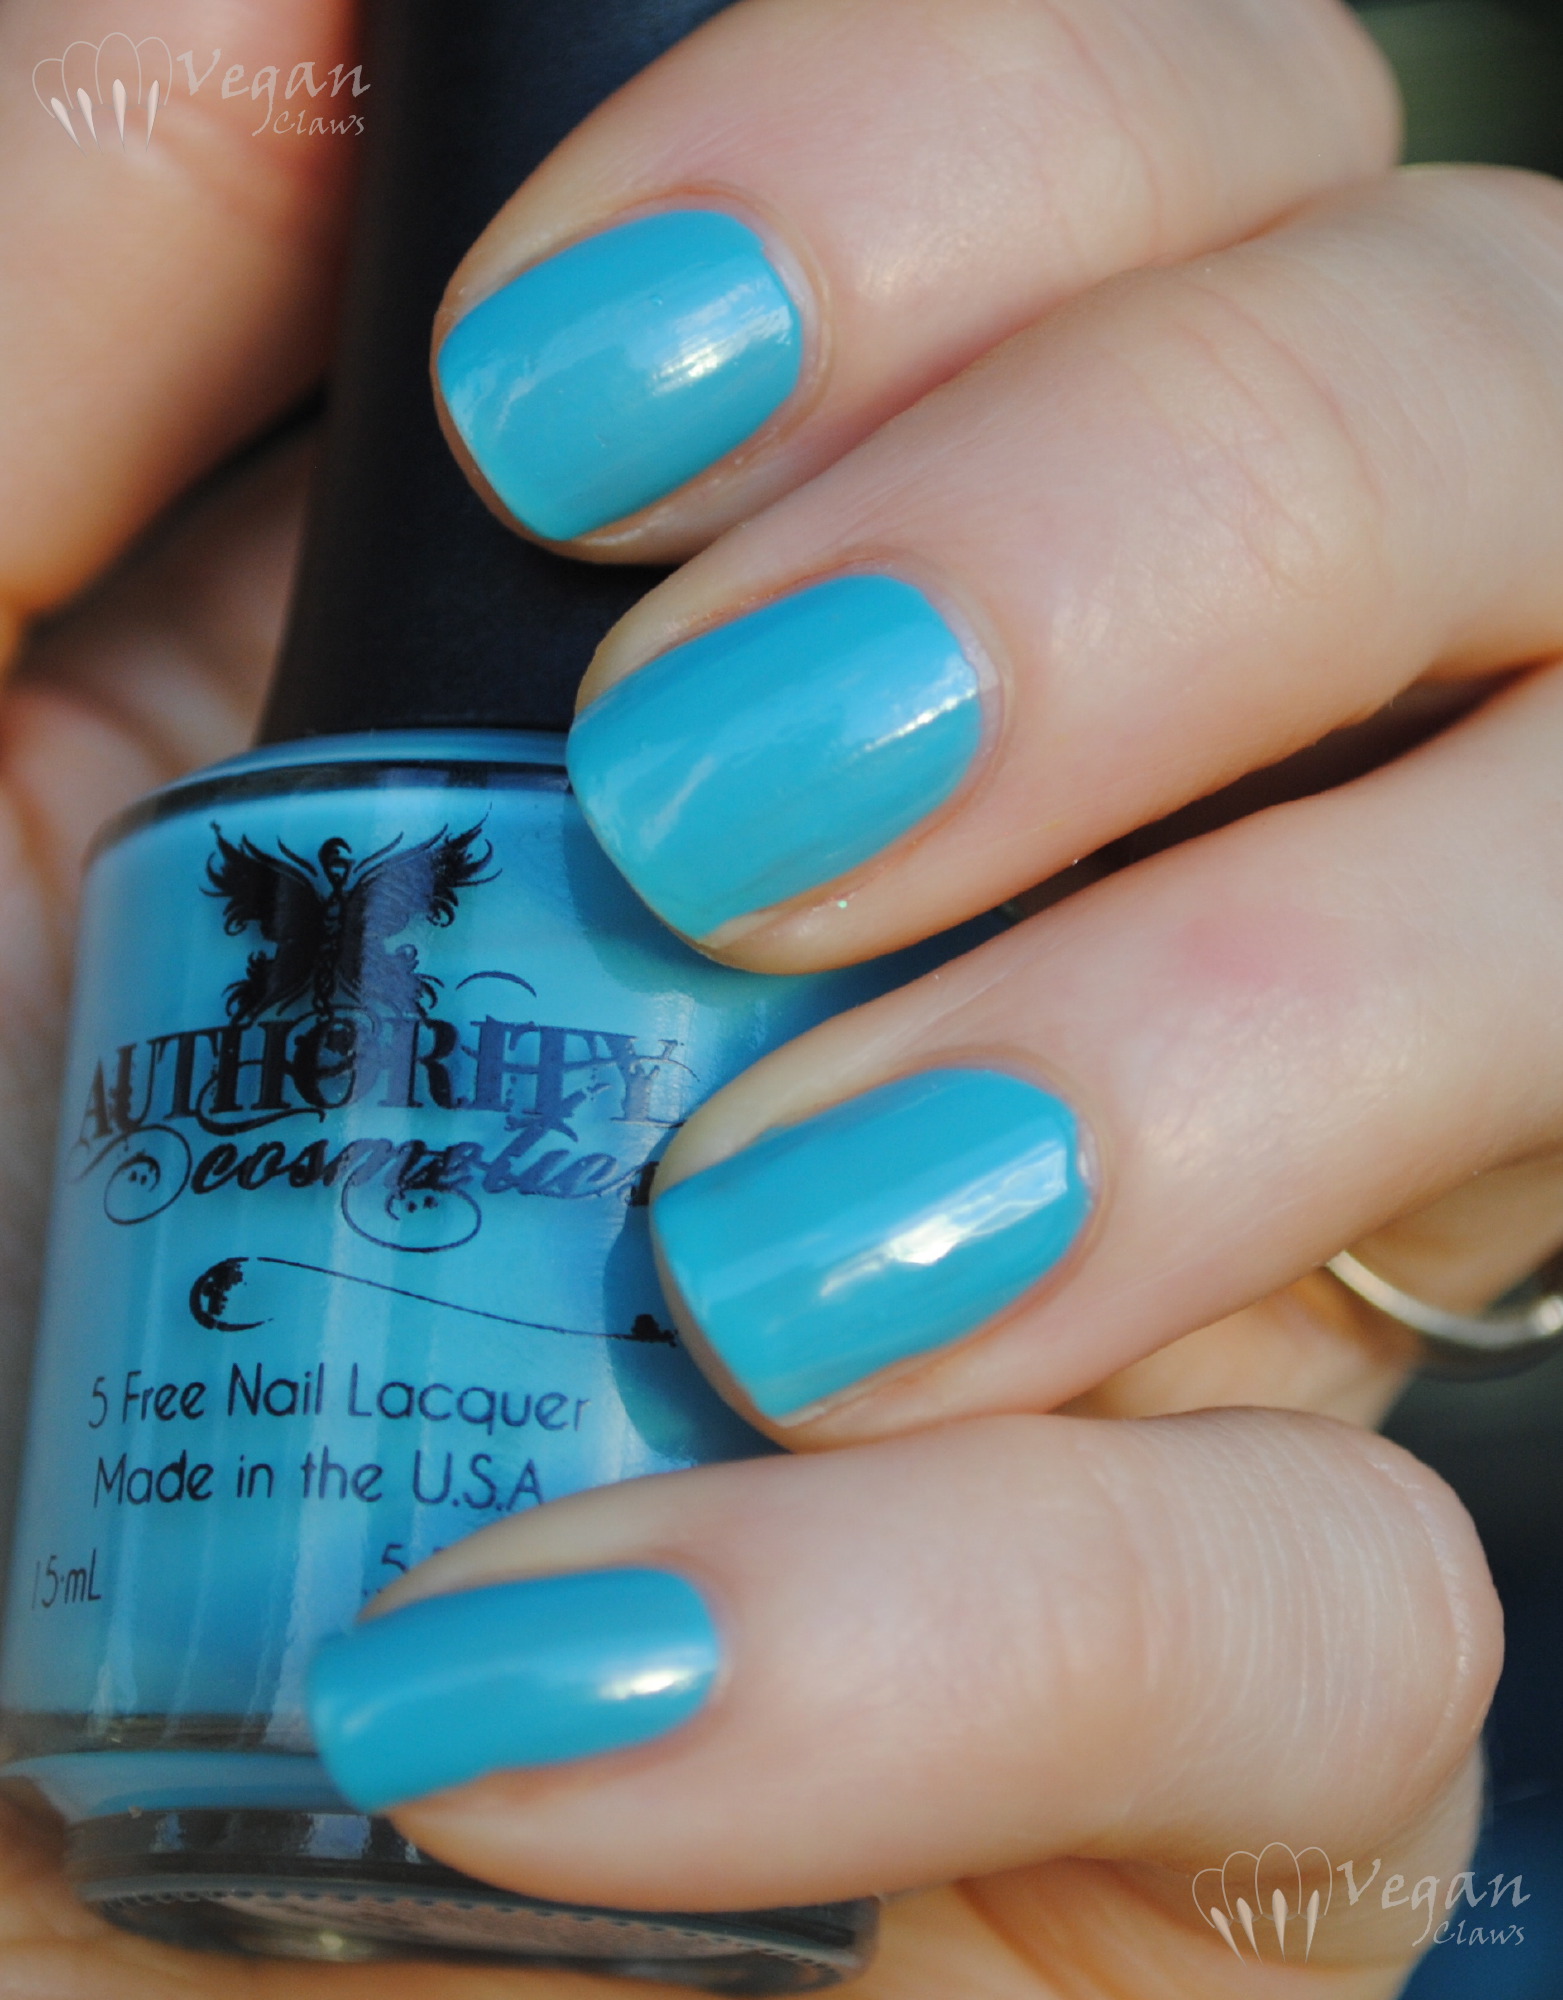
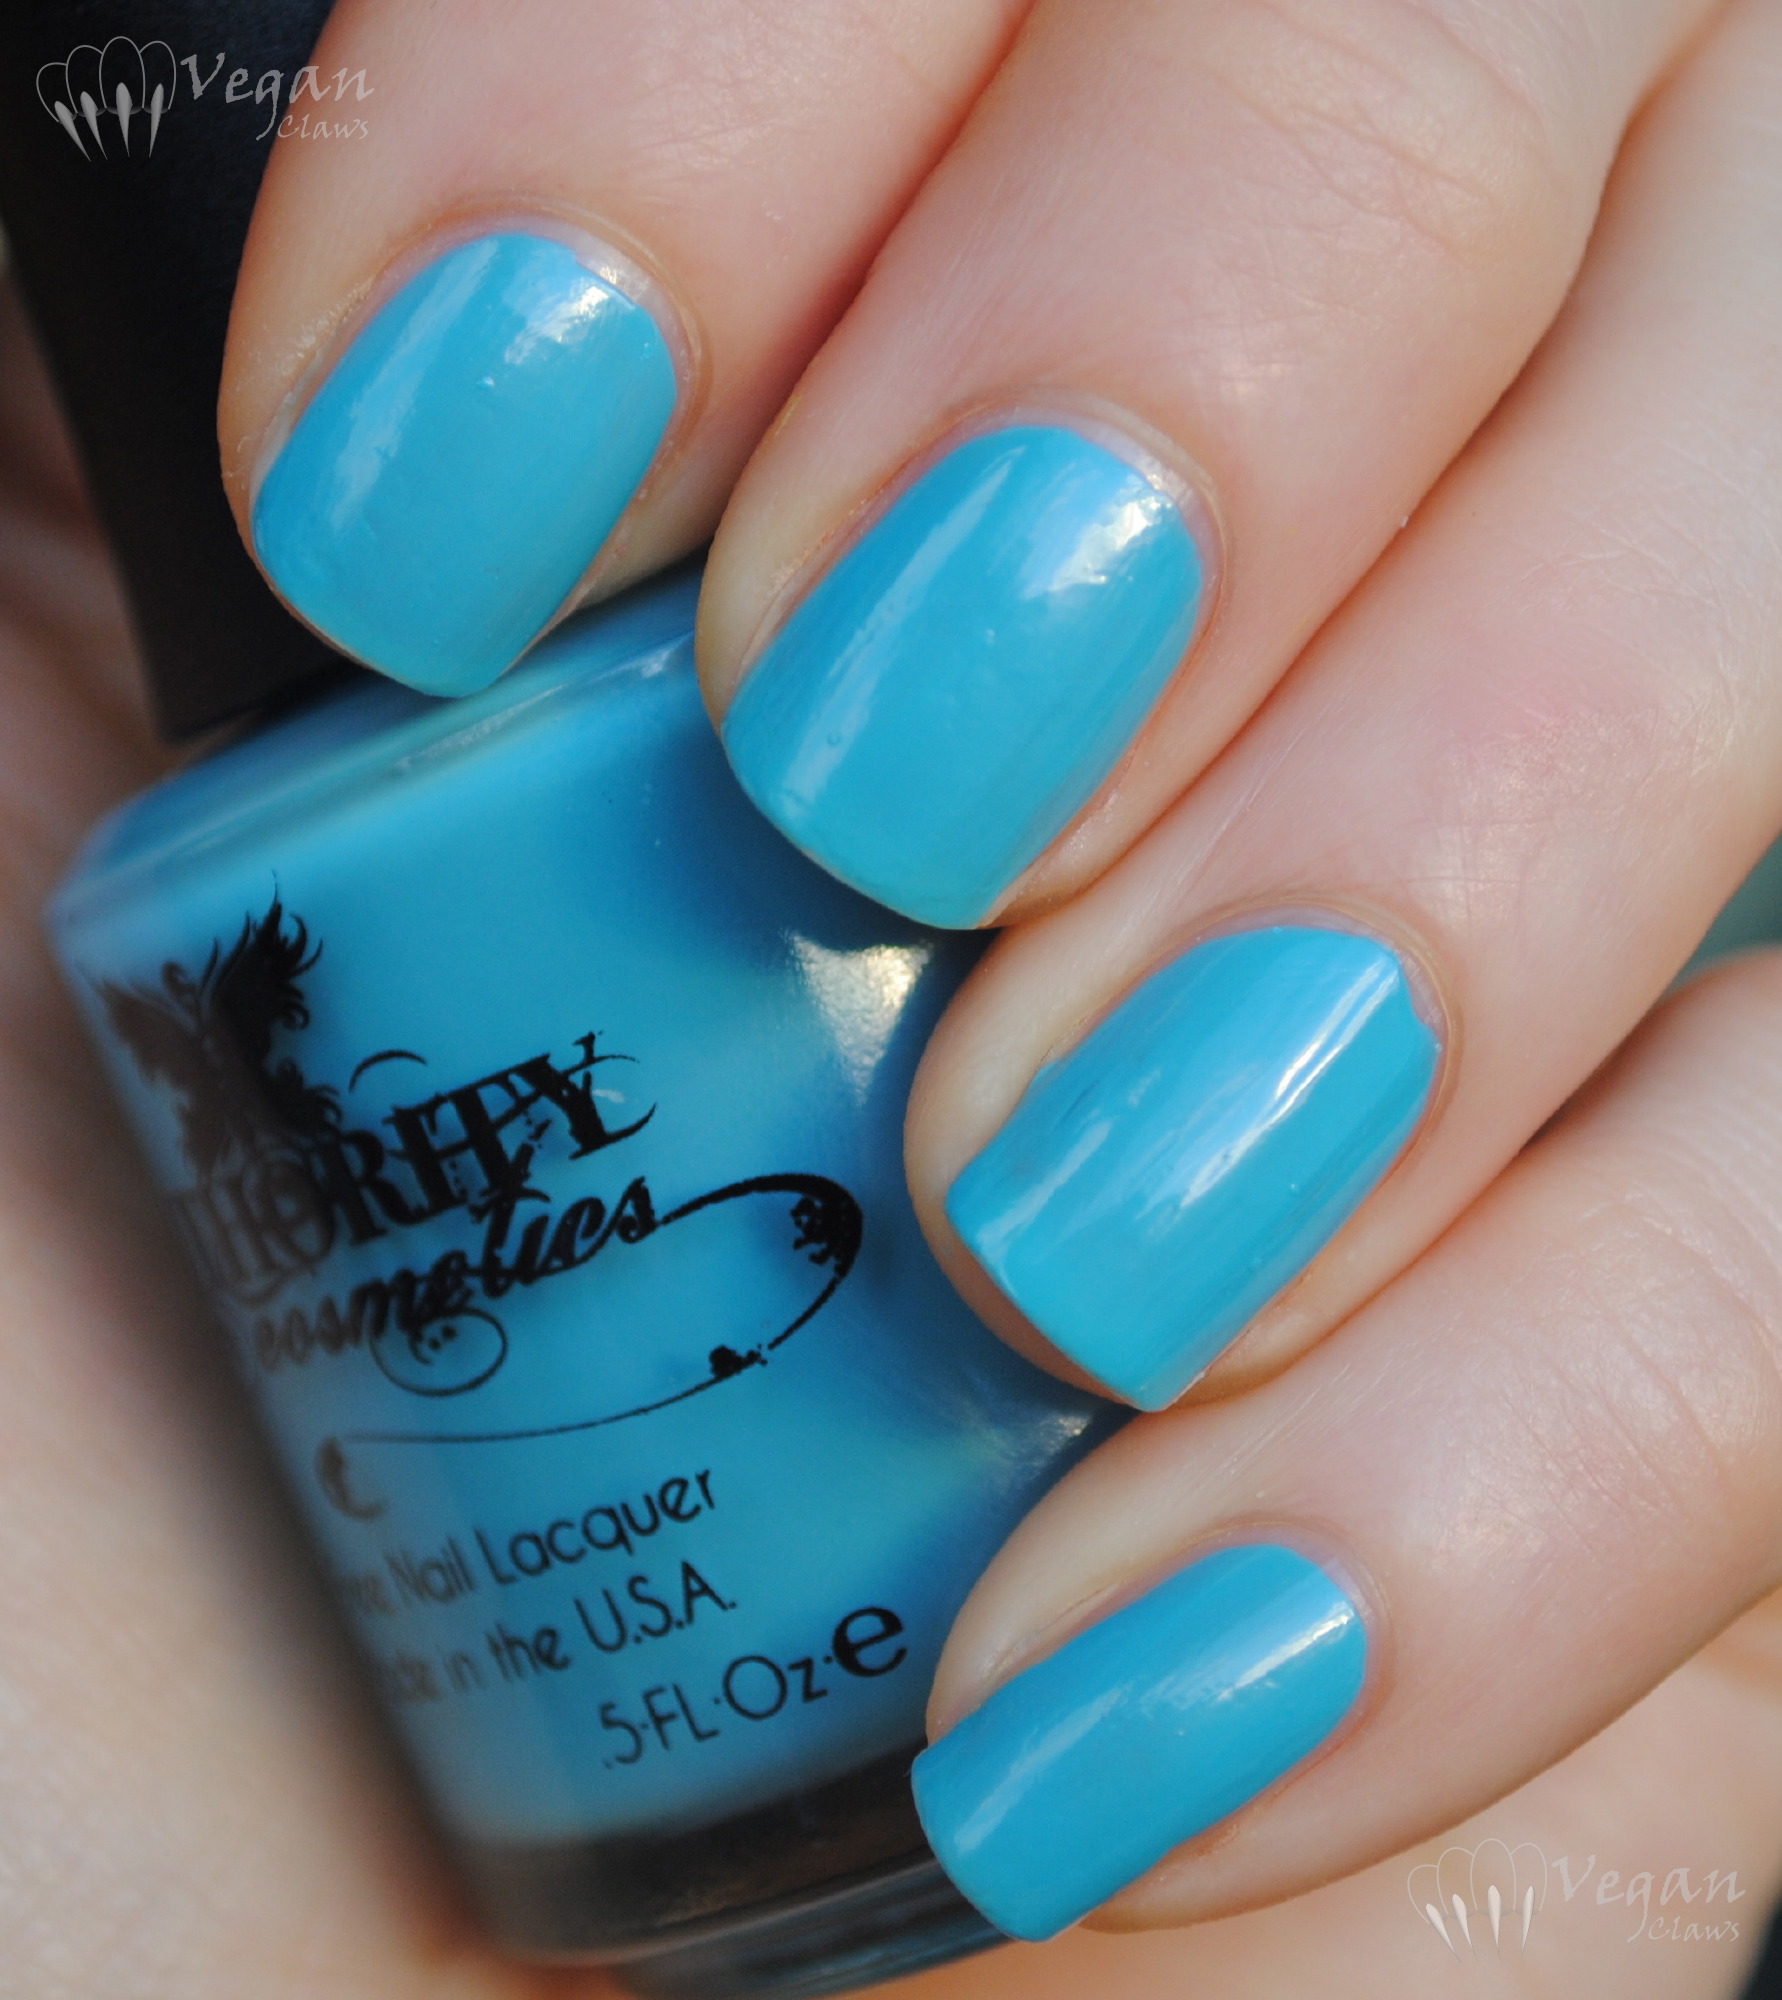
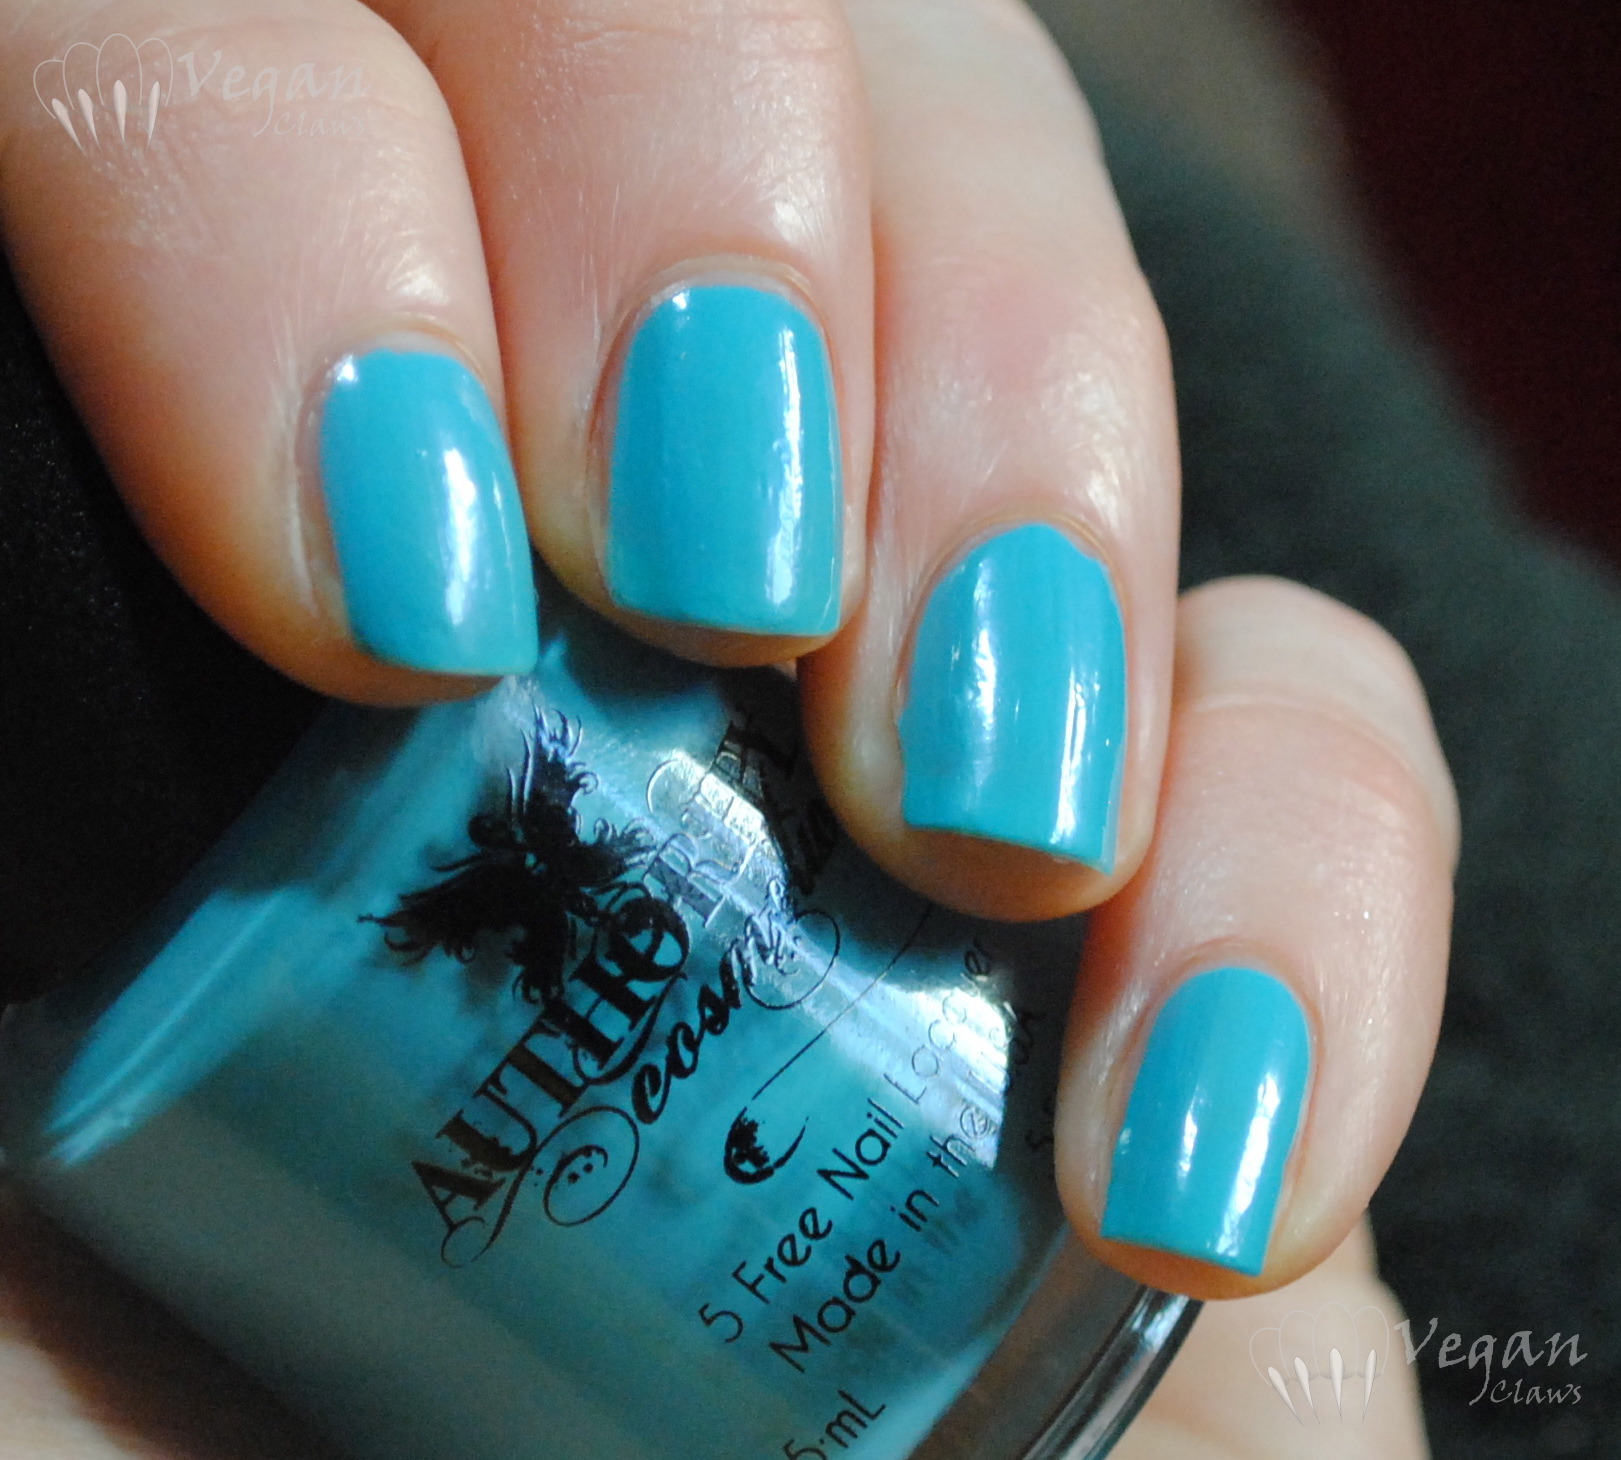
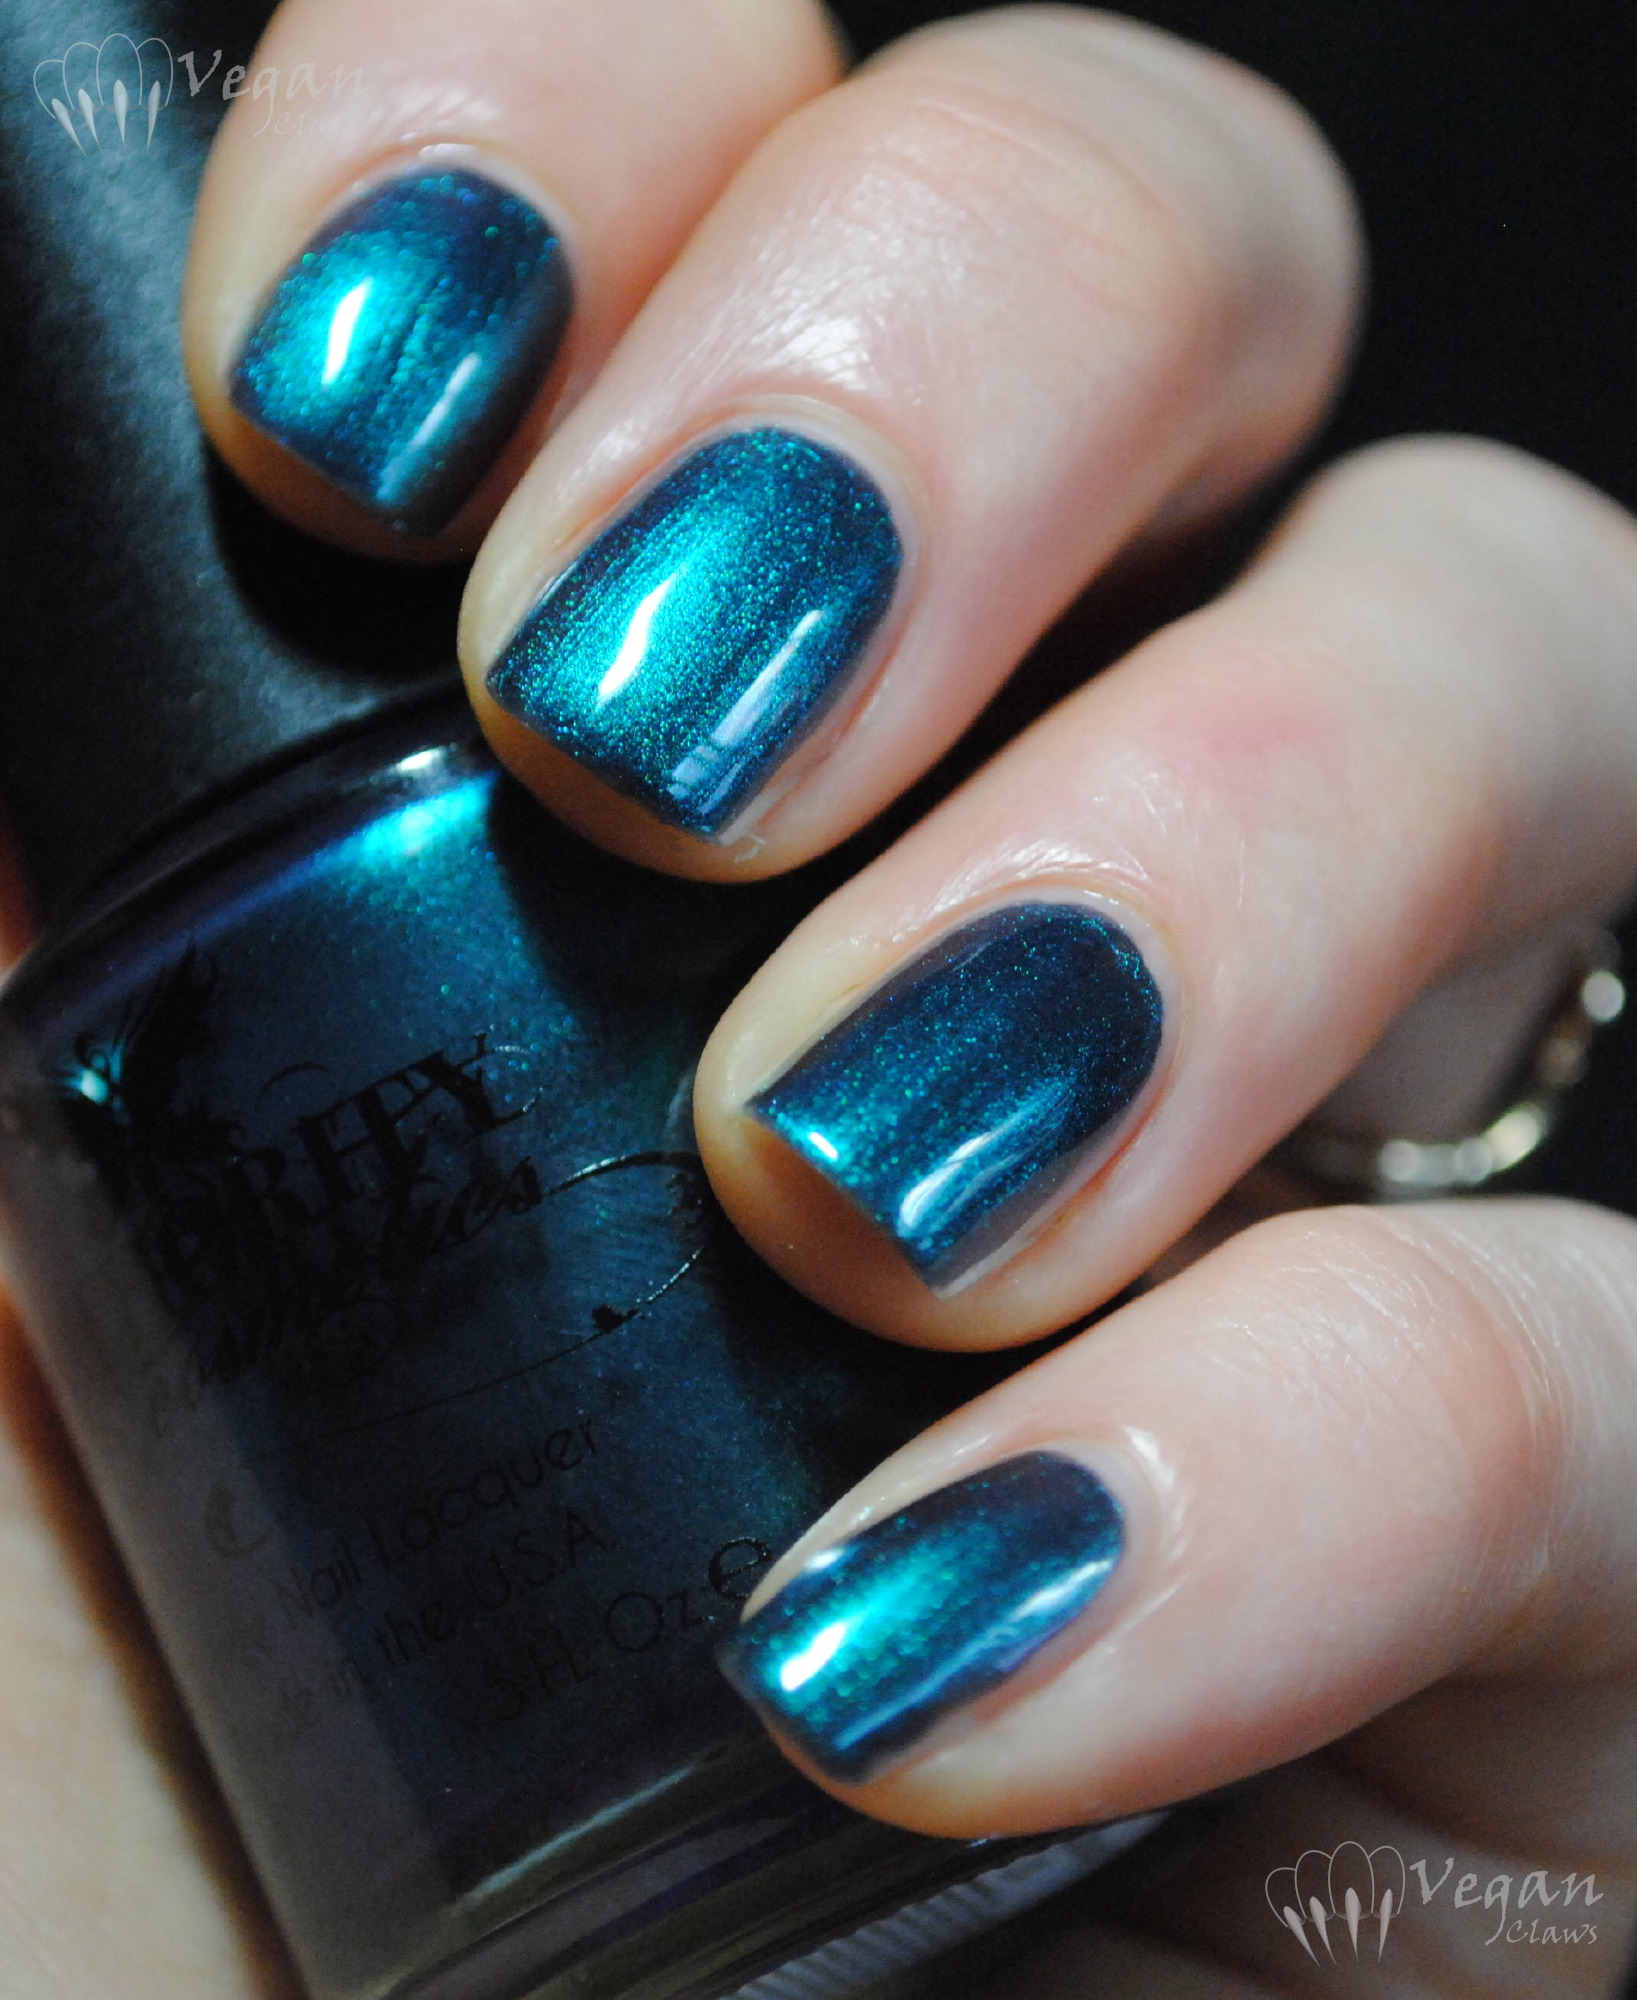
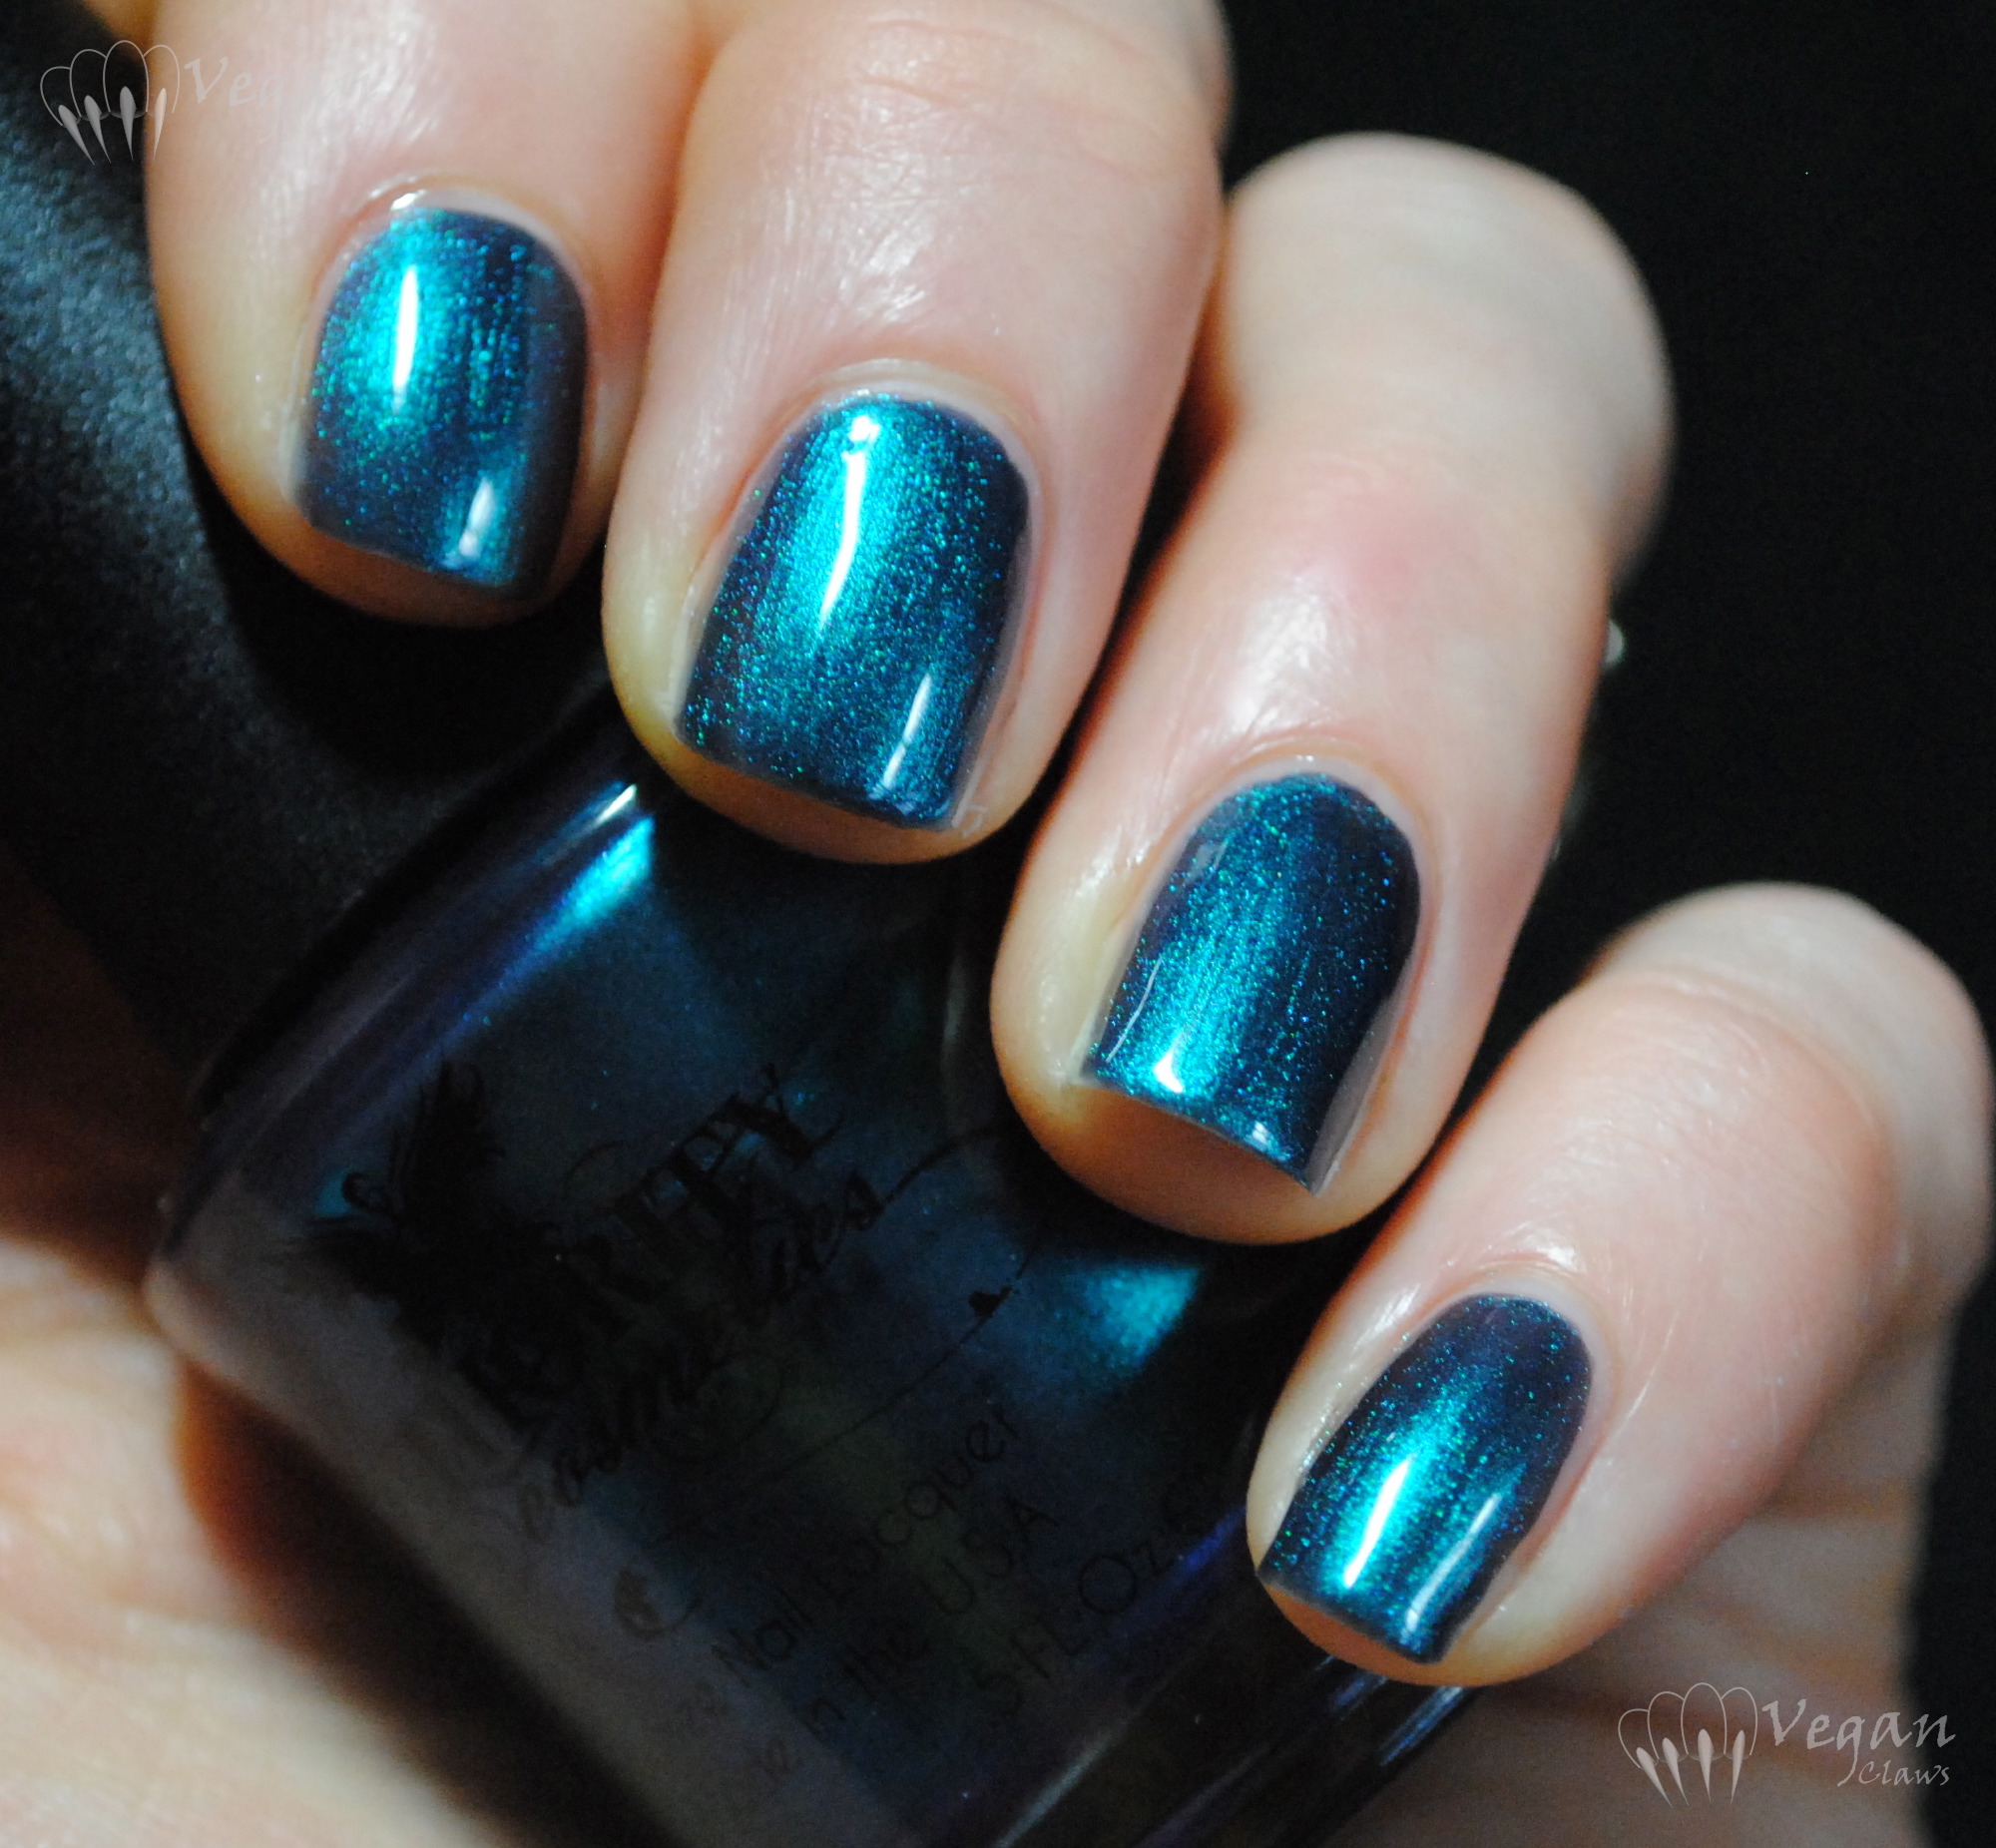
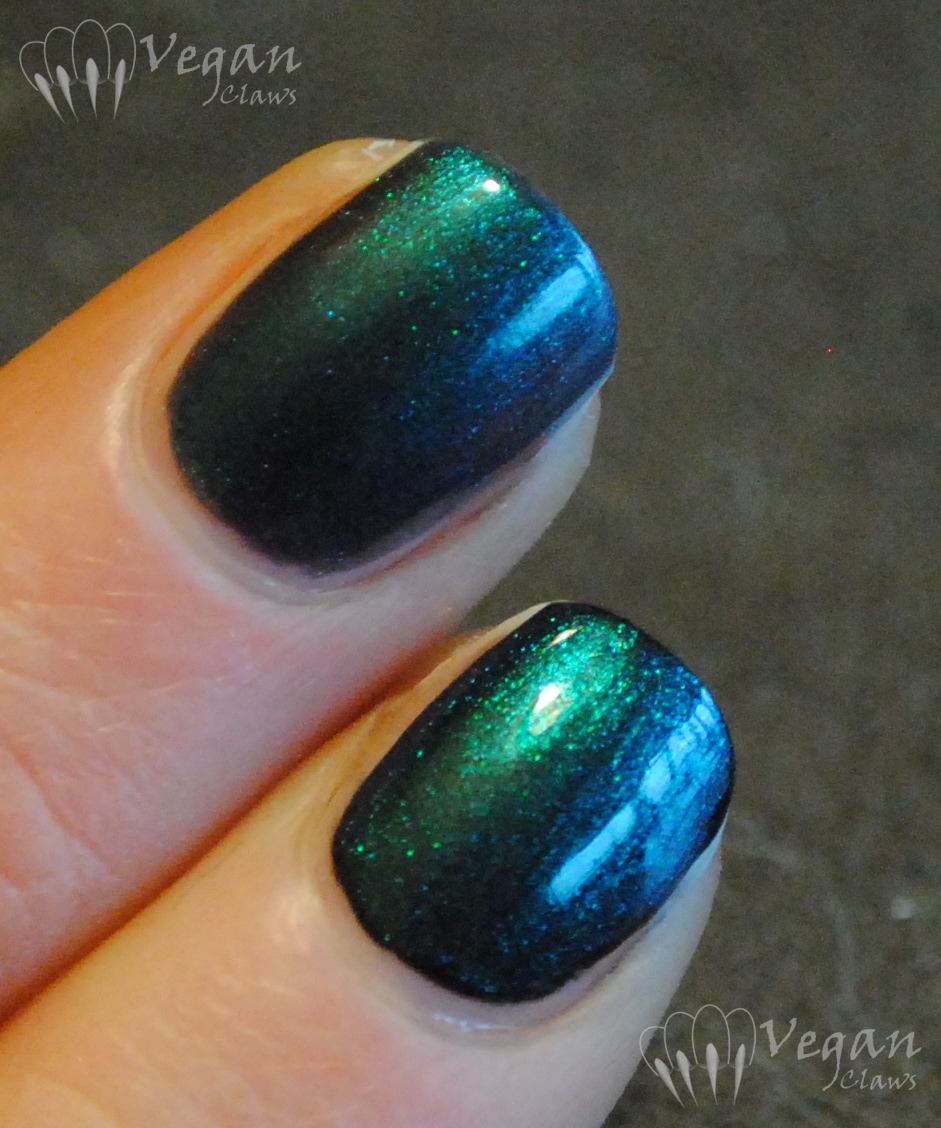
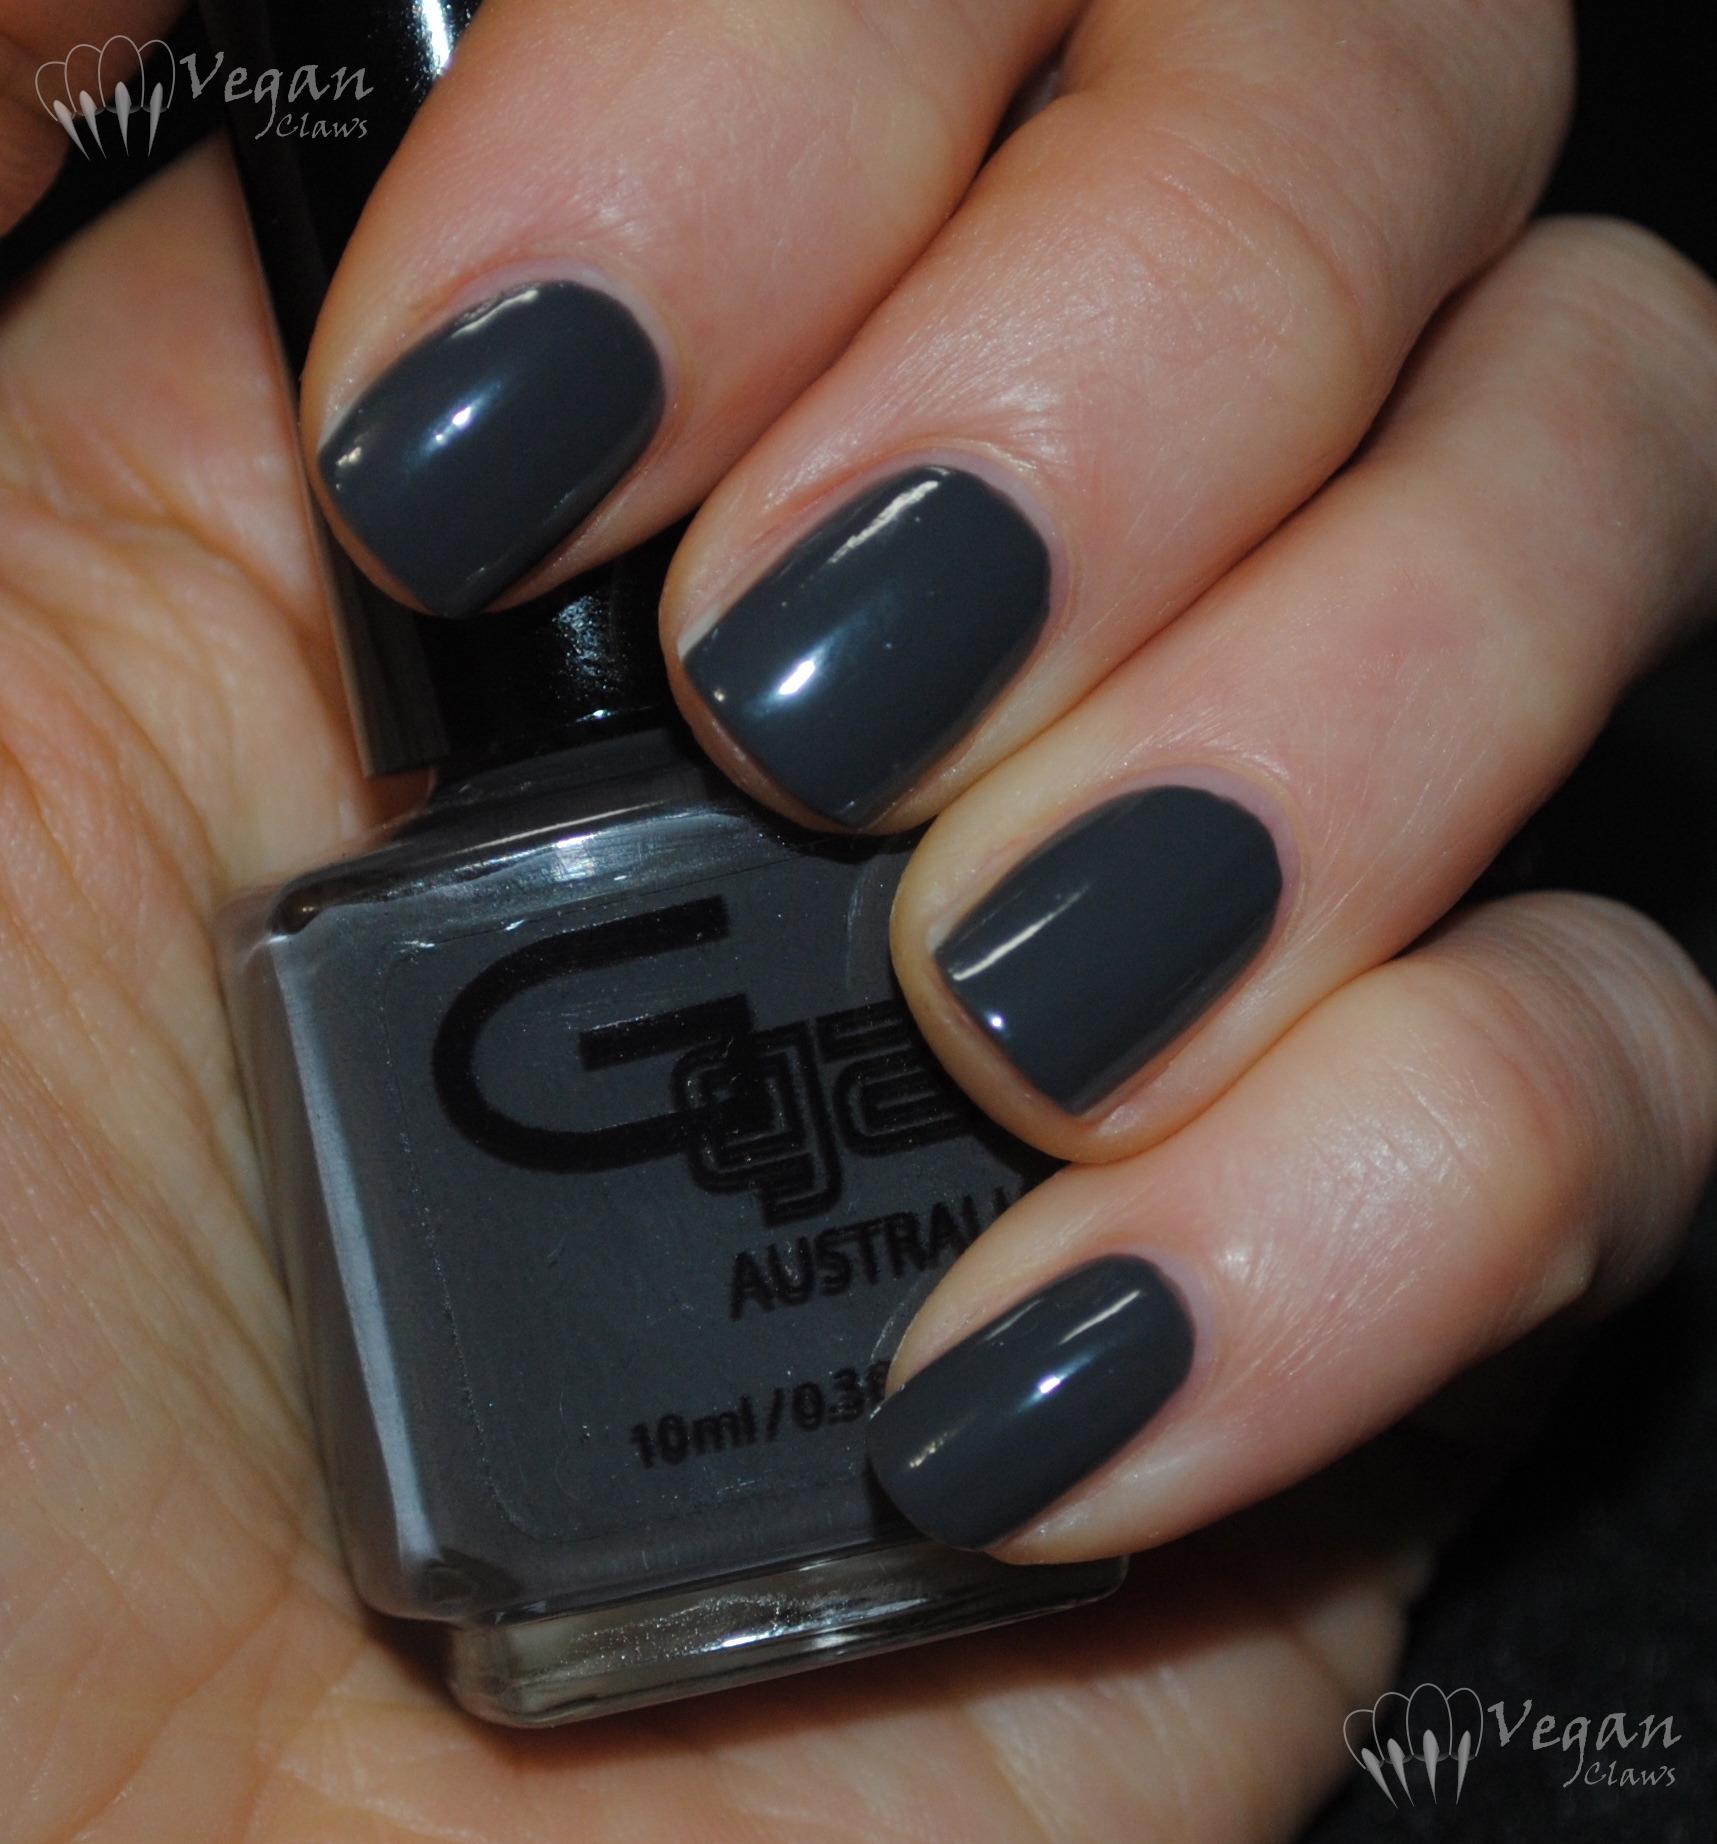
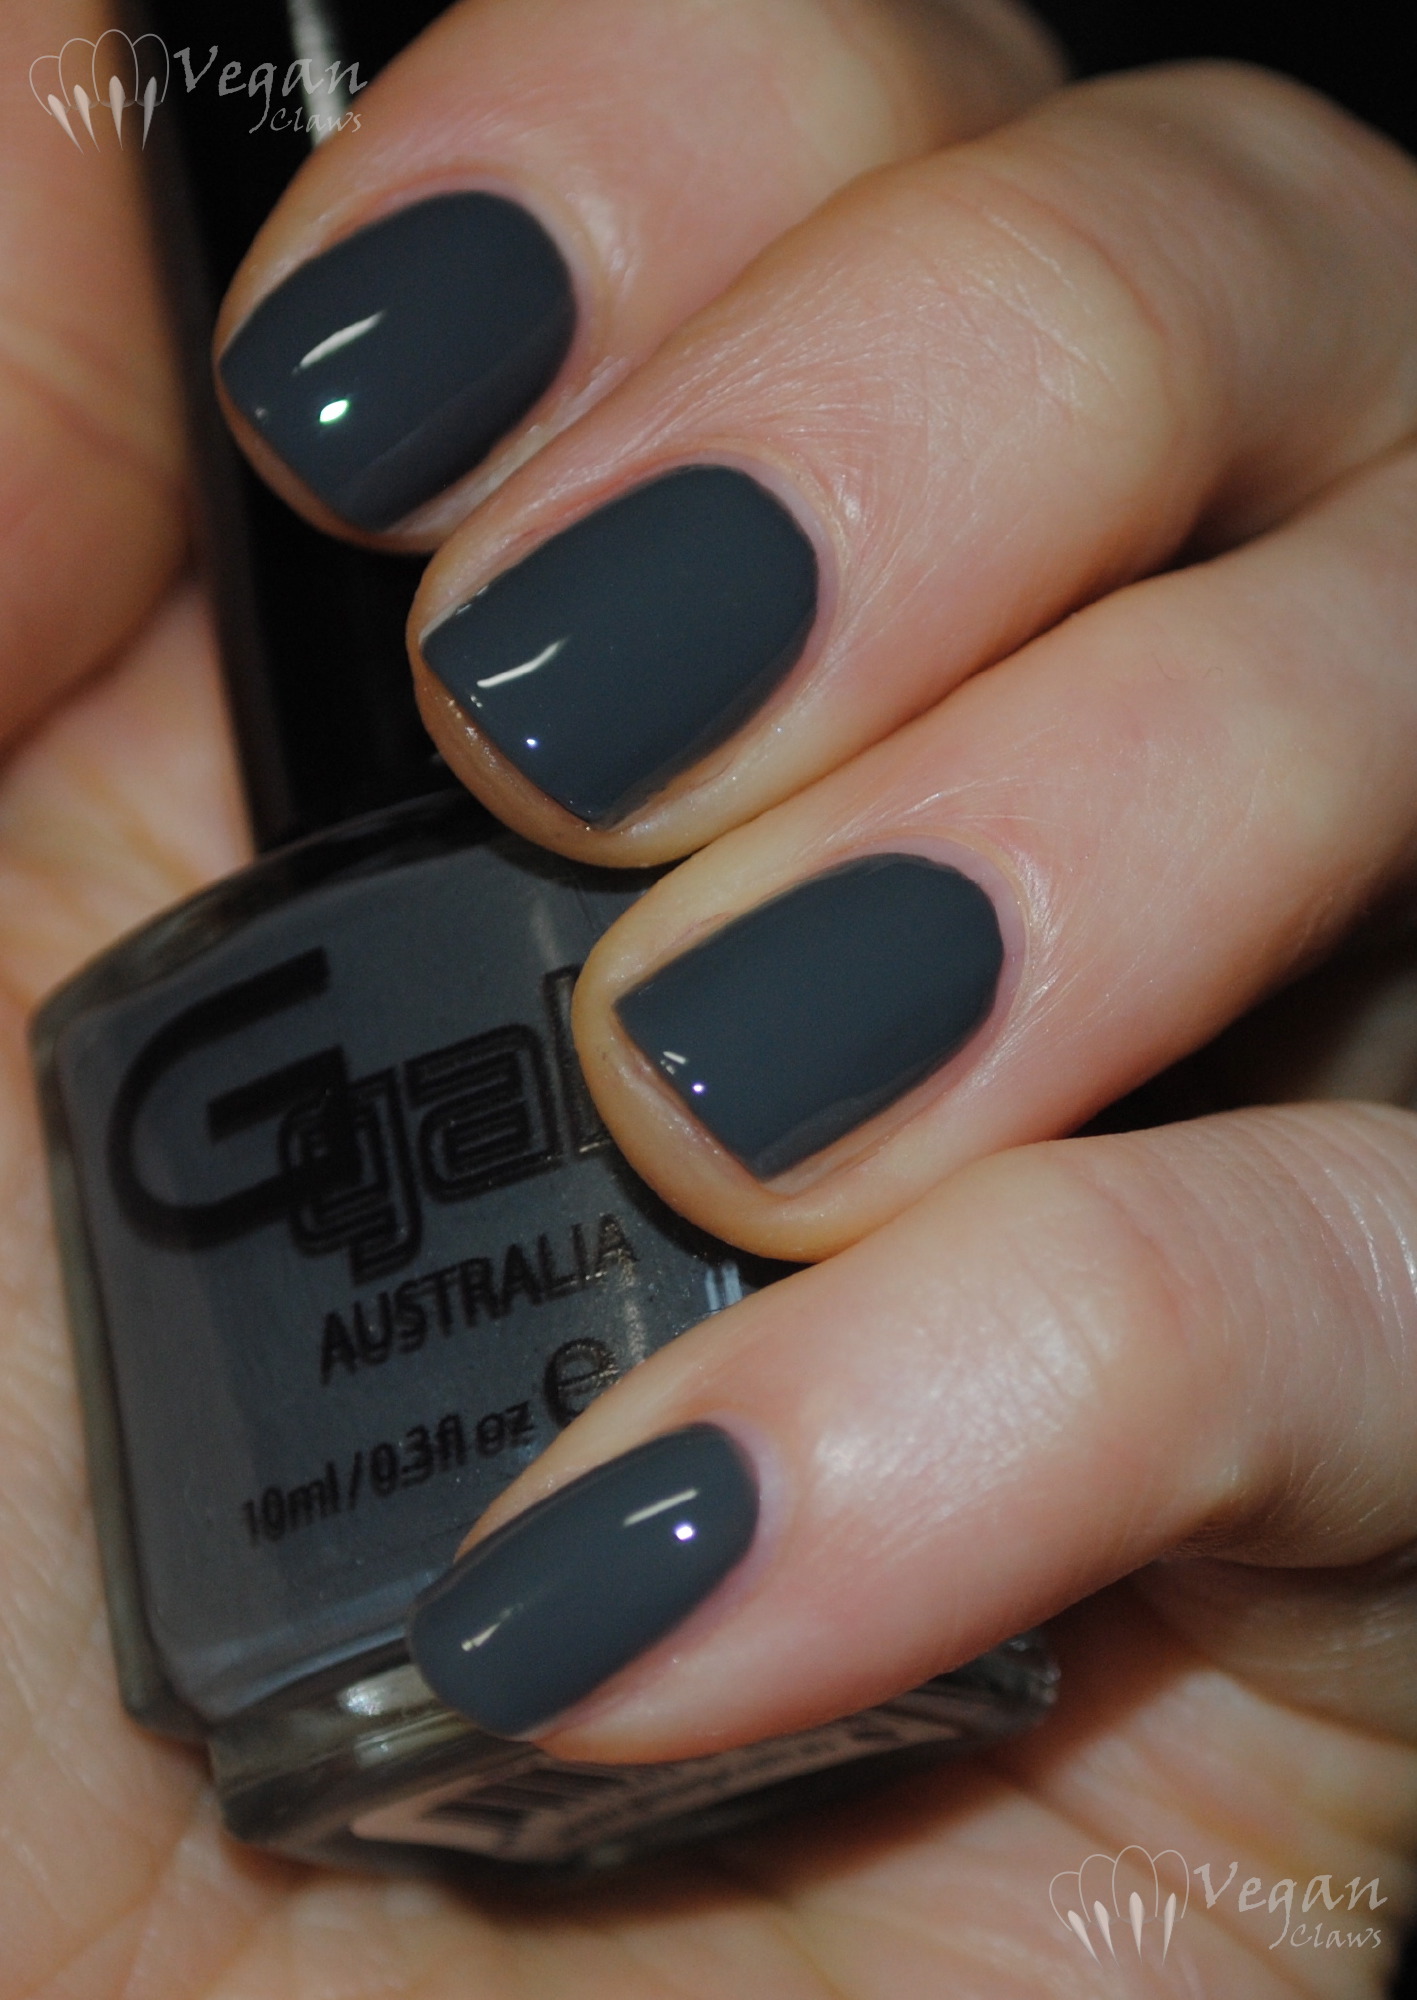
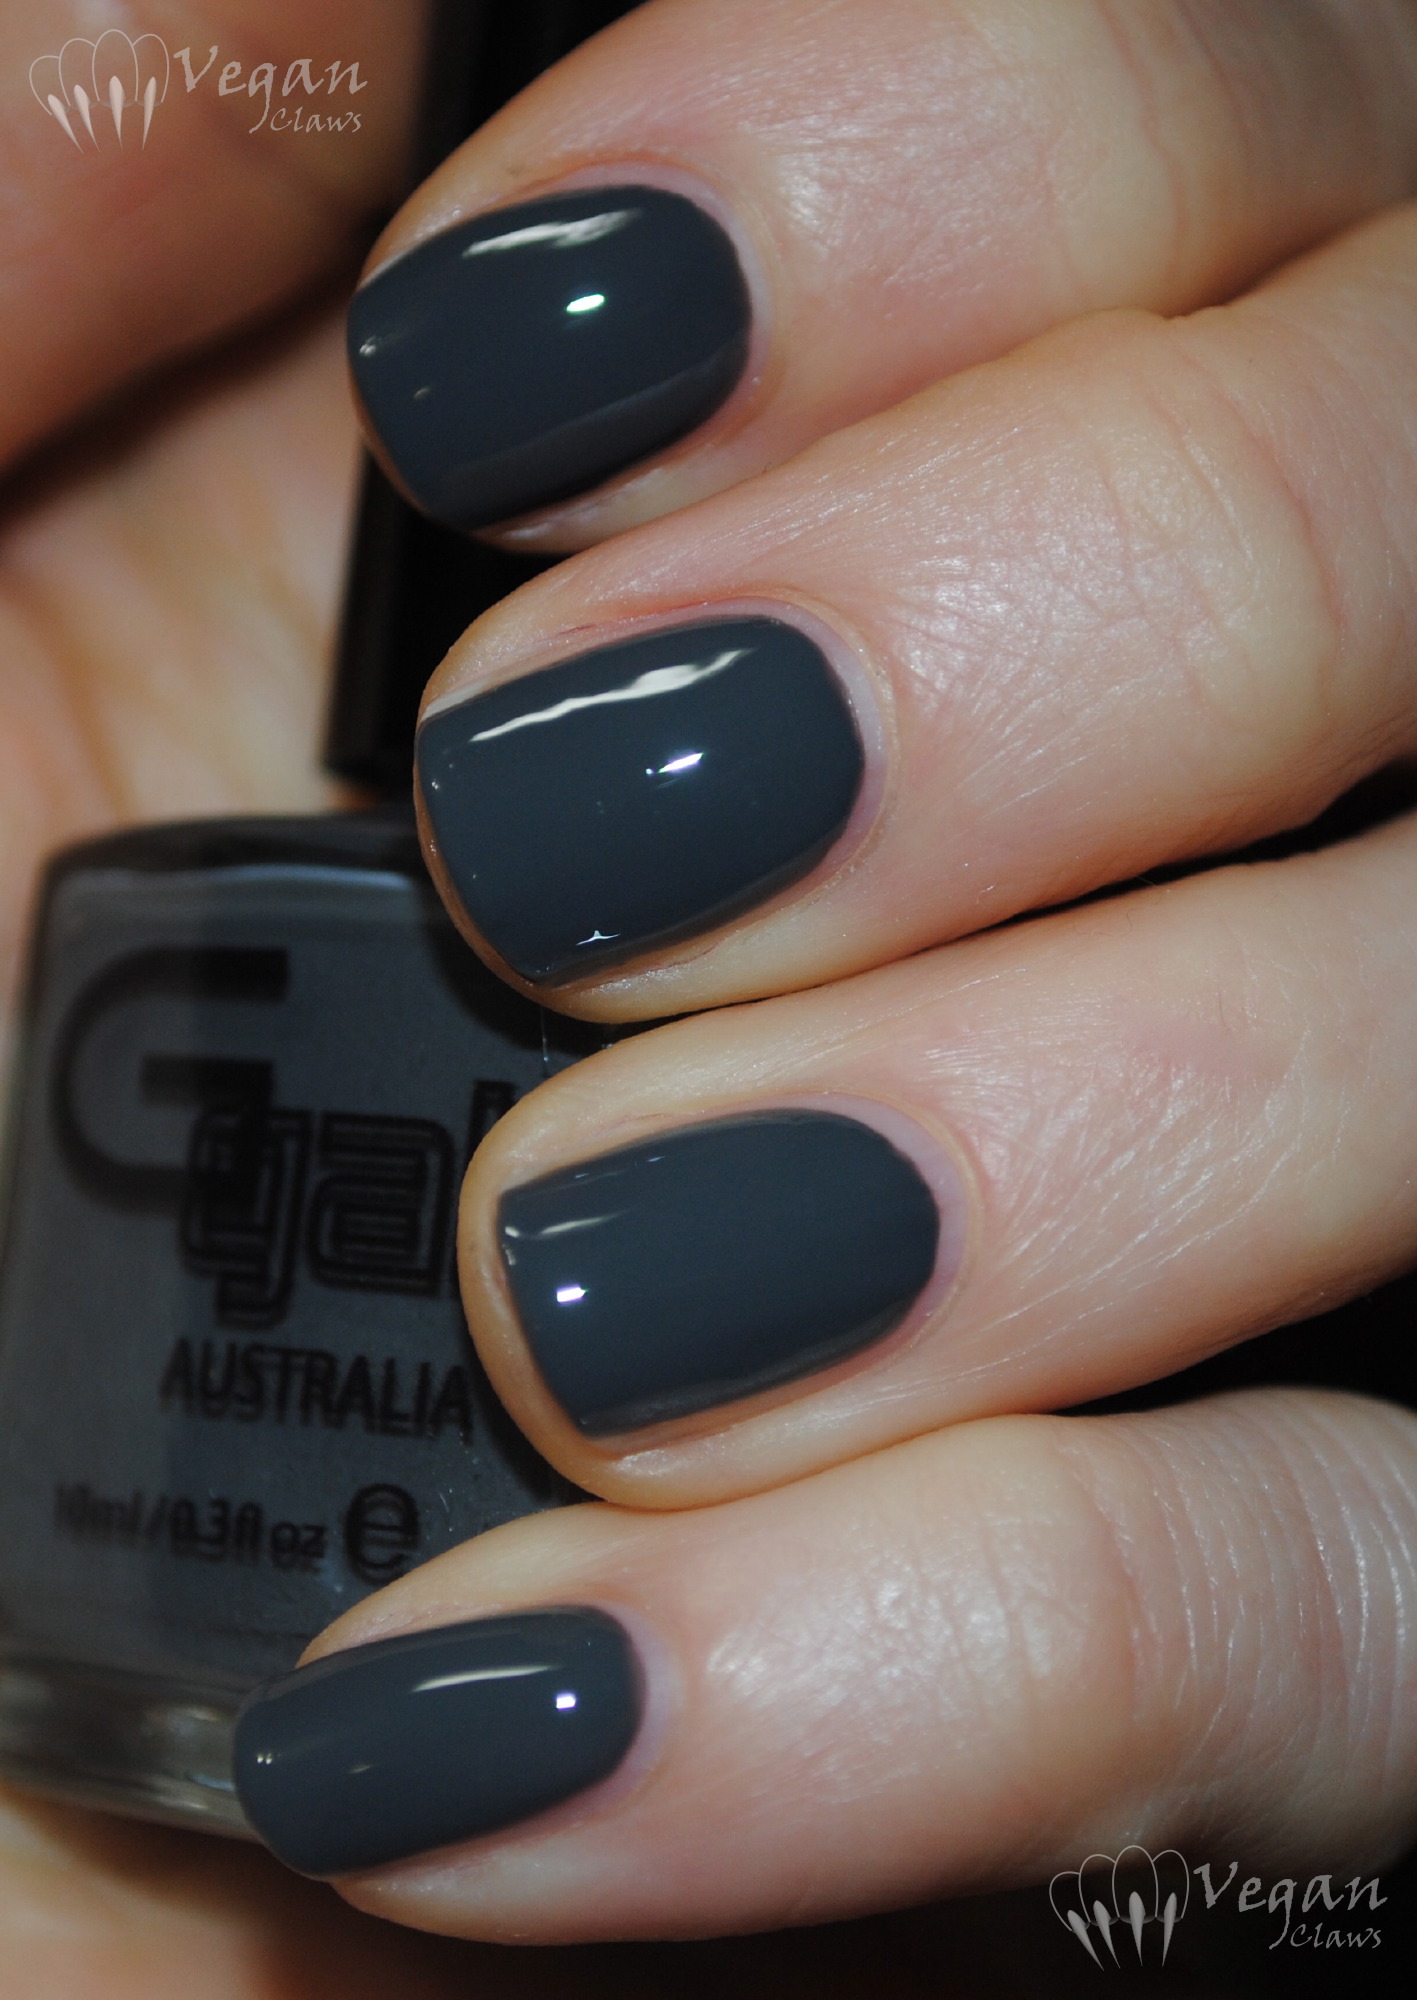
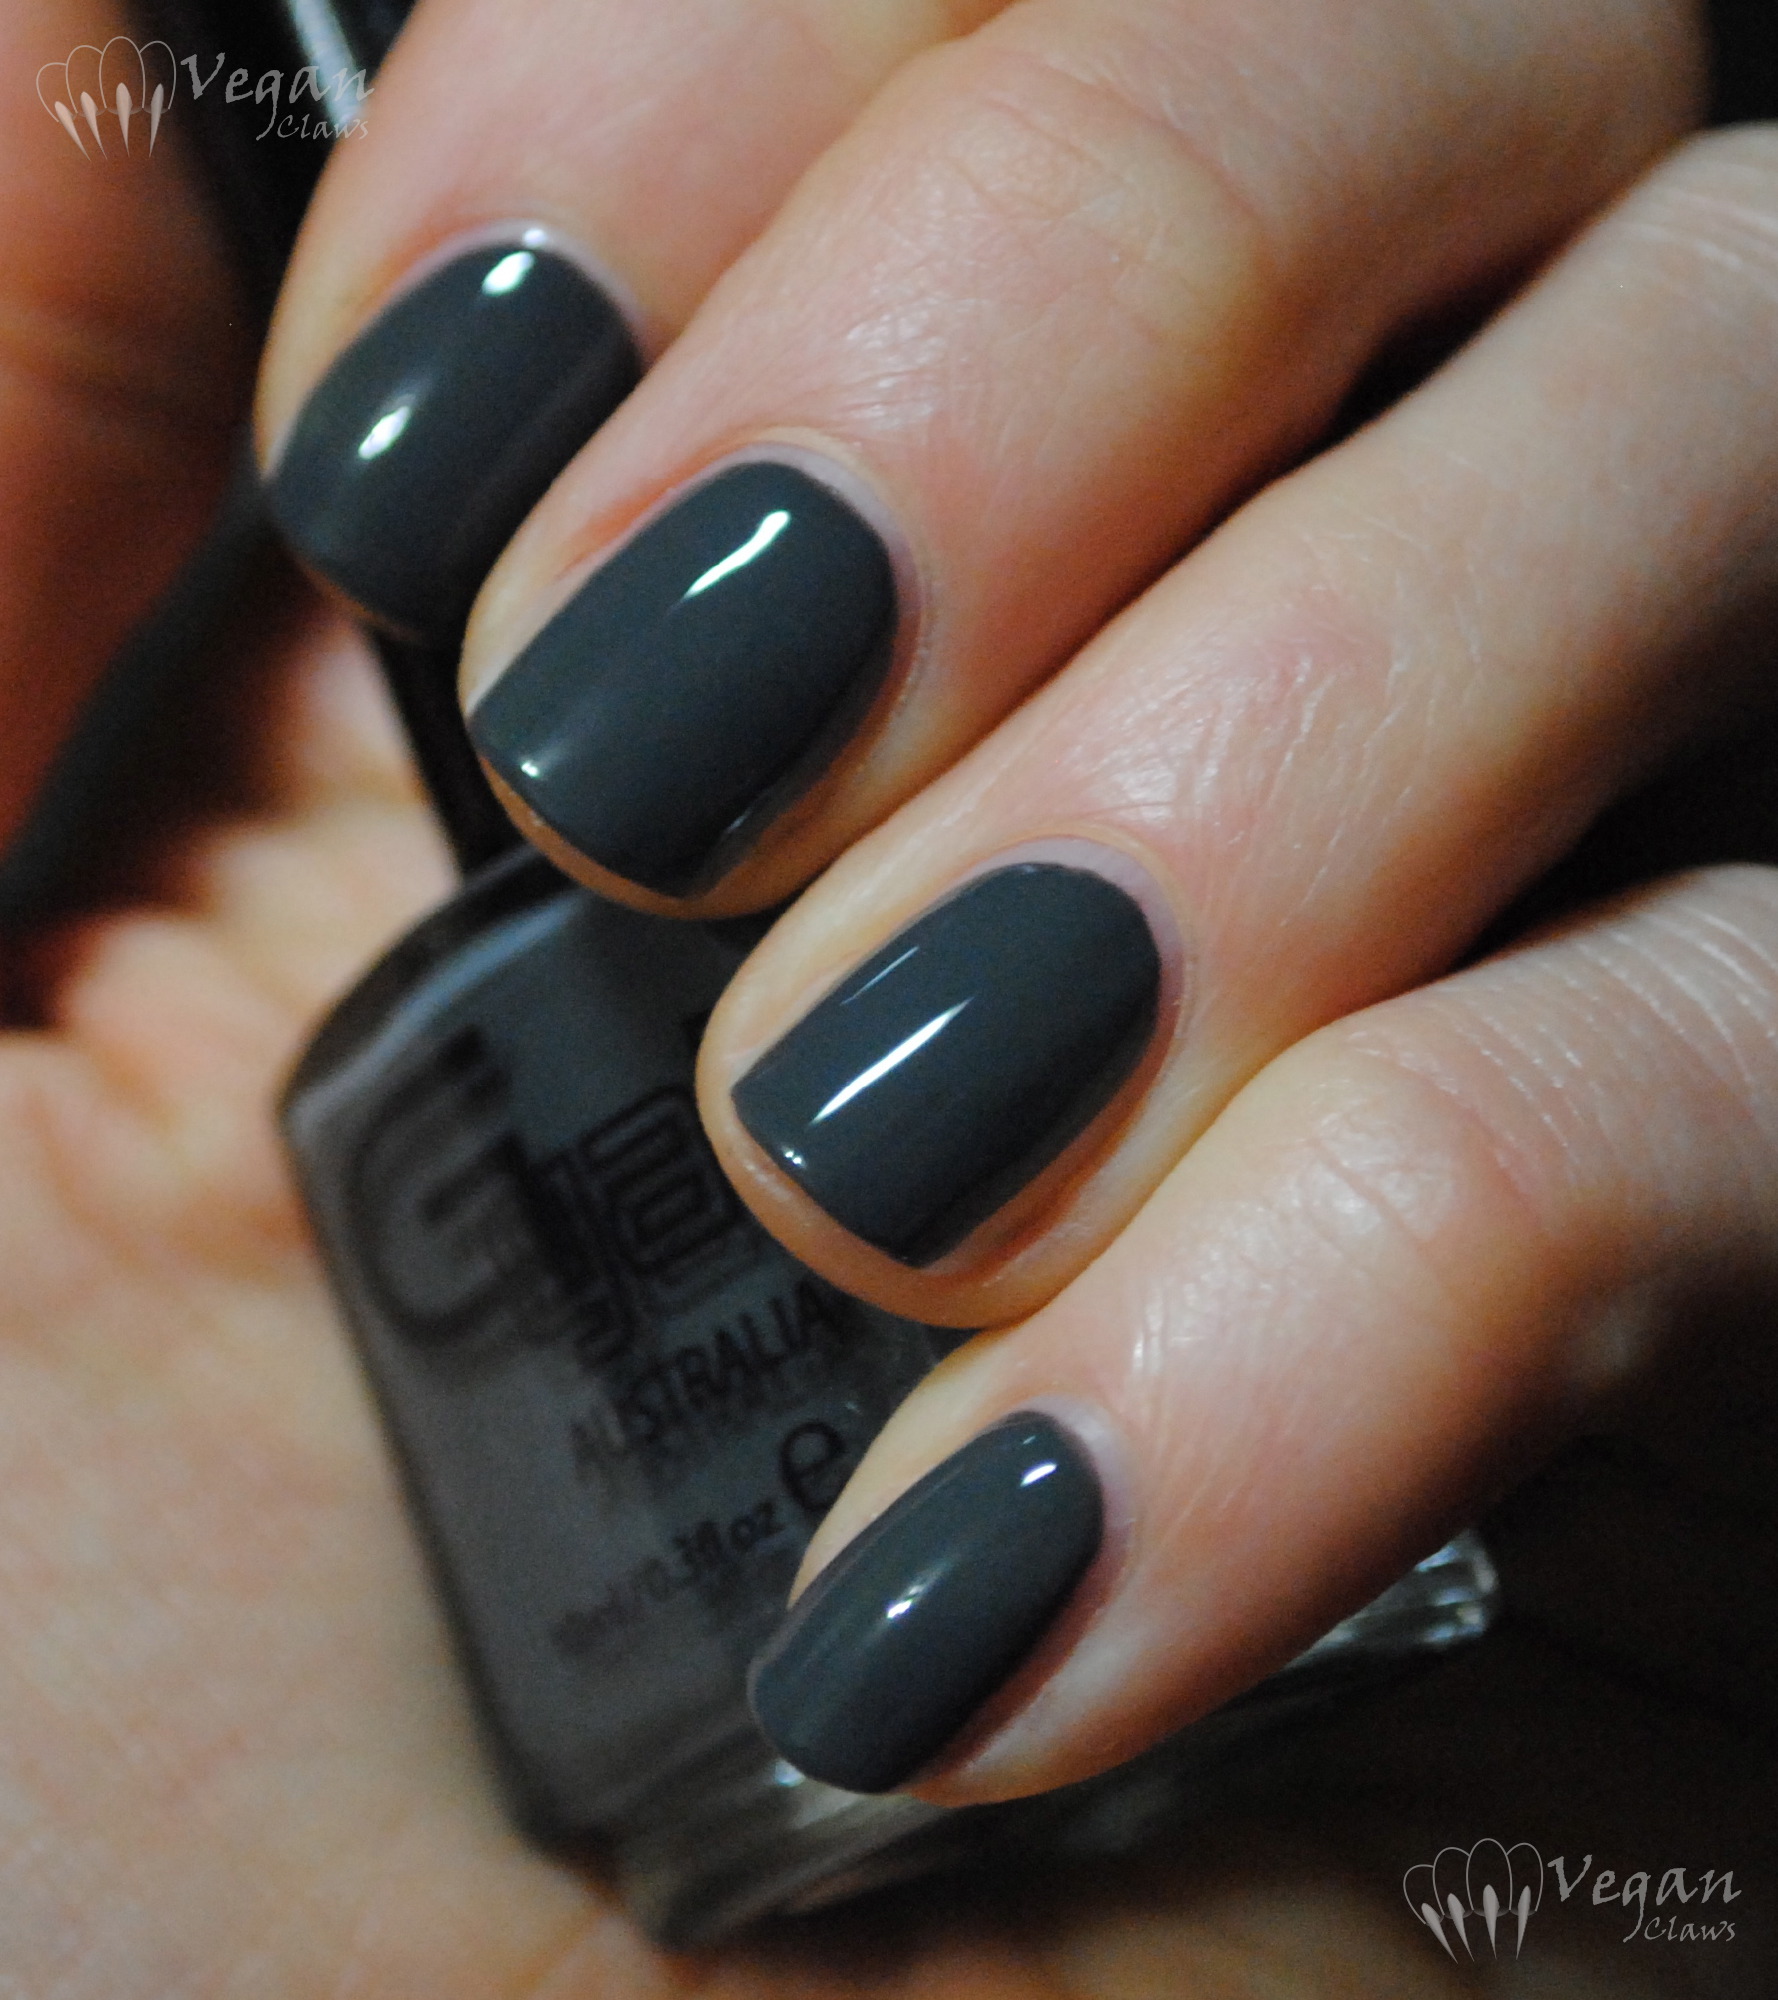
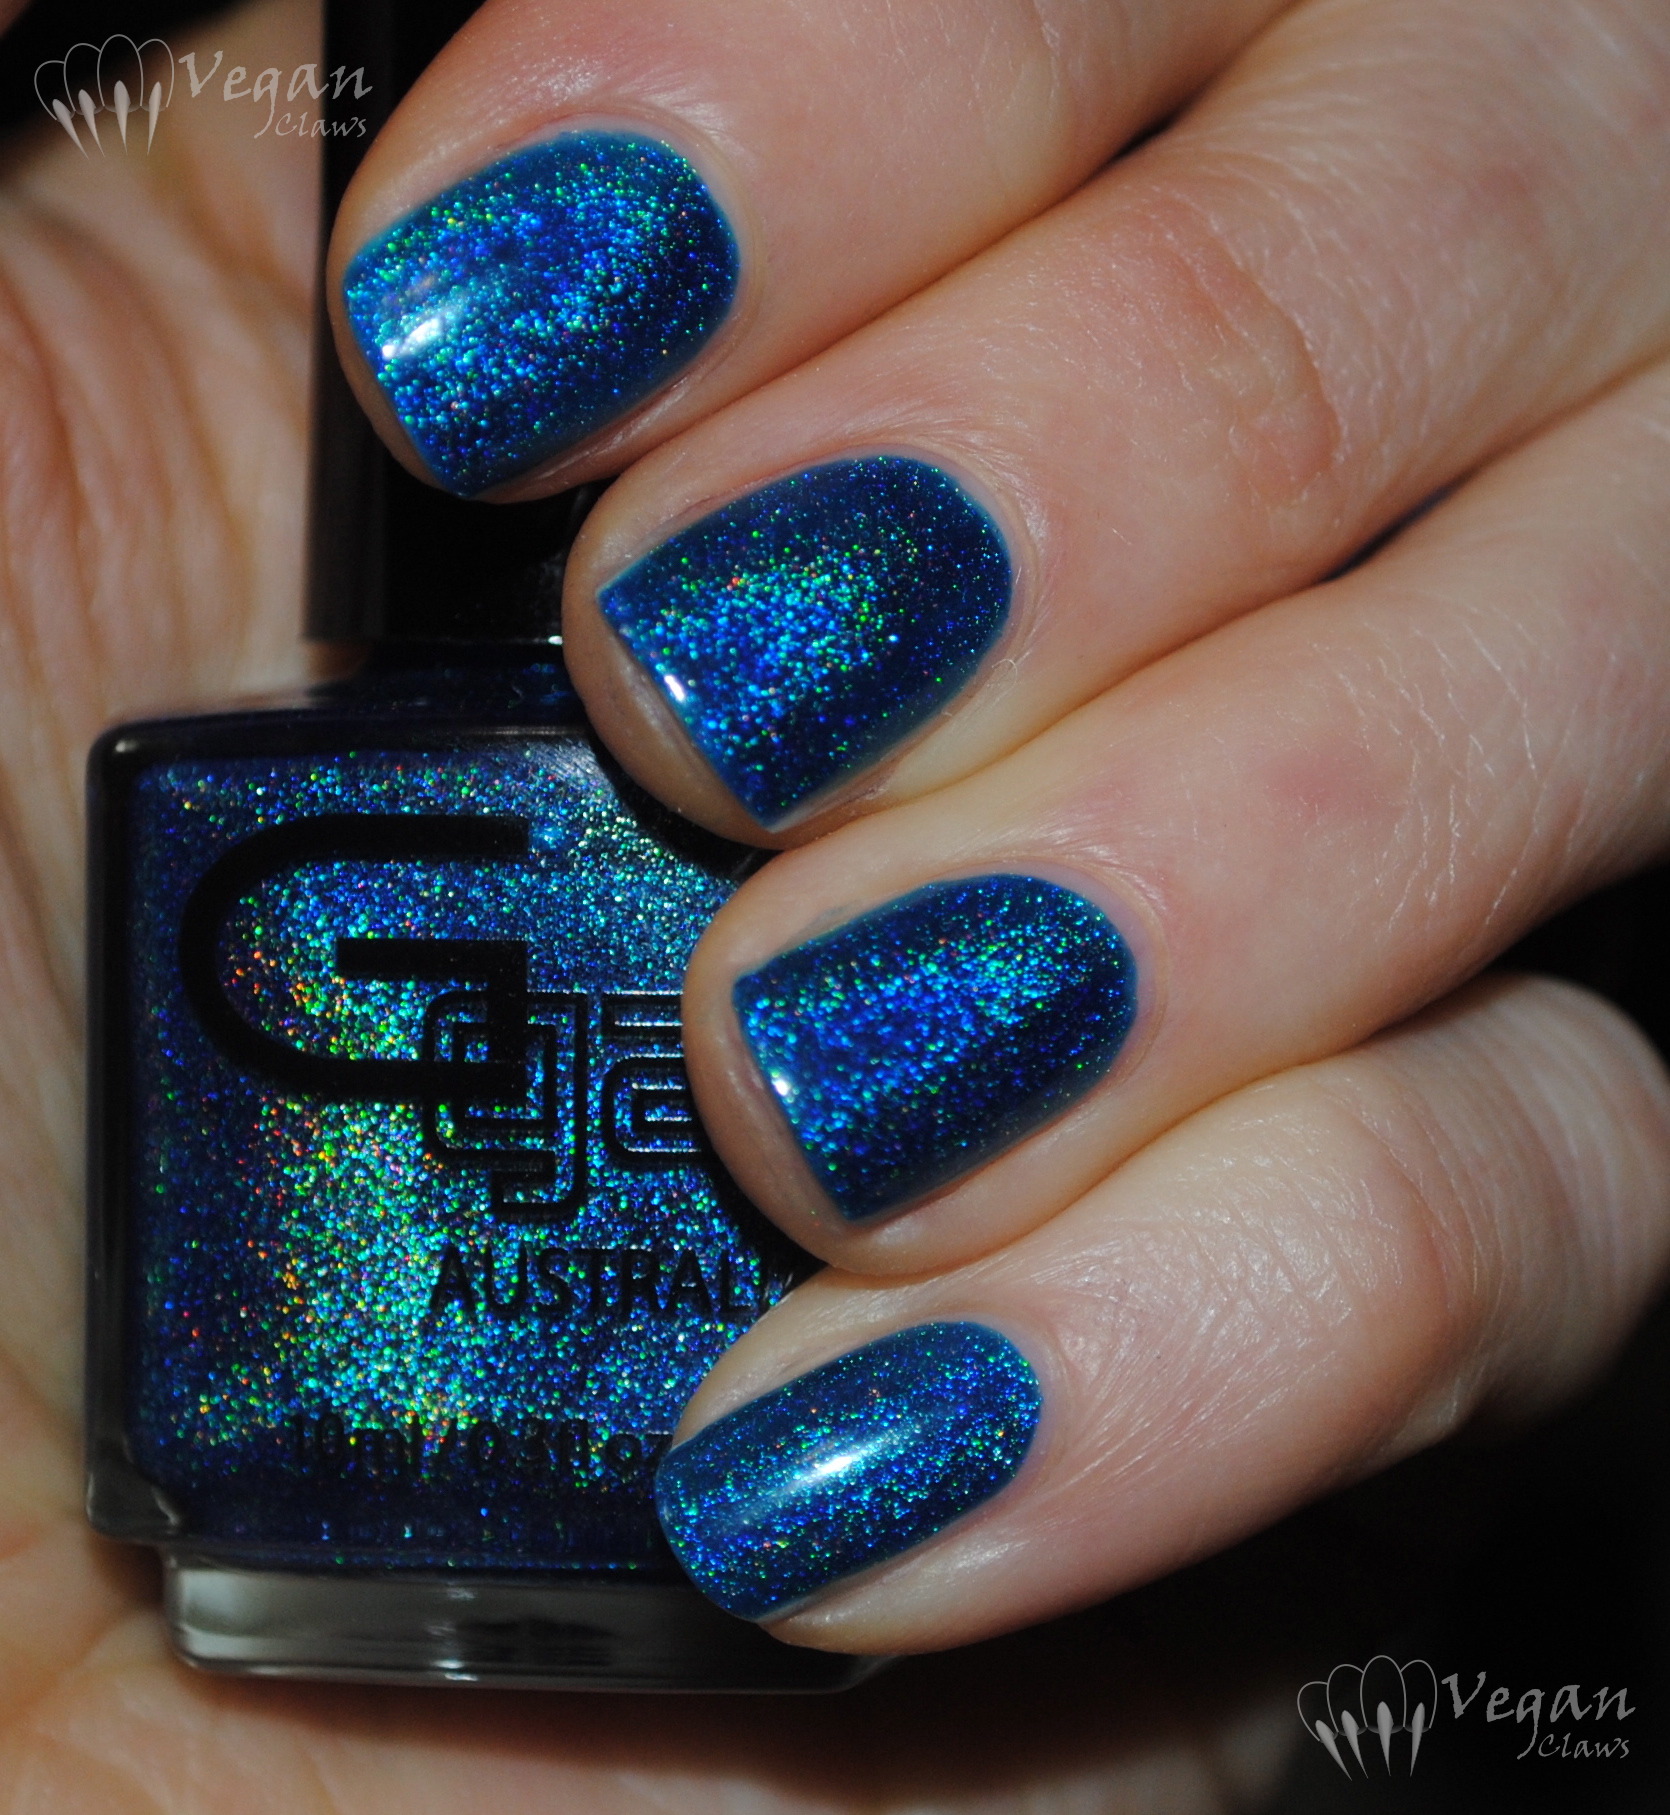
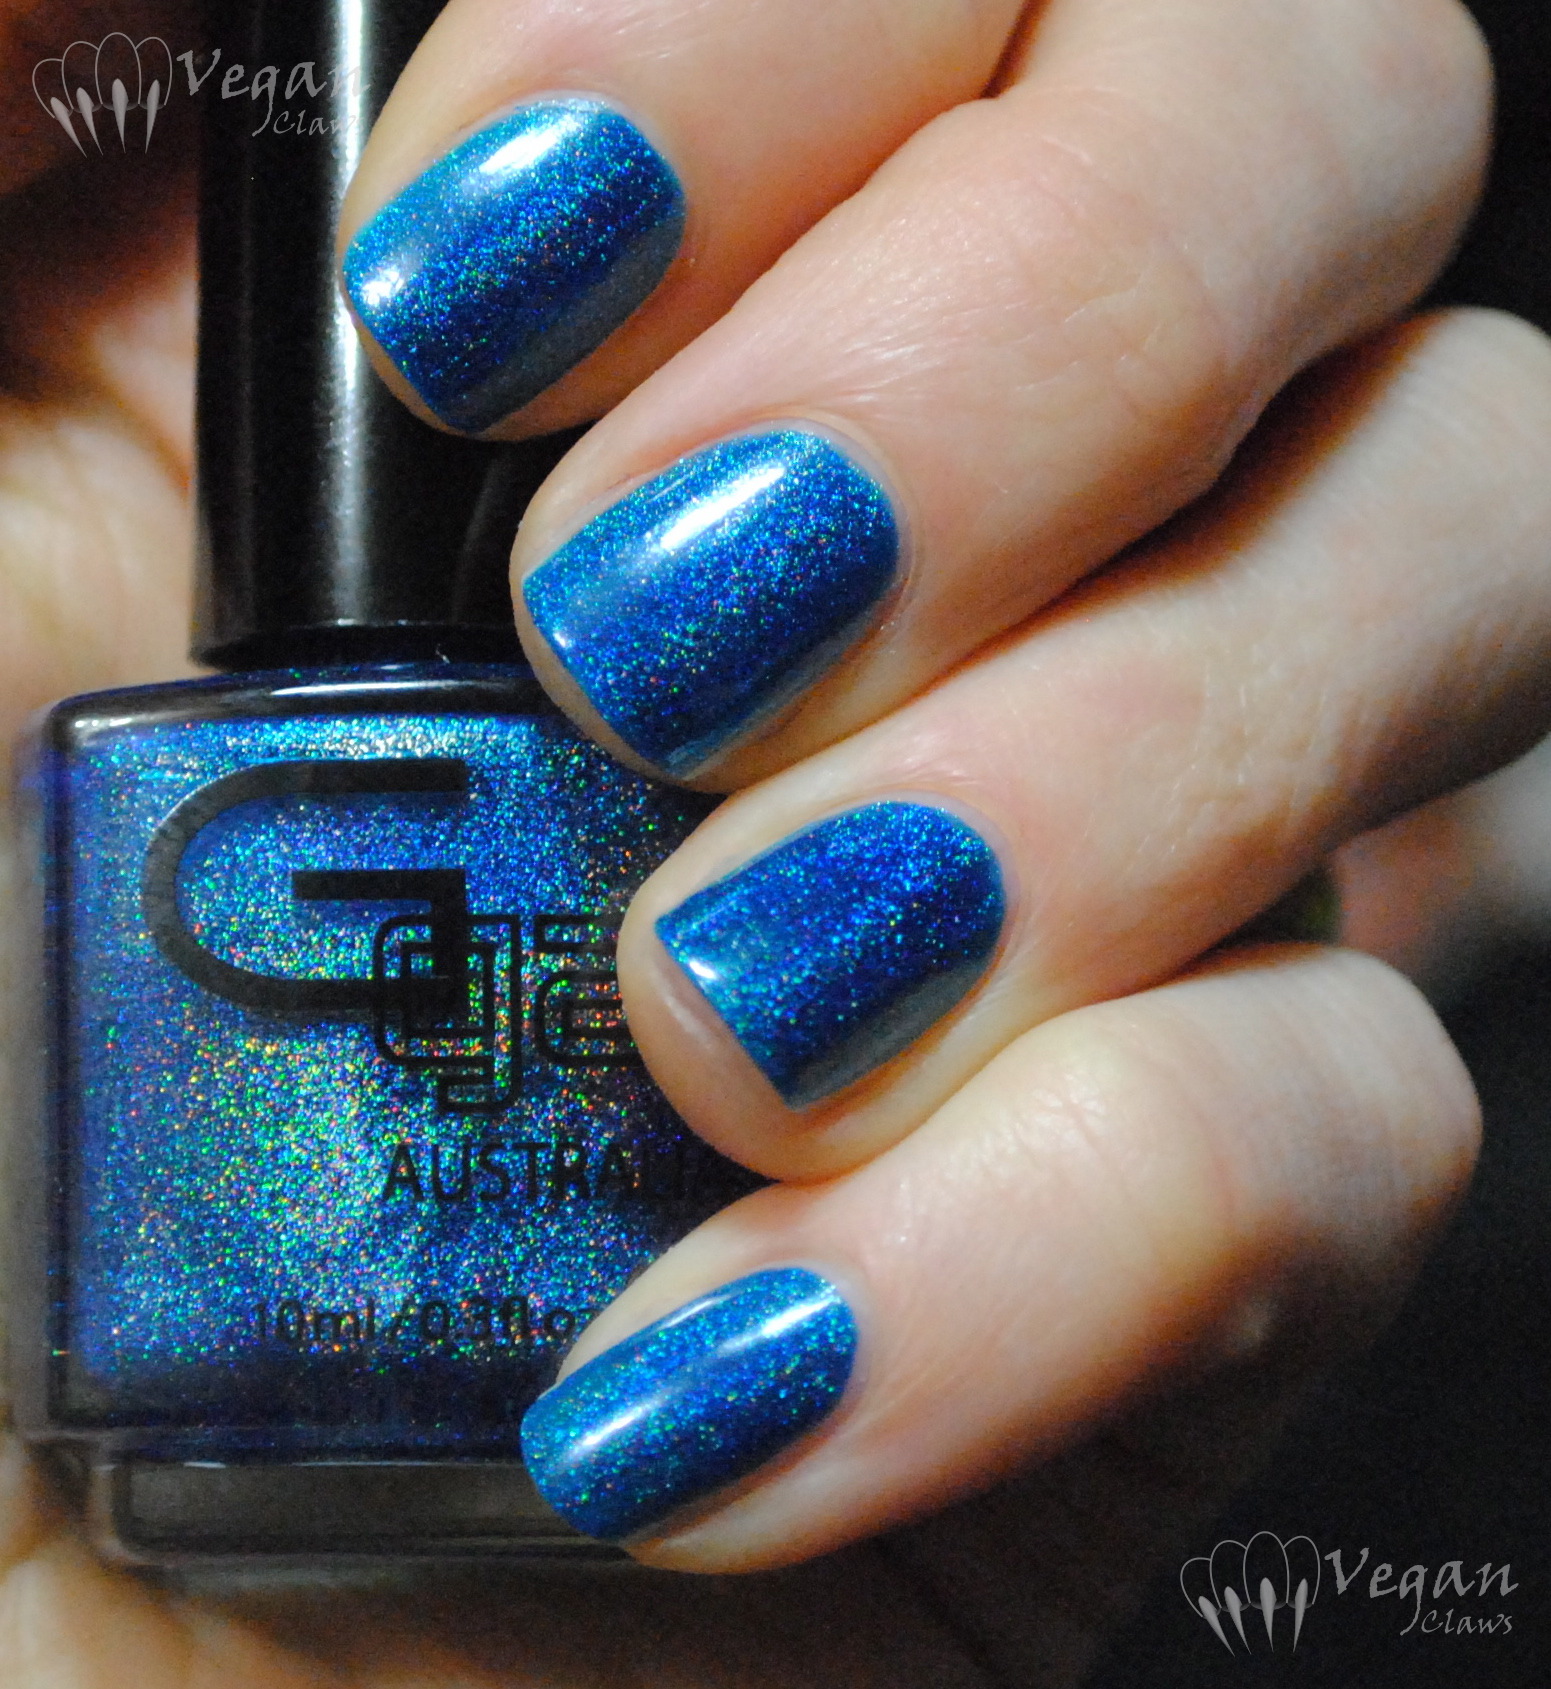
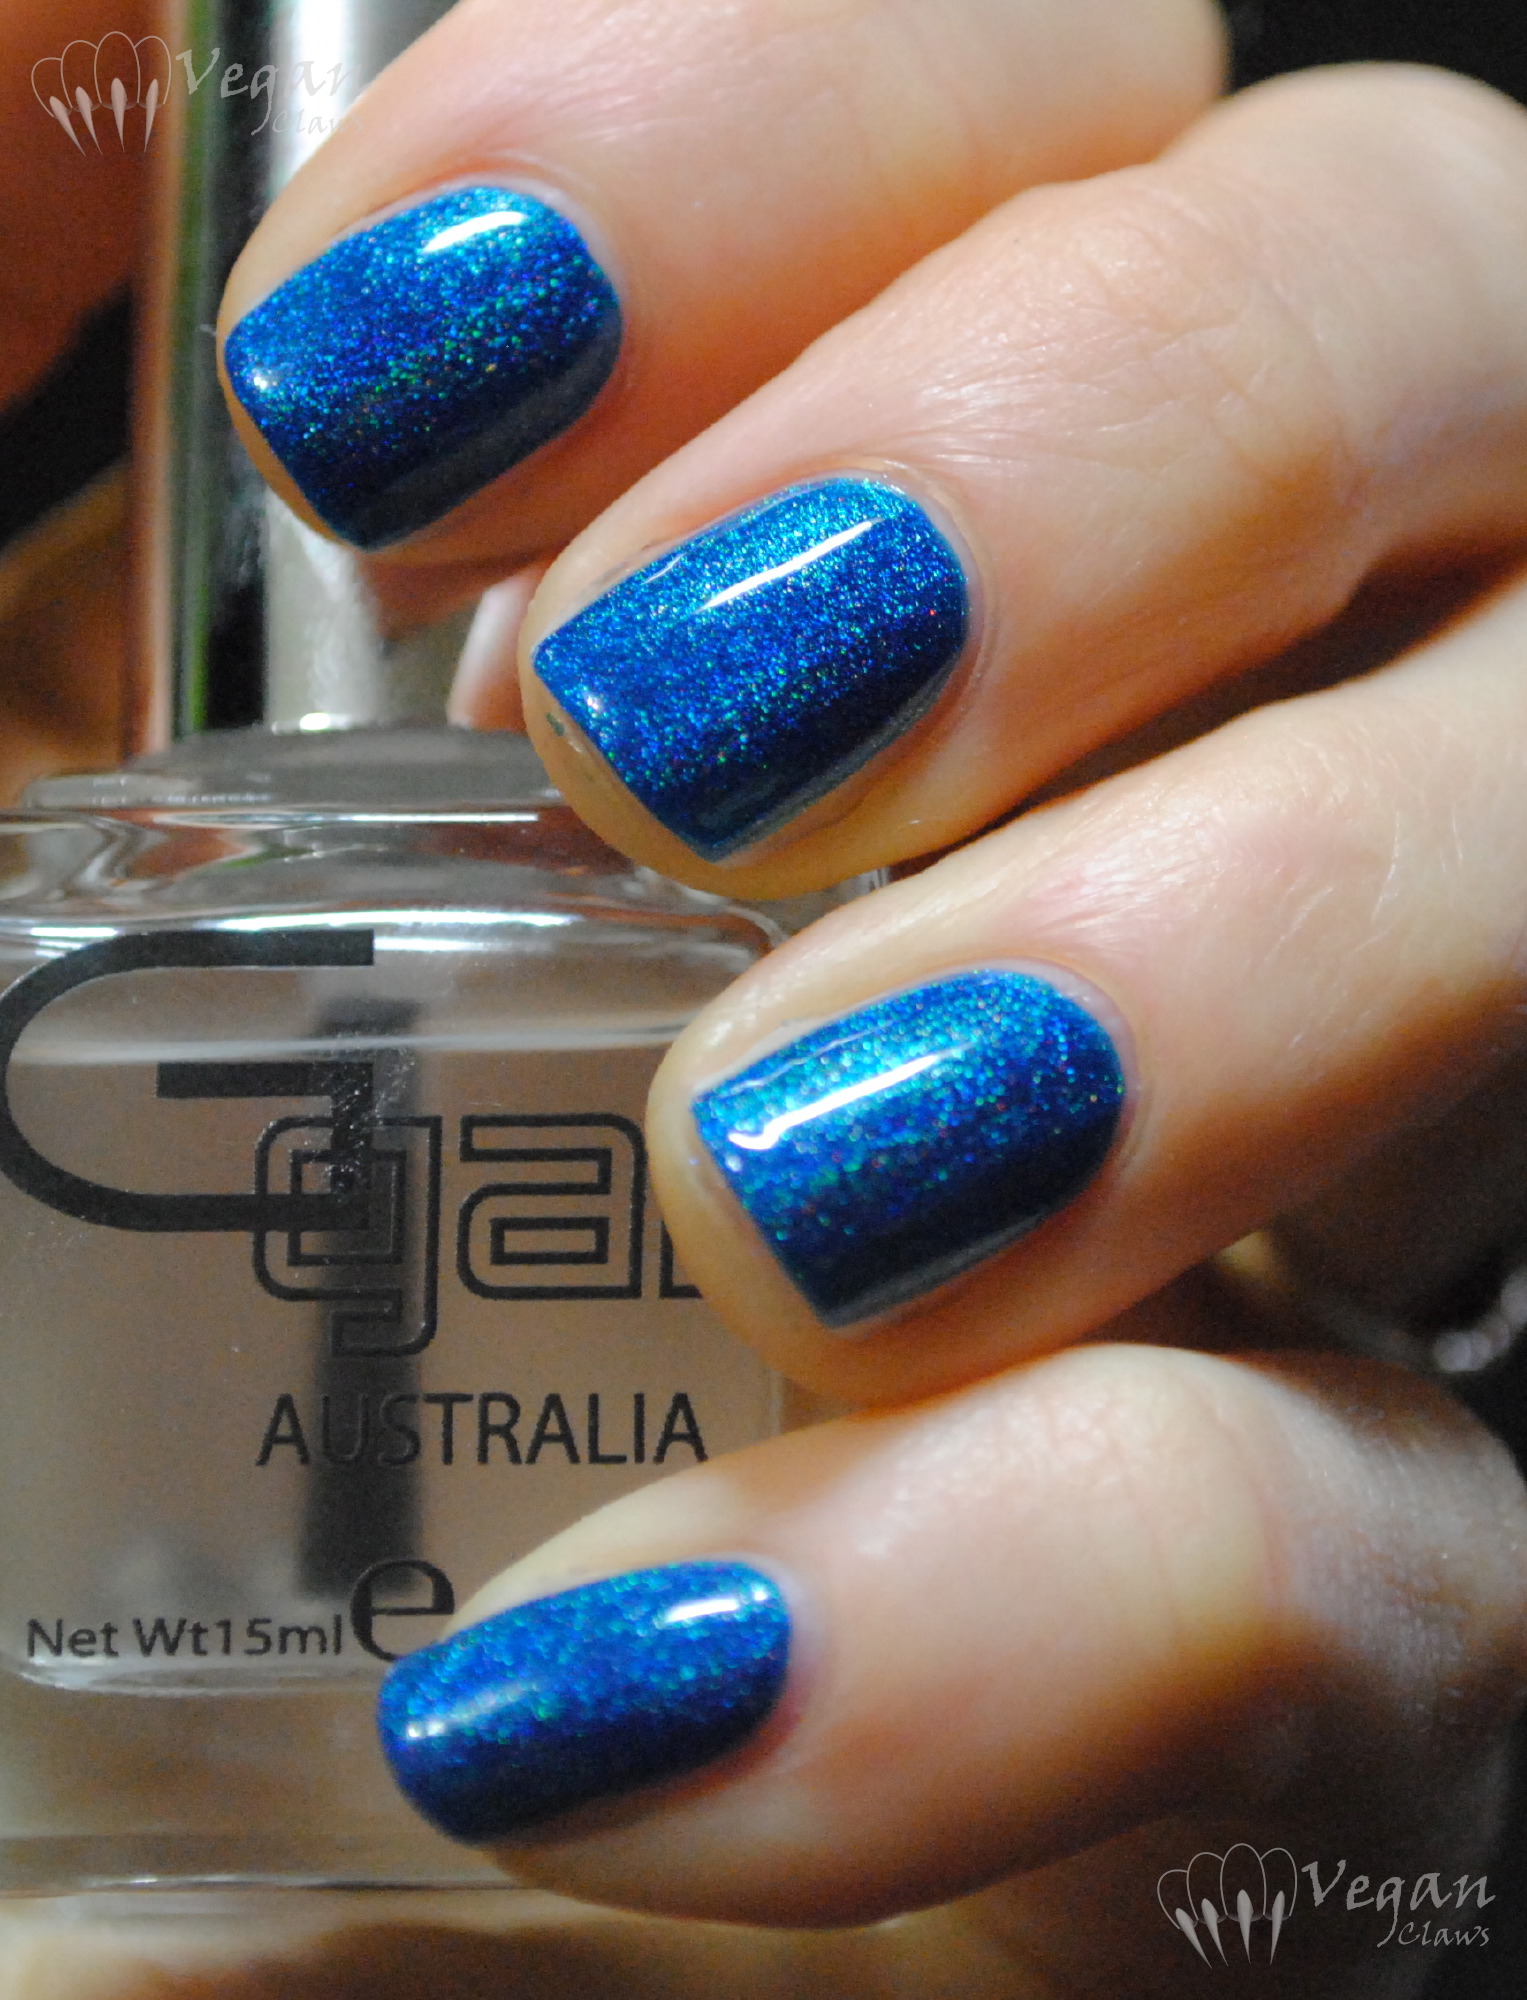
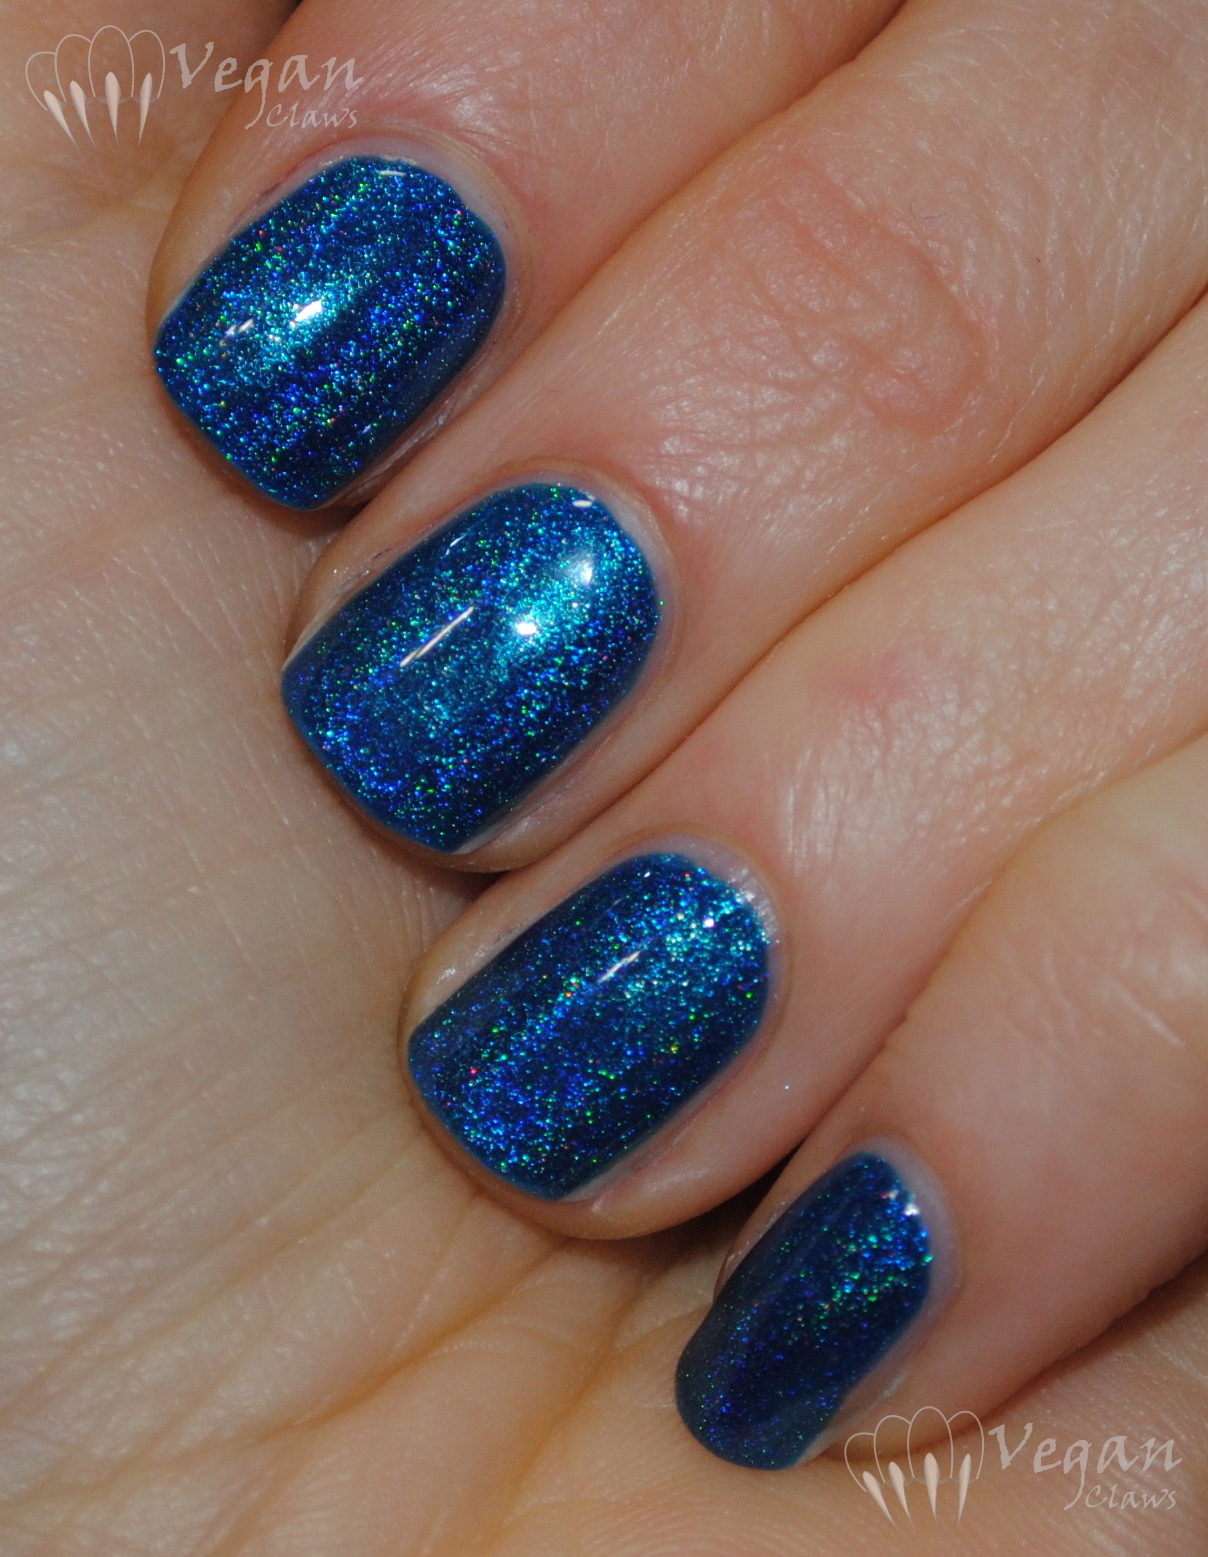
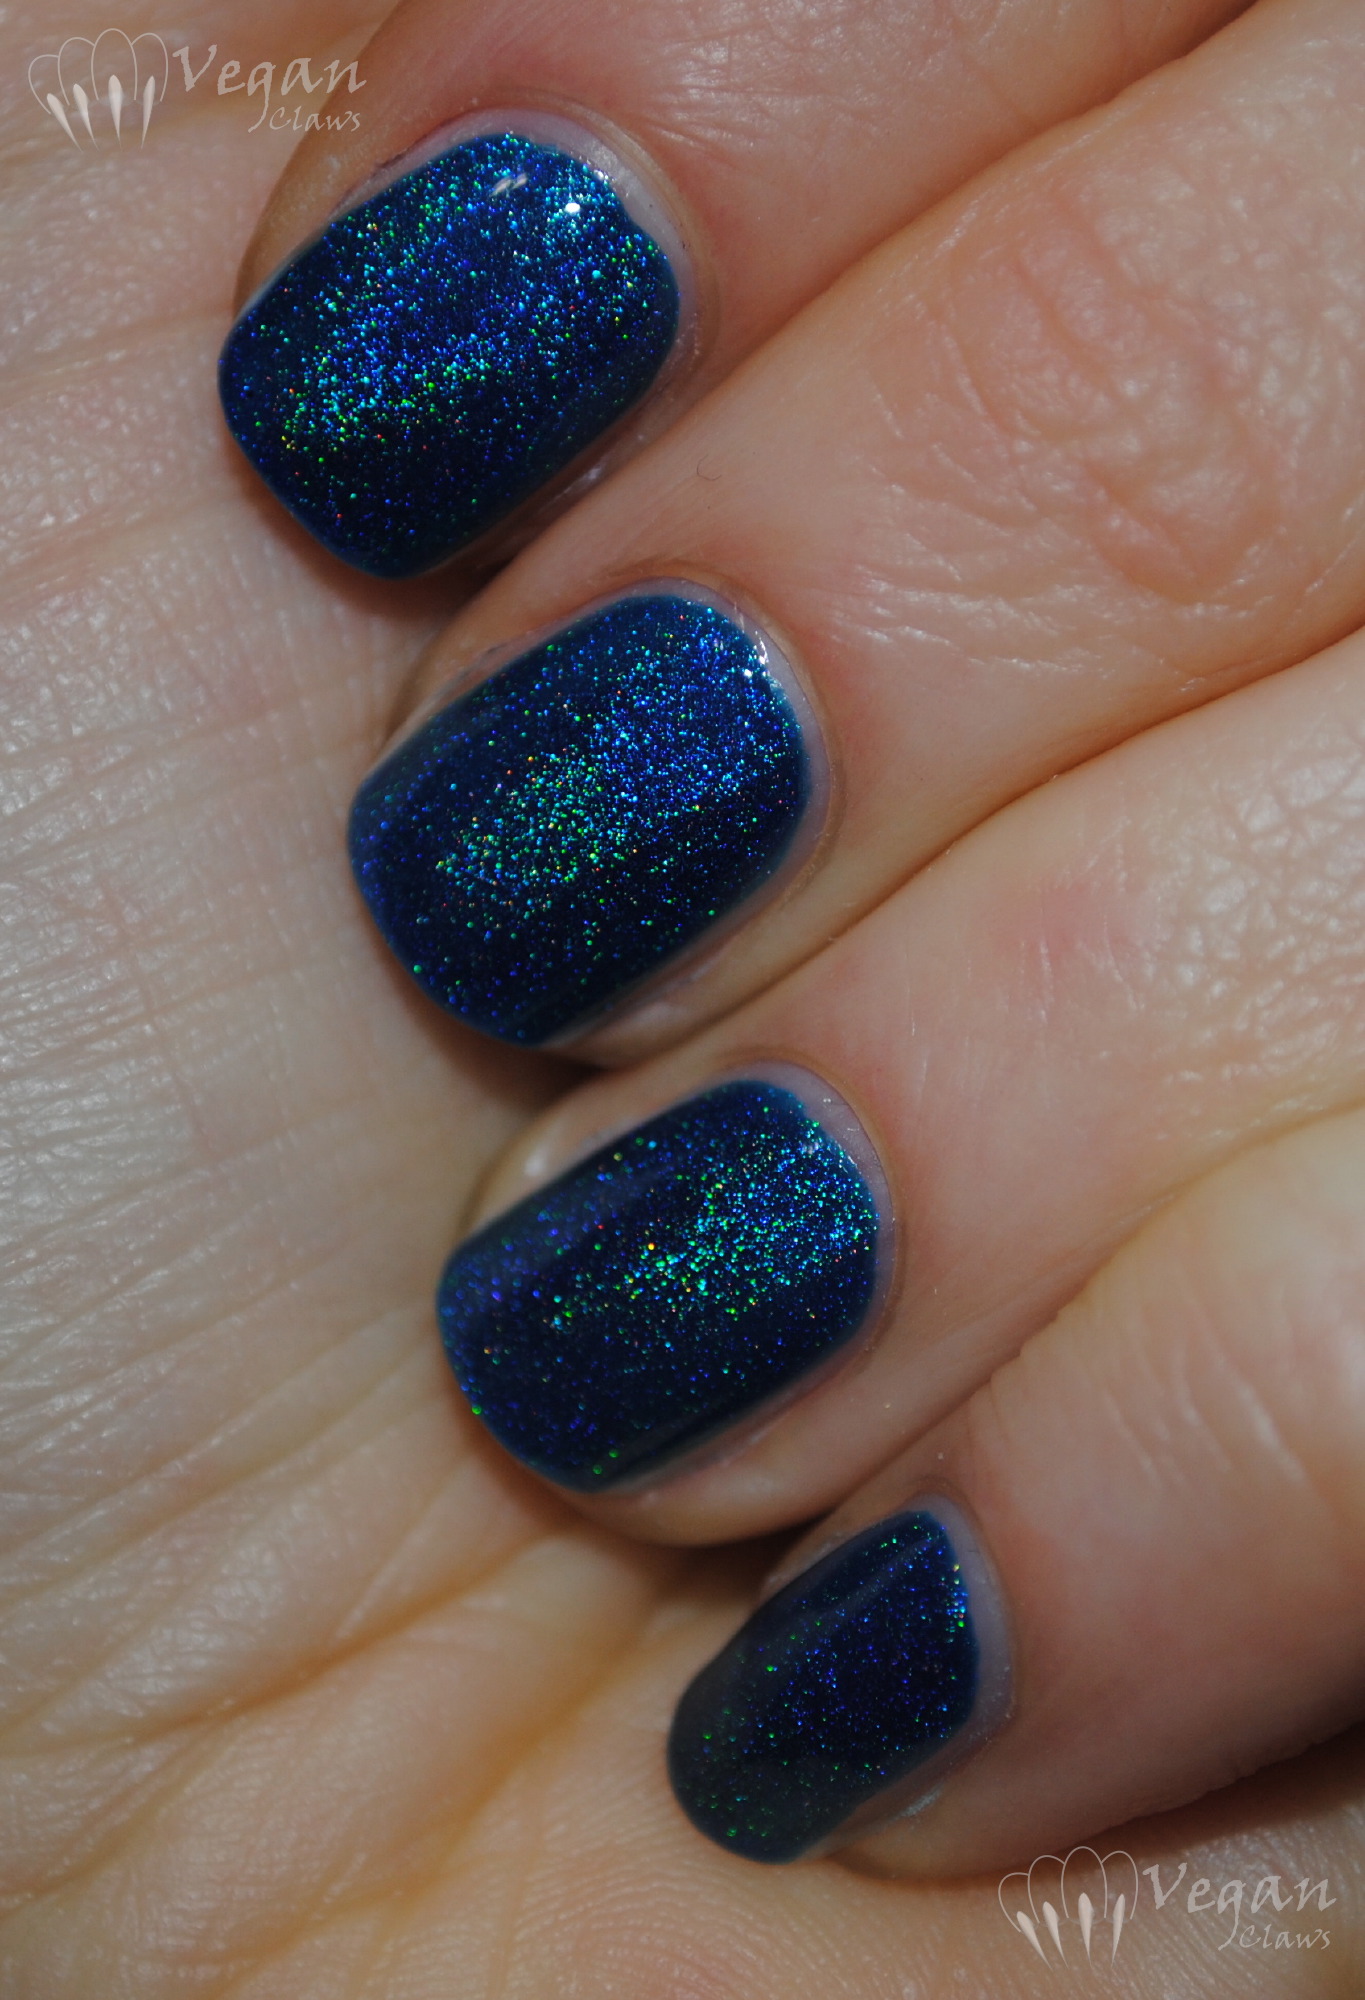
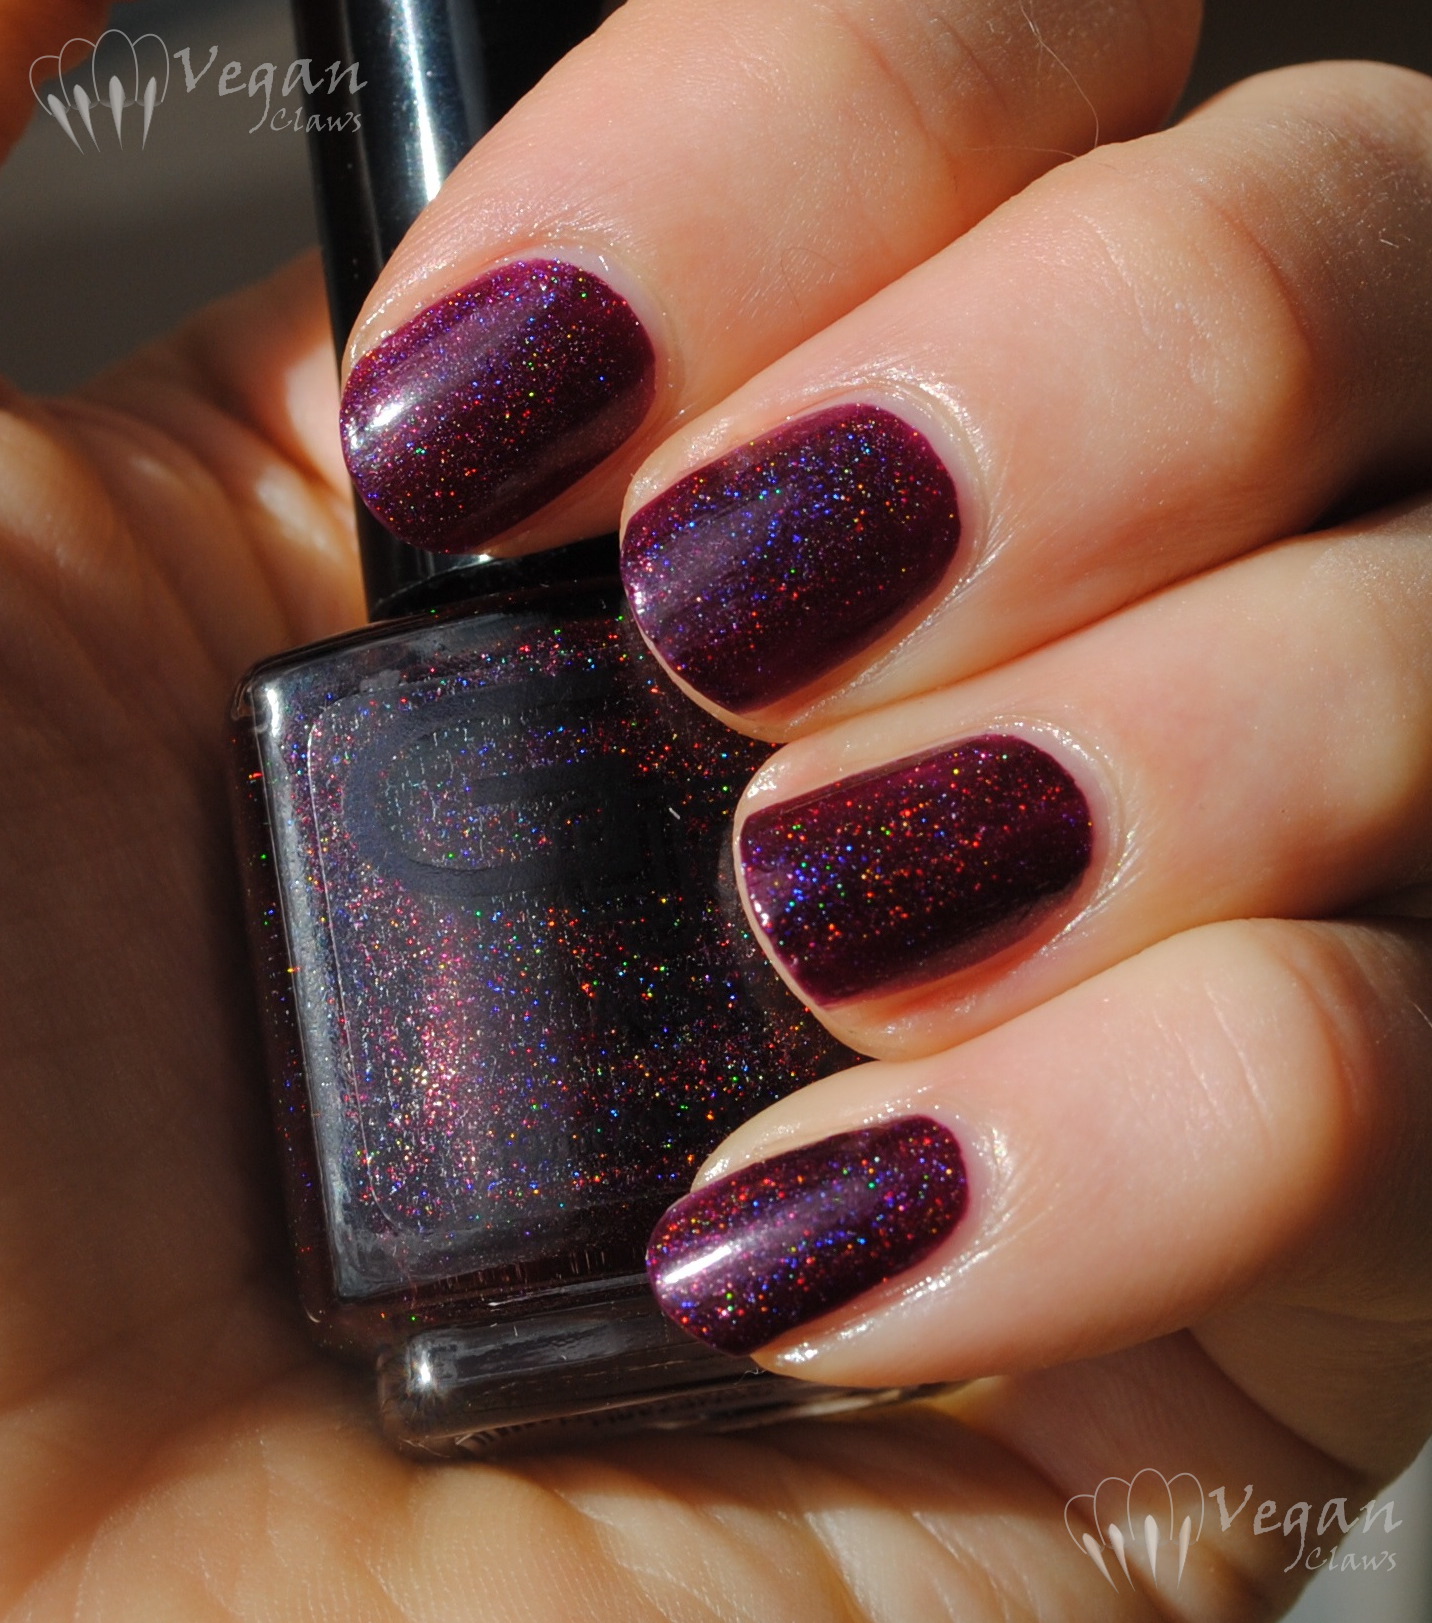
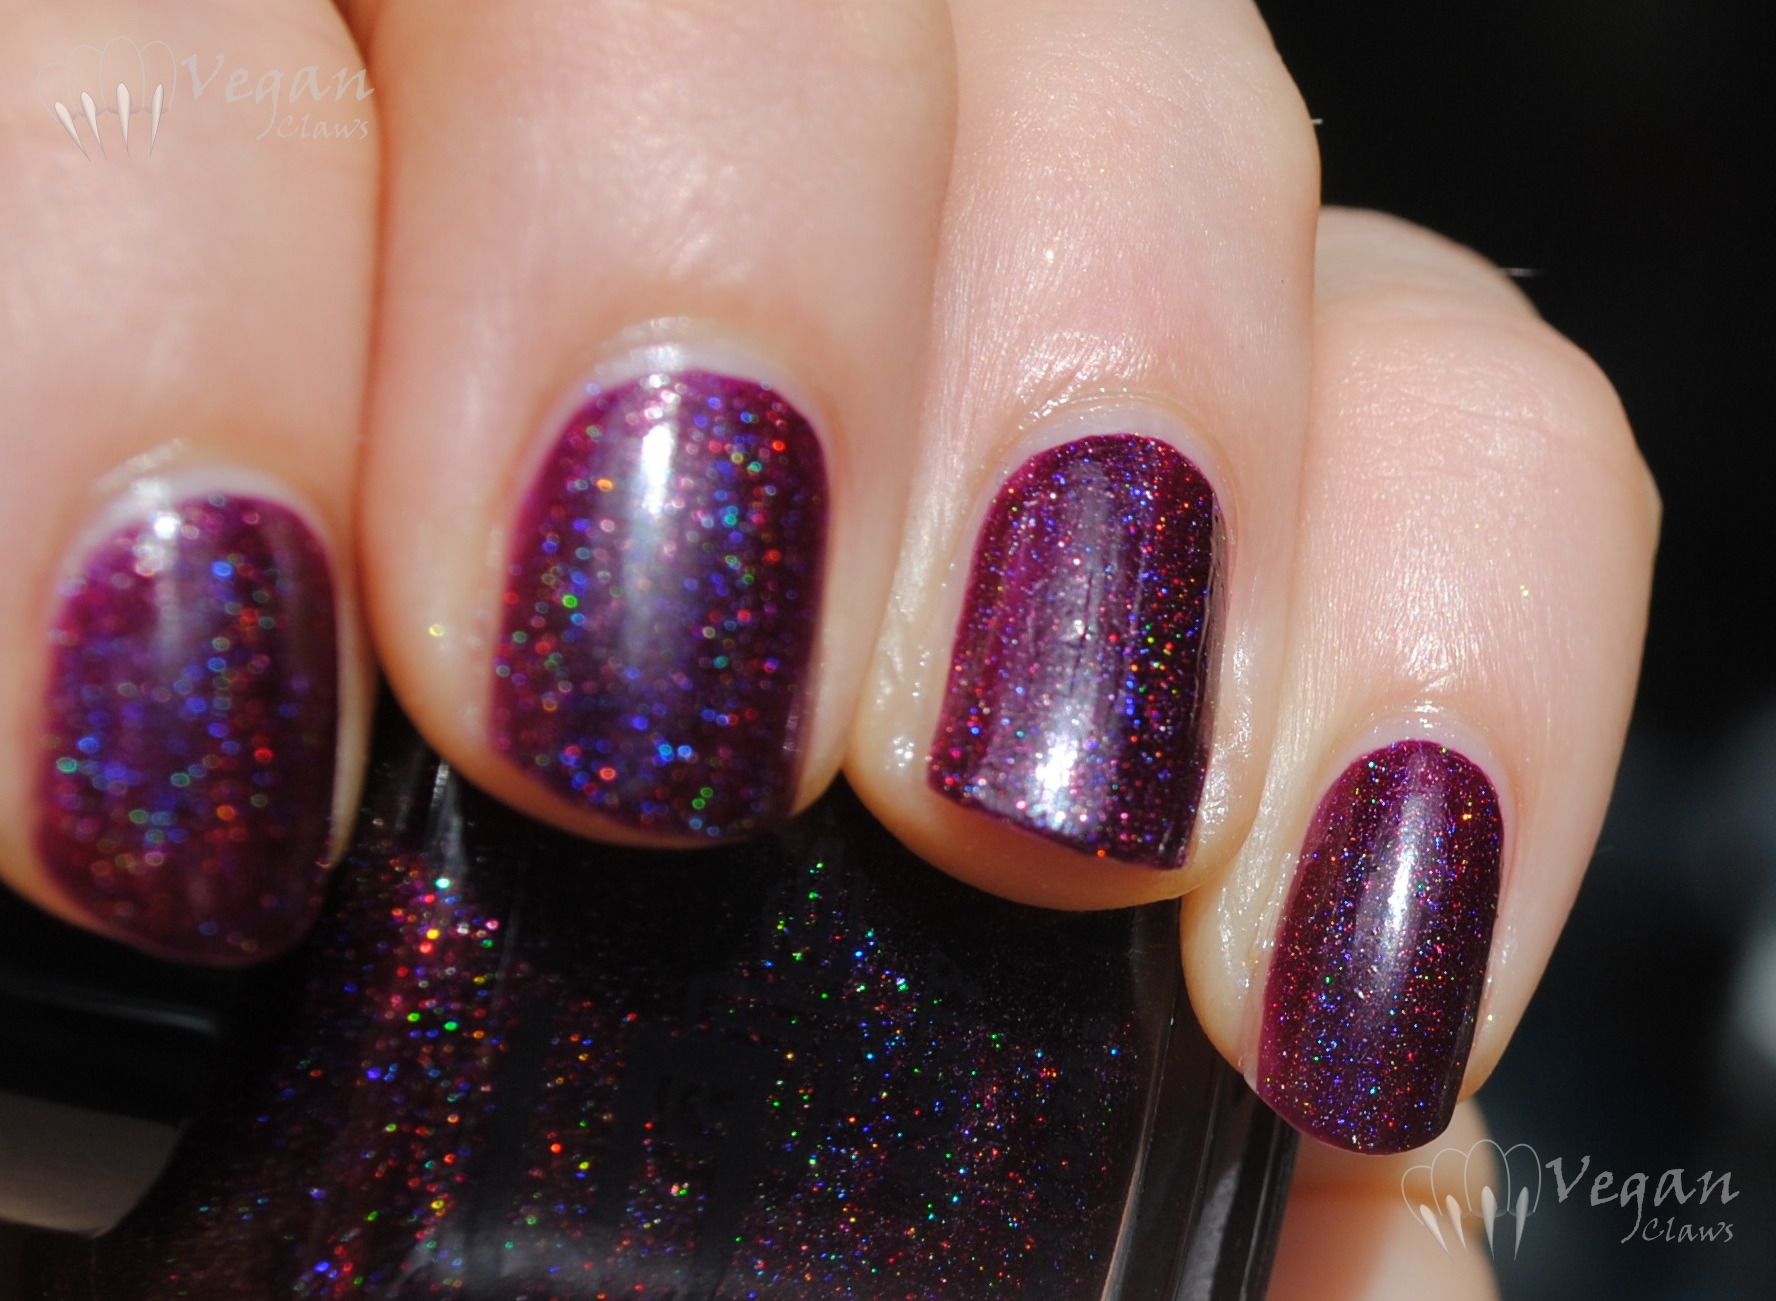
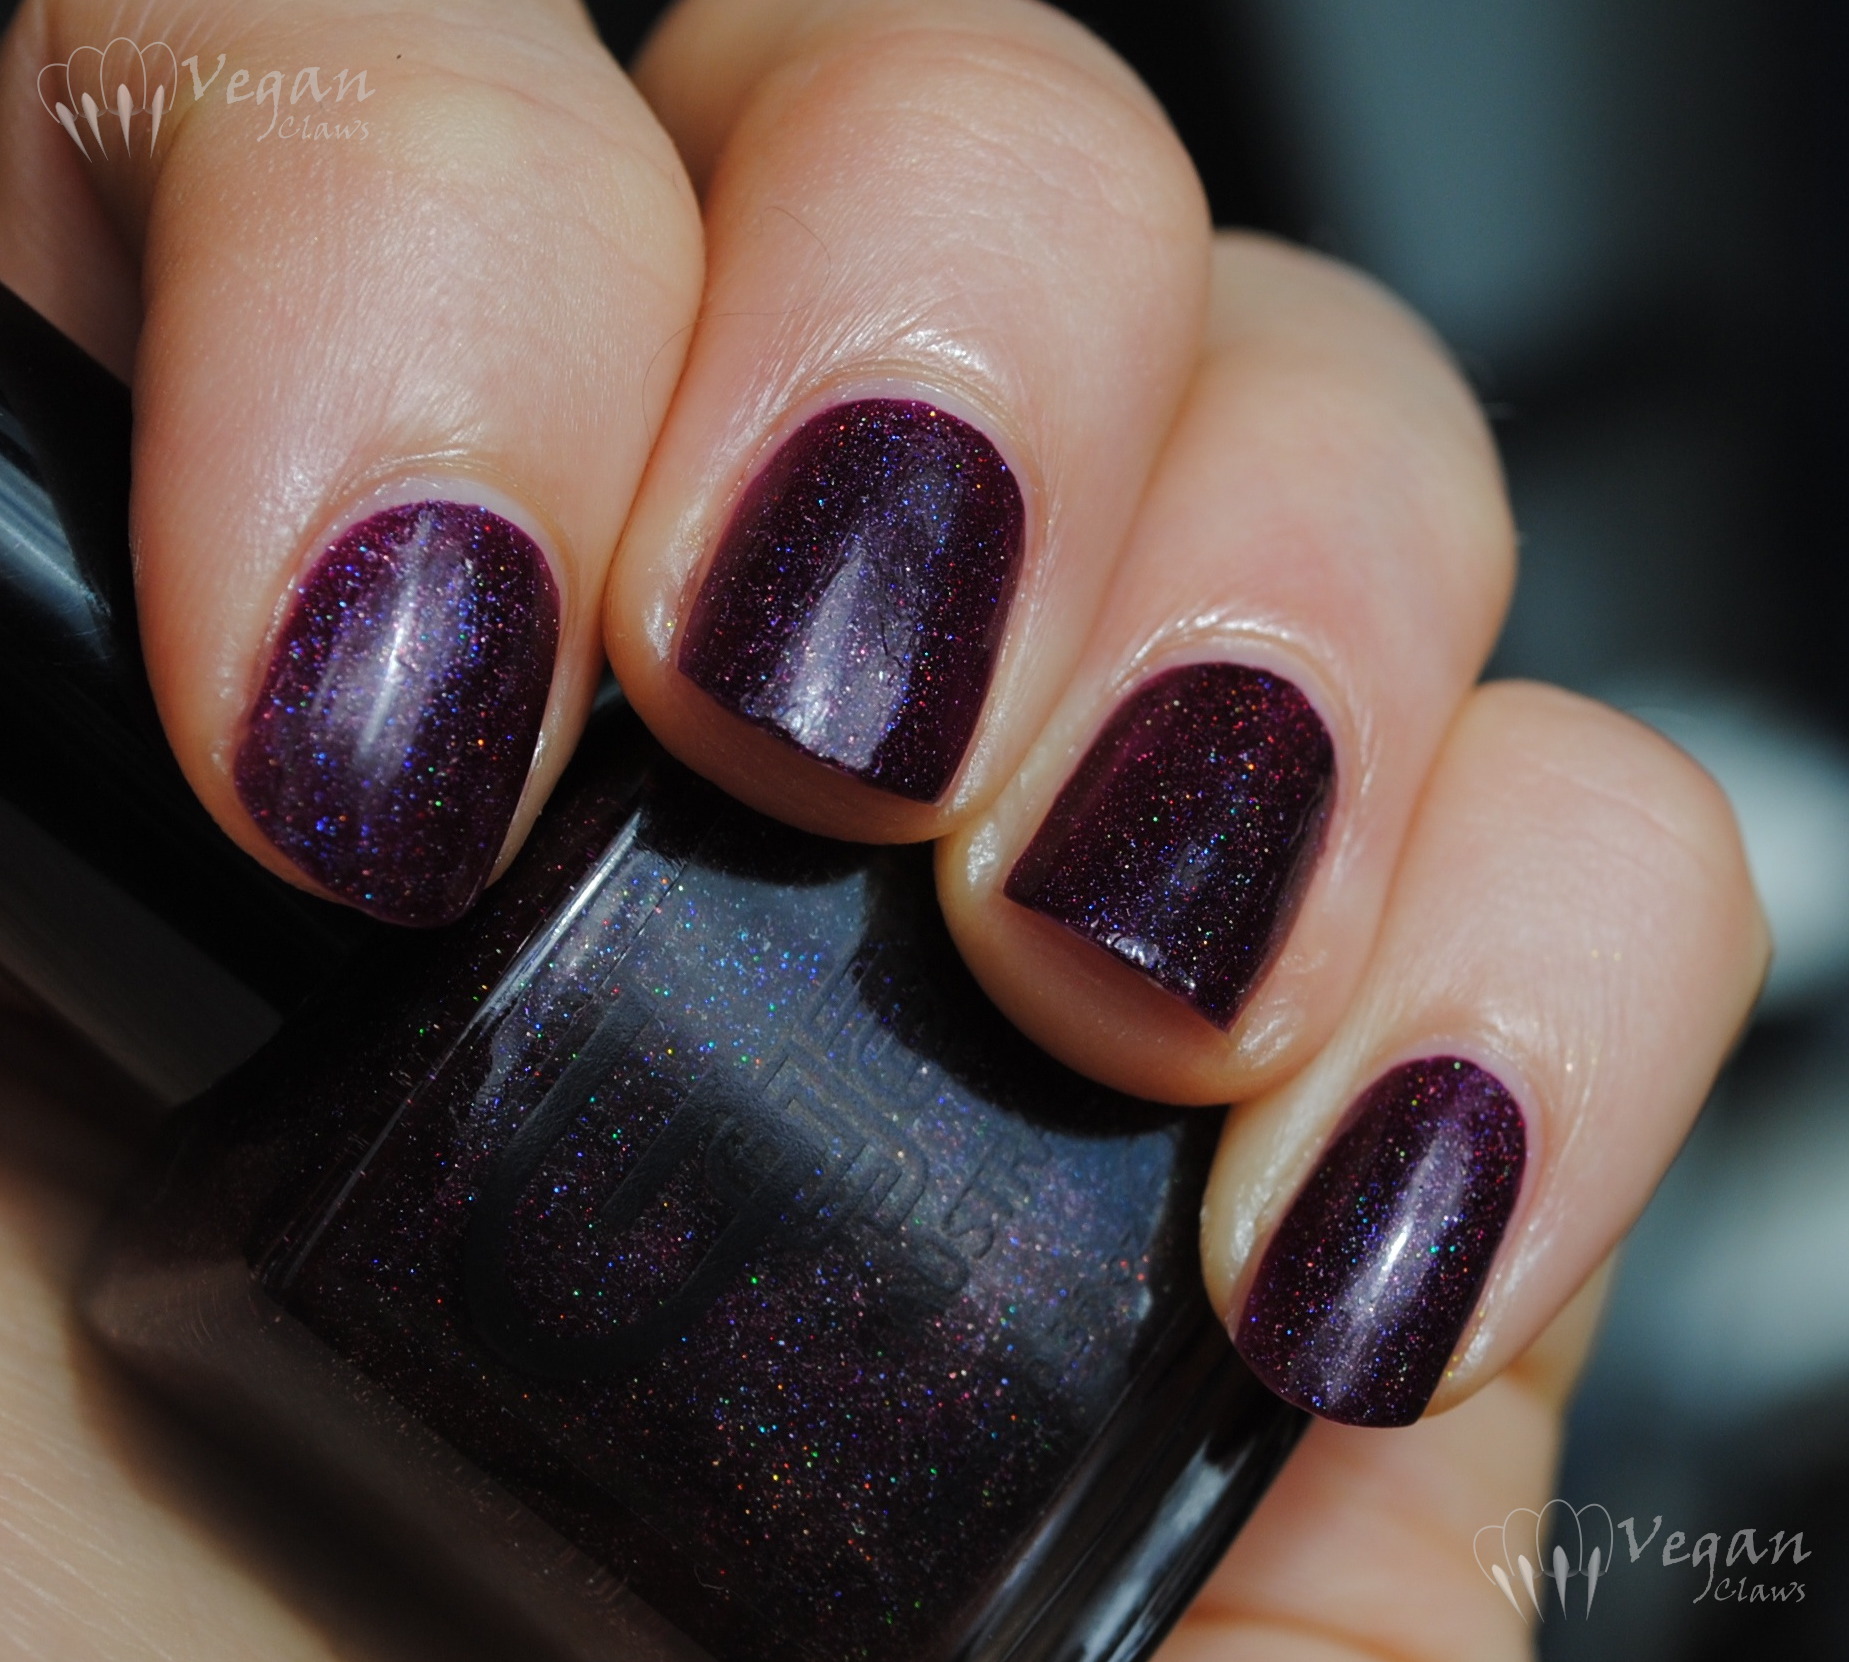
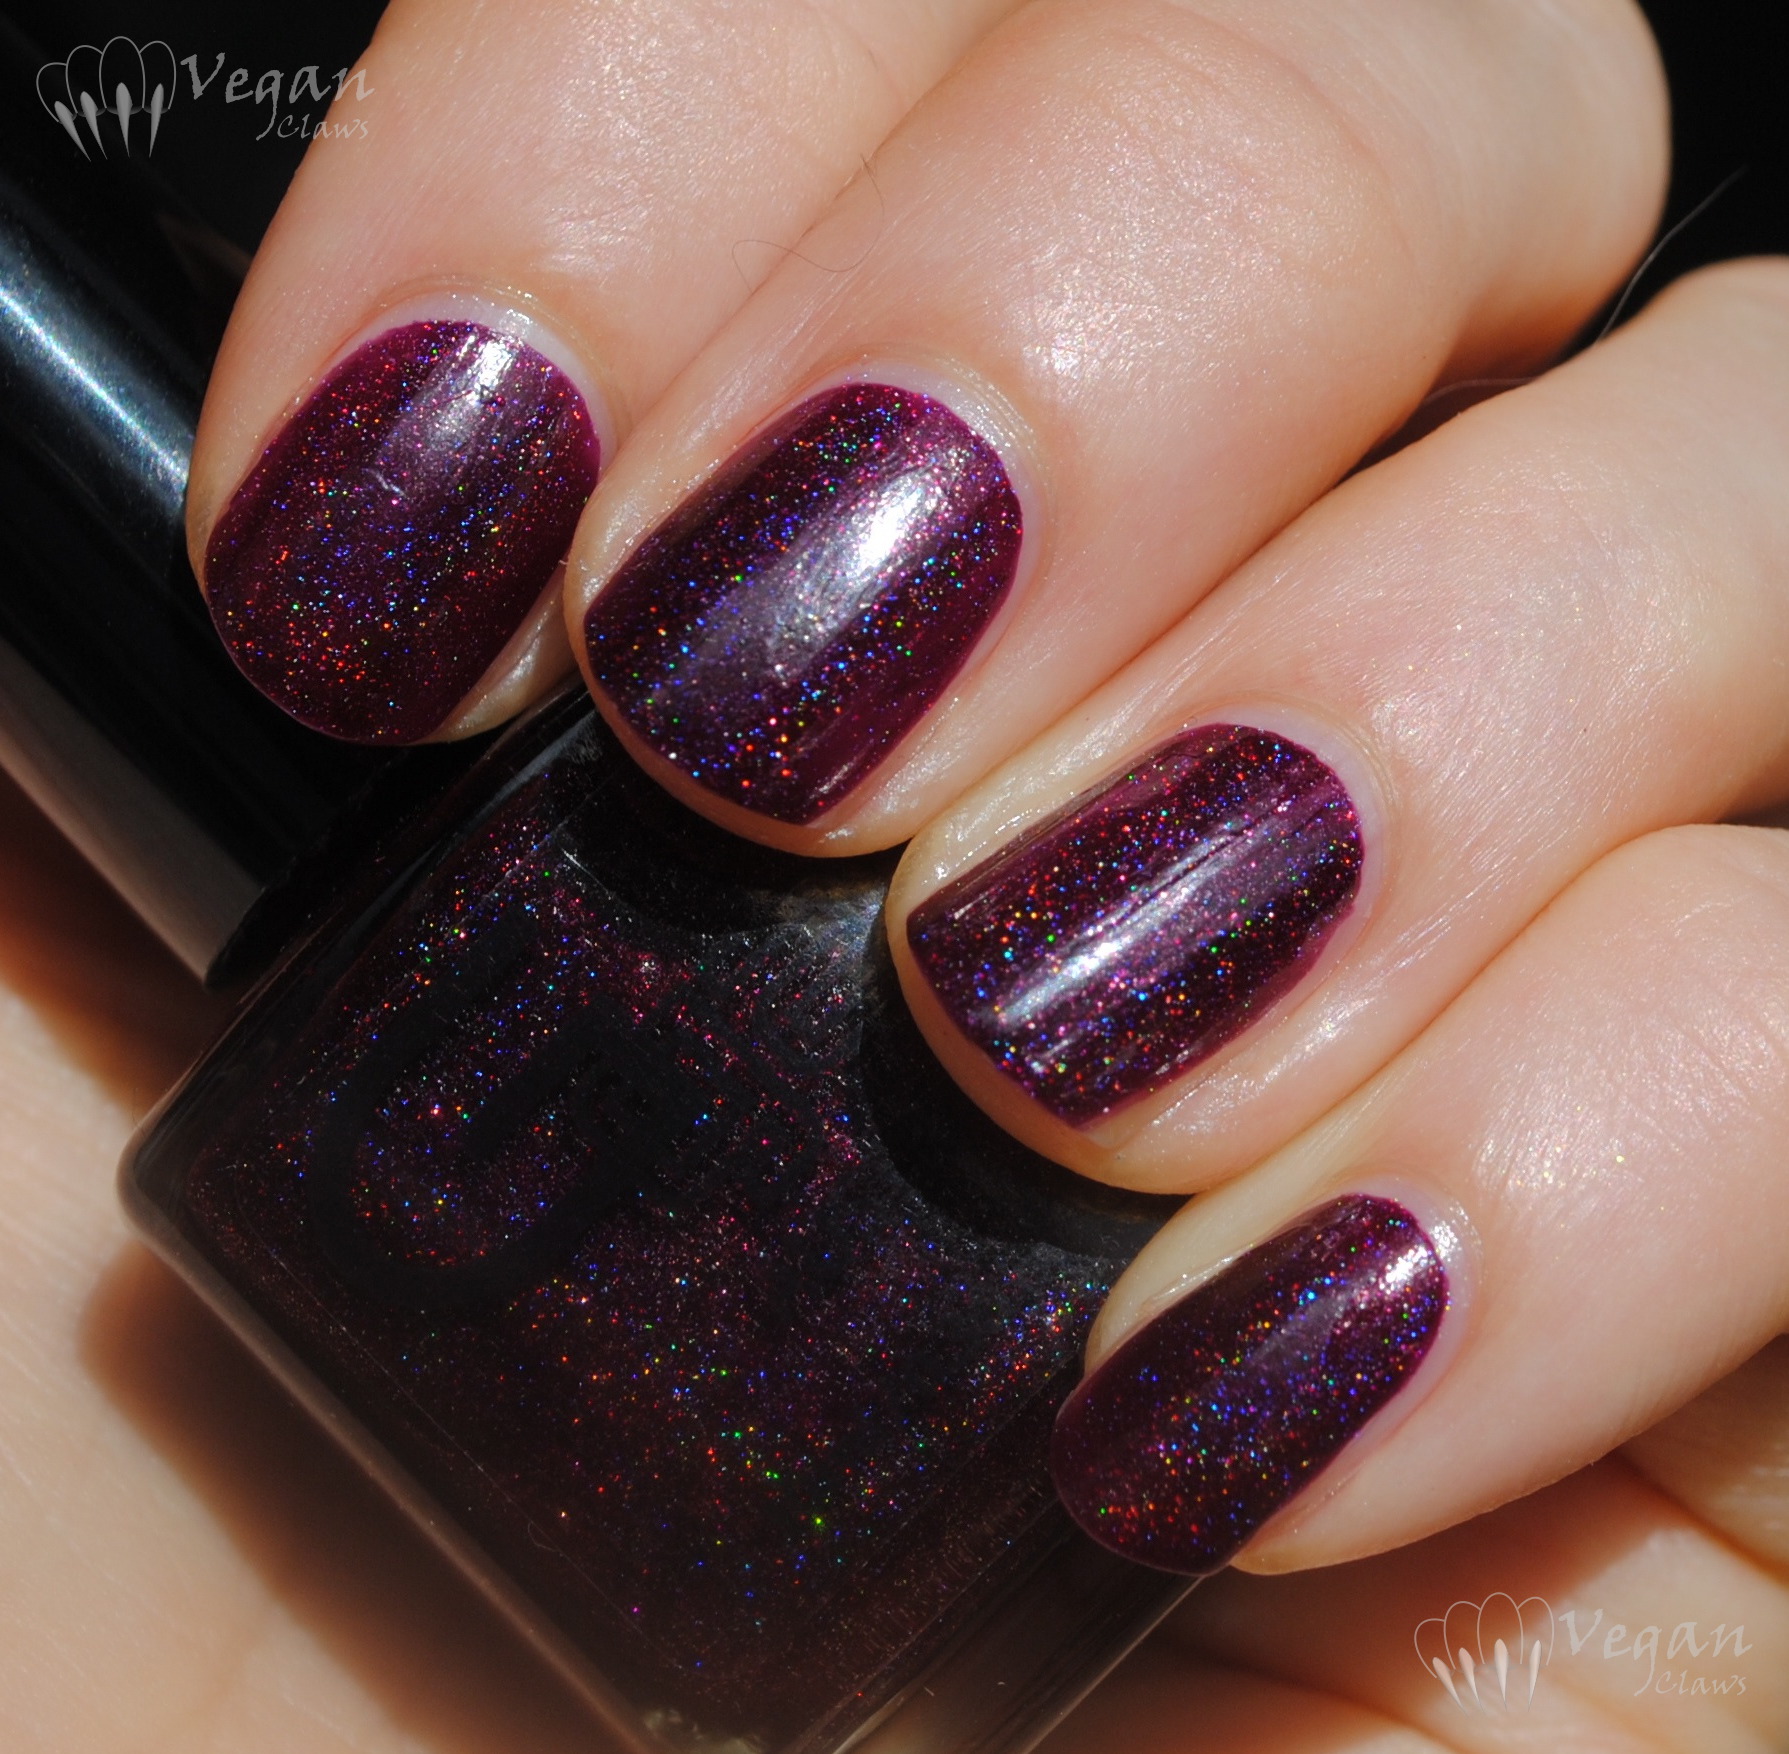
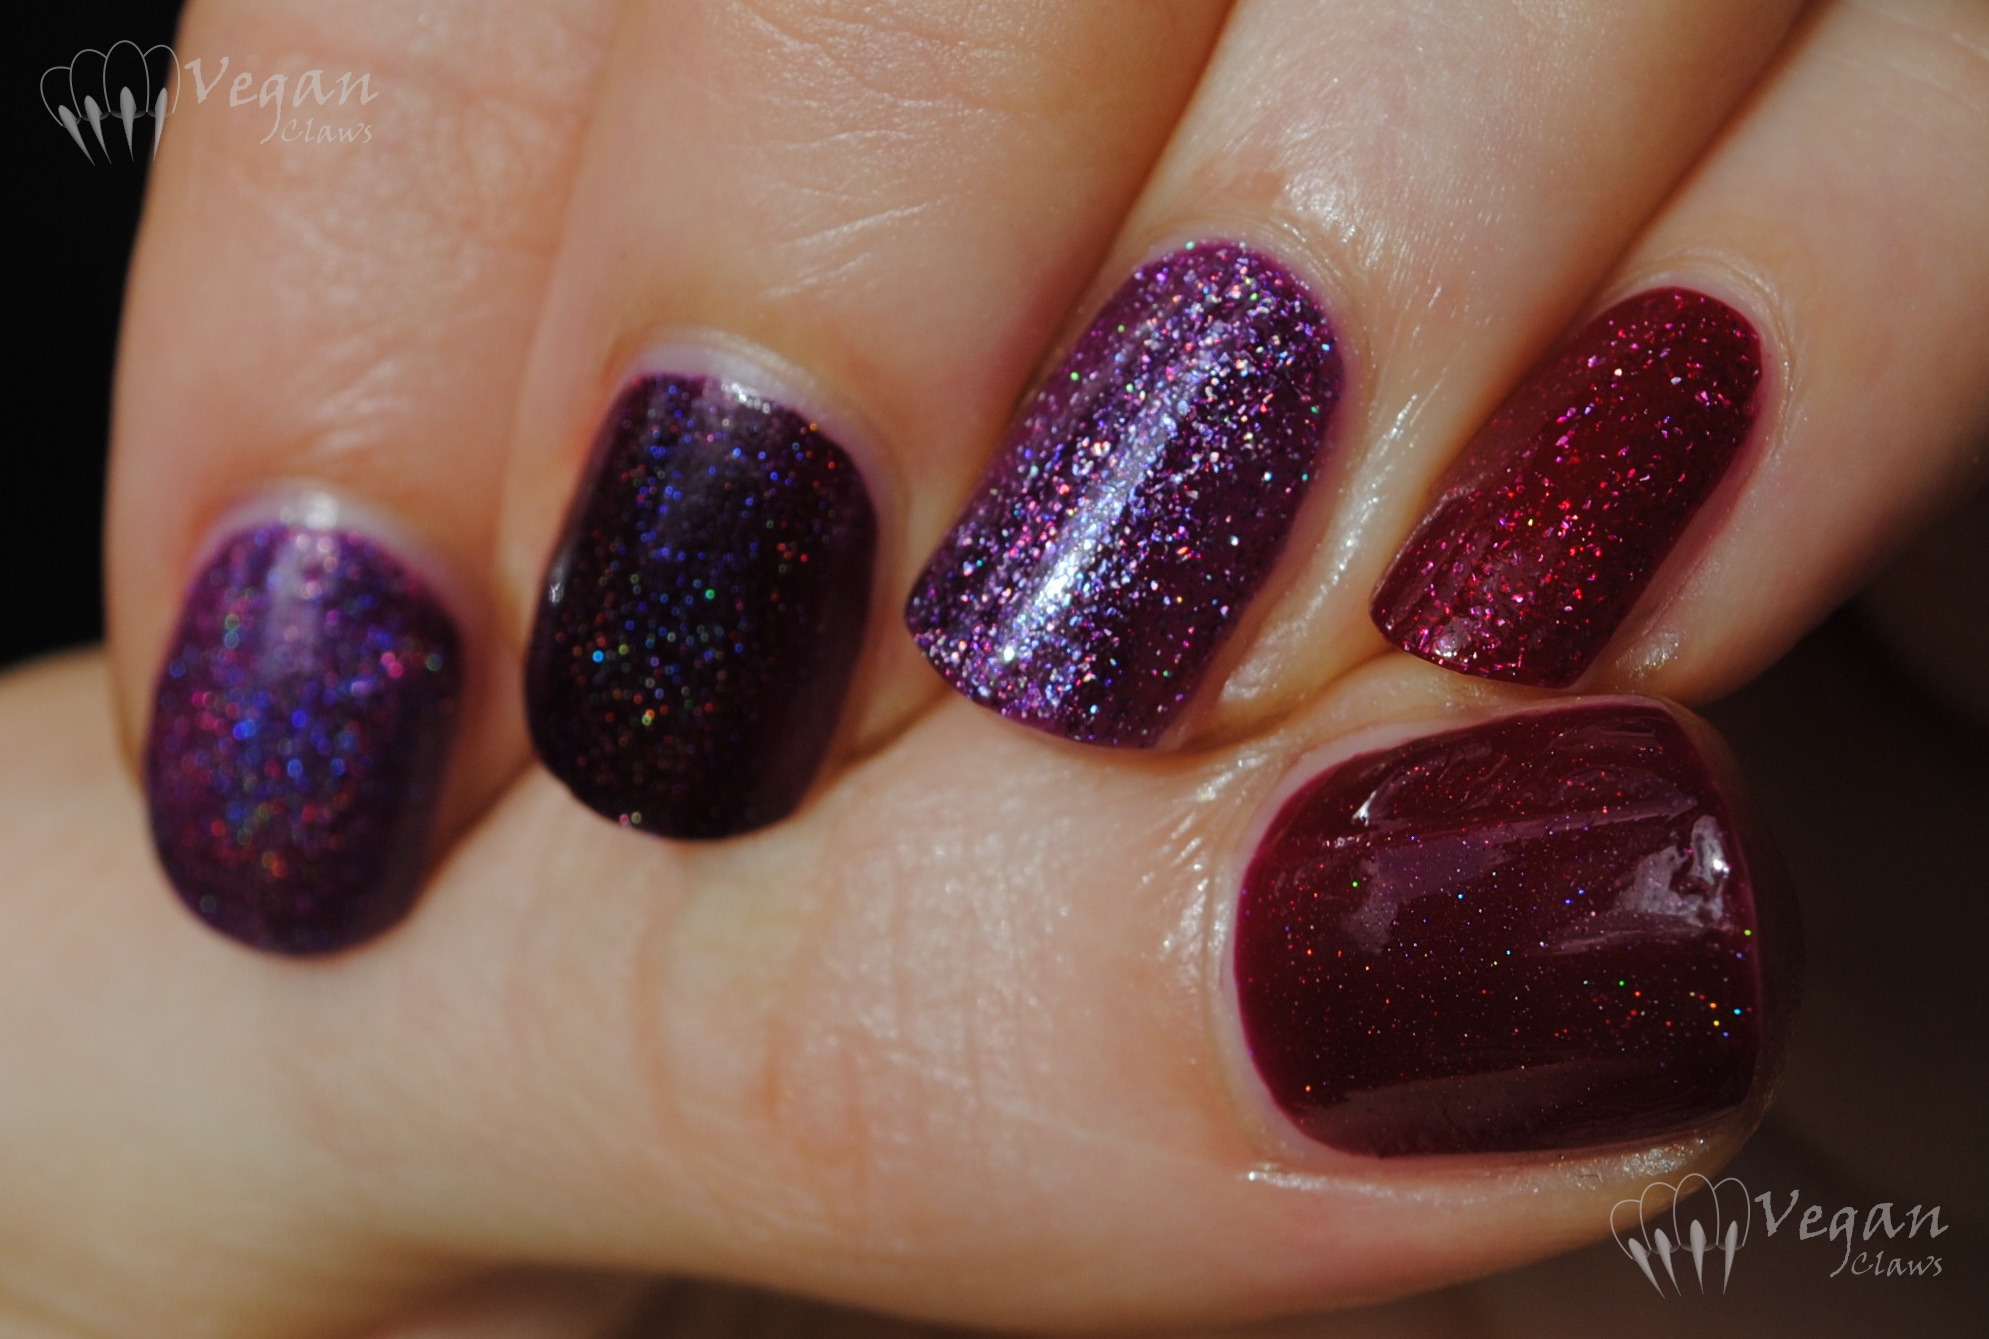
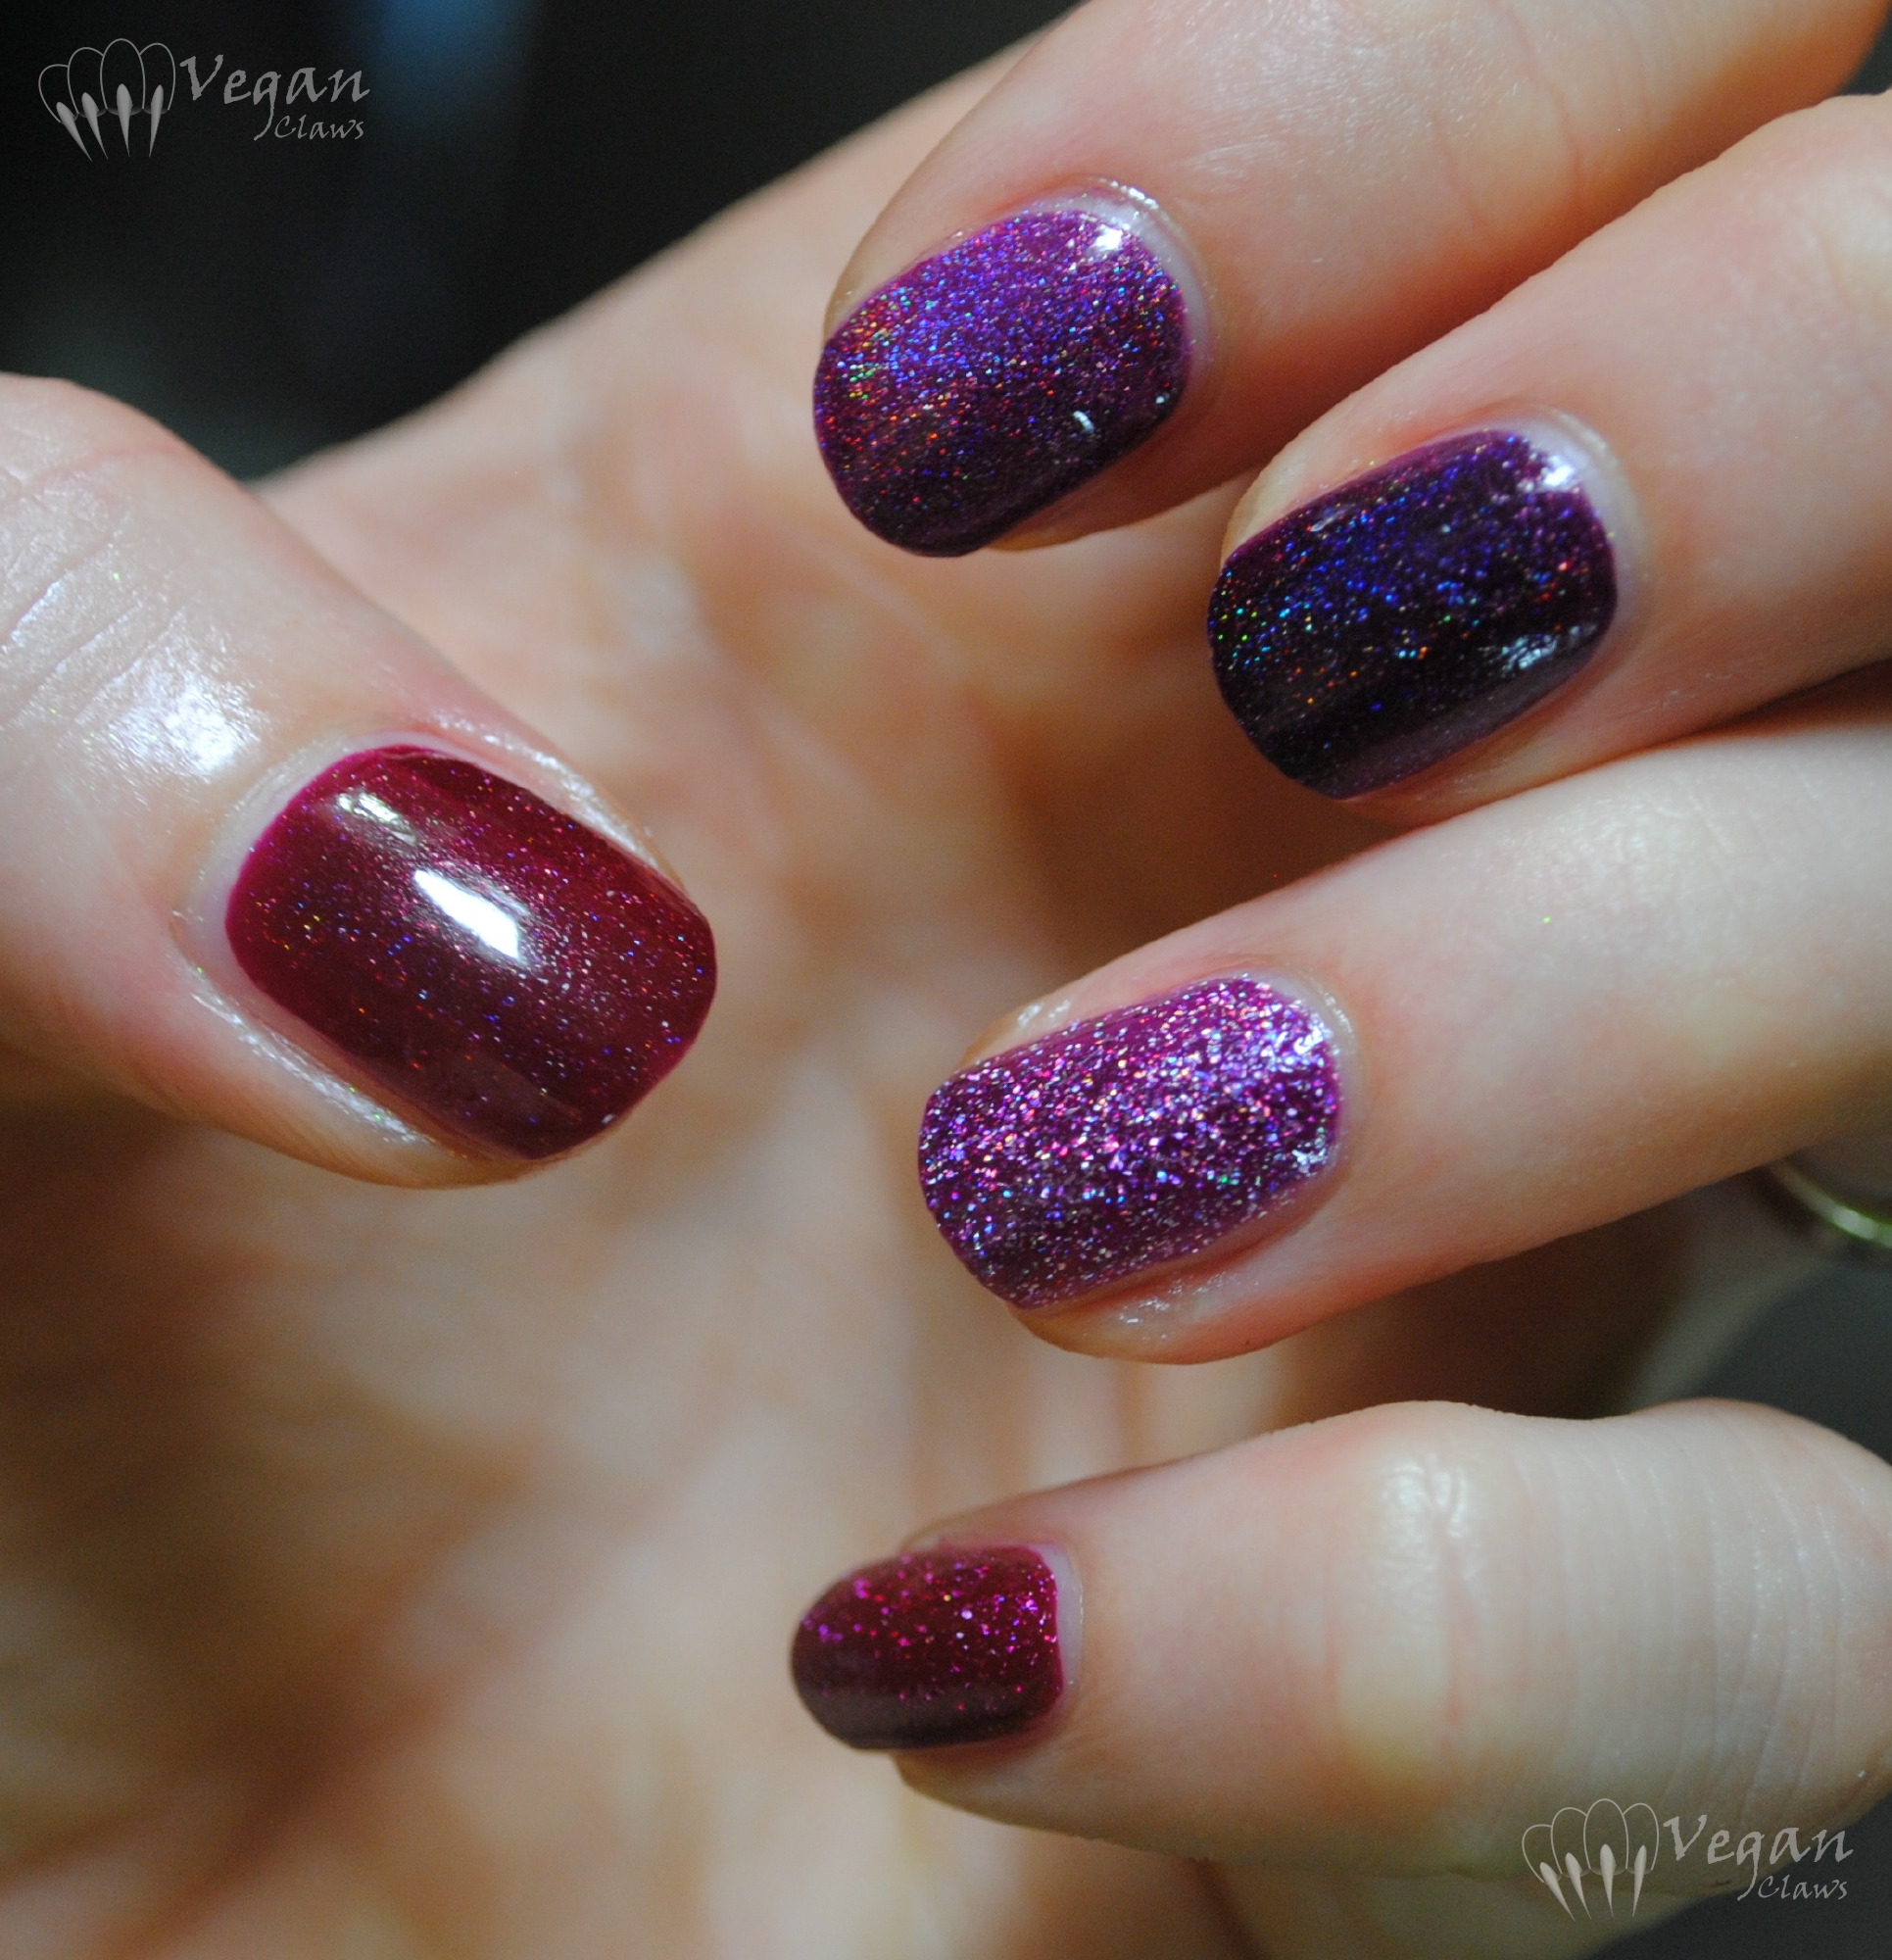
Nail polish! A set of four minis from the Color Club Harlem Lights collection. I’ll be giving these babies their own swatch post in the near future!

vegancuts

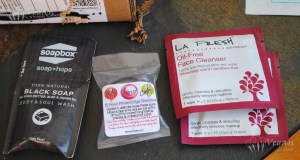
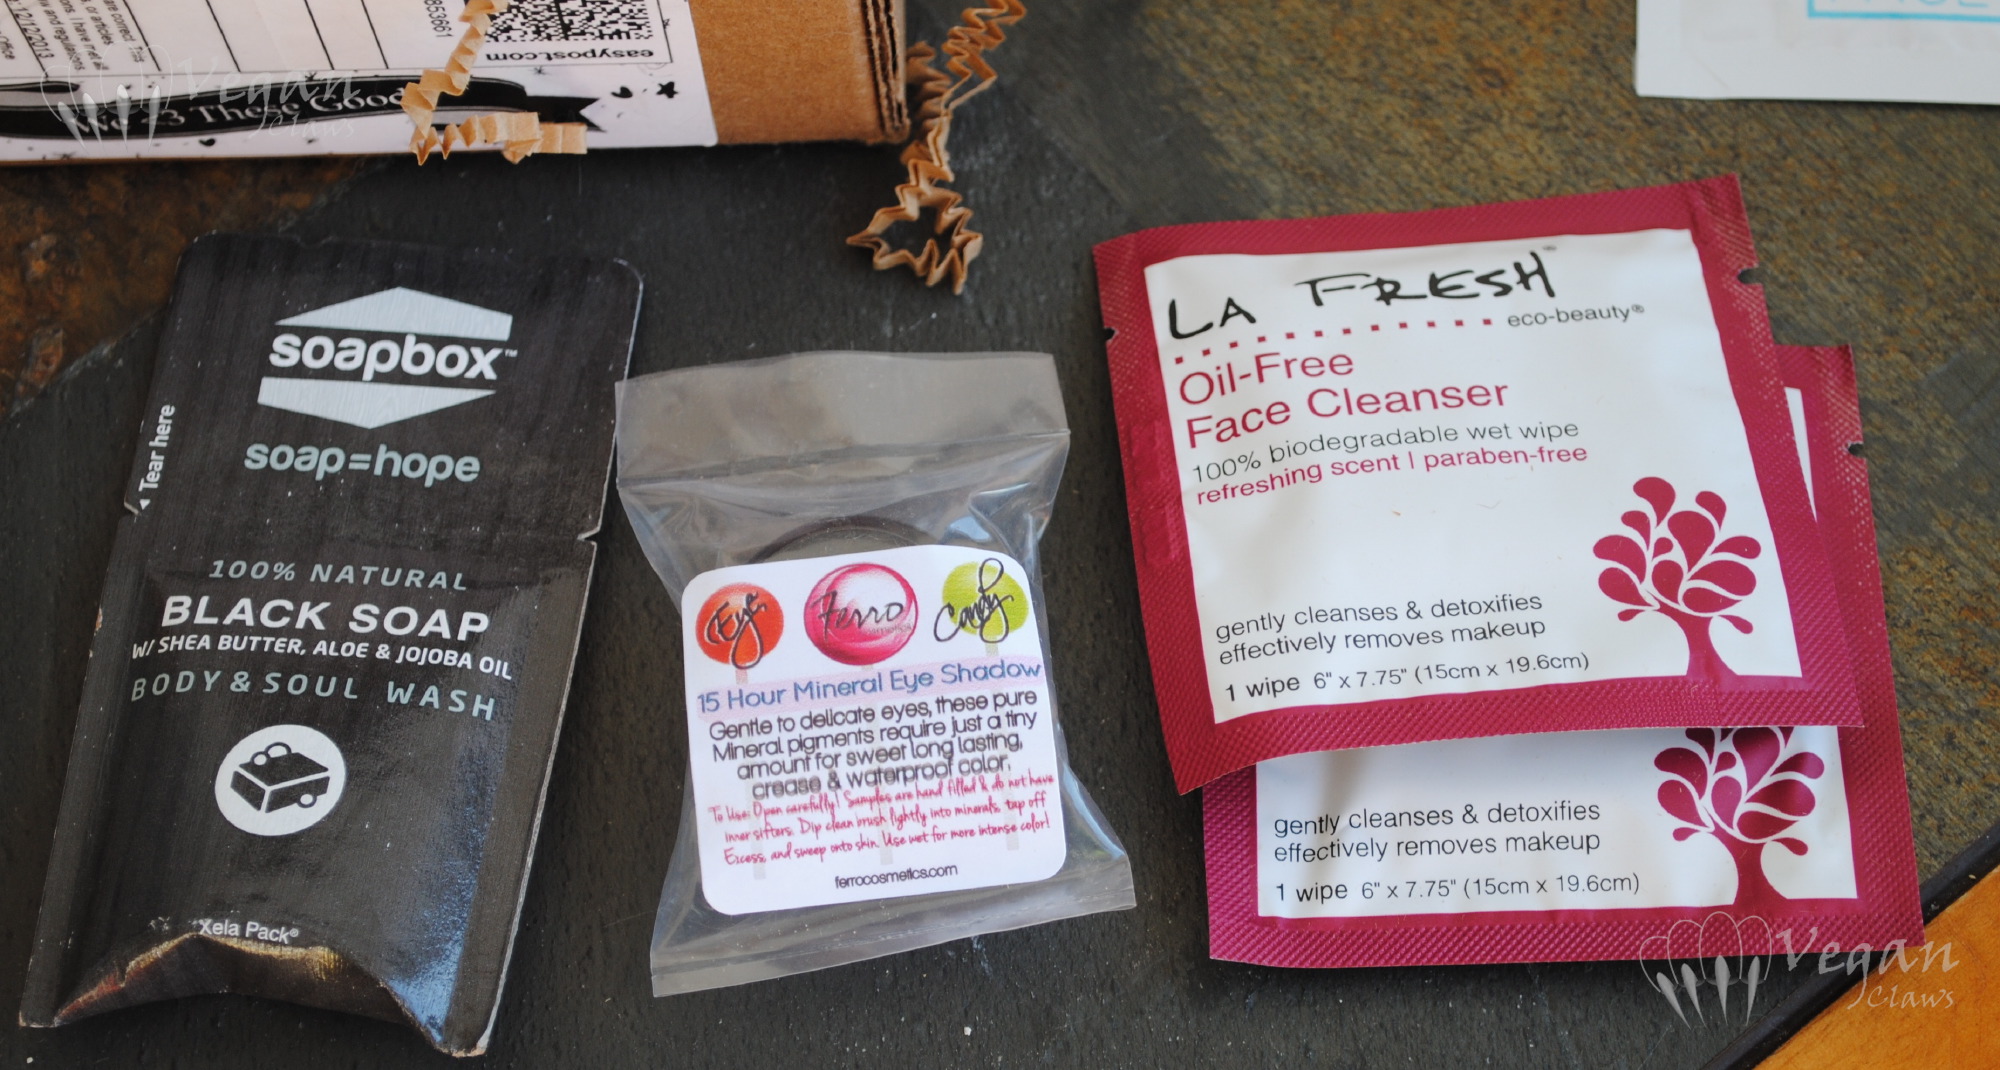
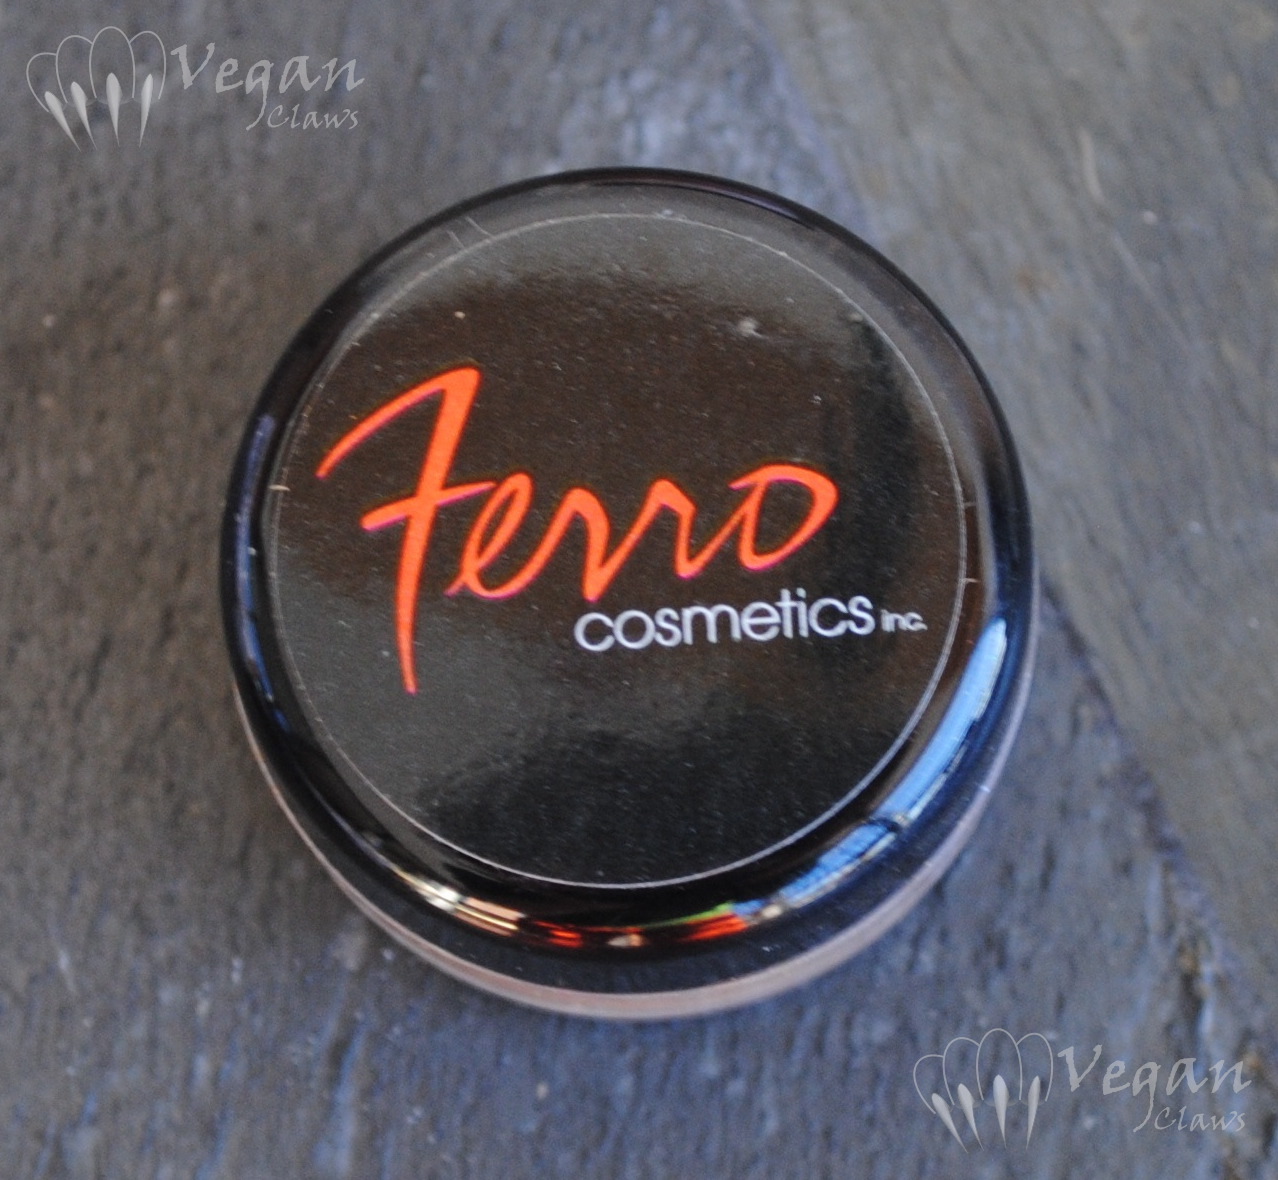
Next, a sample of Soapbox black soap – I haven’t tried this yet, but I love black soap! – a Ferro eyeshadow sample, and two LA Fresh oil-free face cleansing cloths. I tried one of the cleansing cloths – it was really nice, does a great job removing makeup, and leaves your face feeling refreshed, no rinsing needed.

vegancuts2

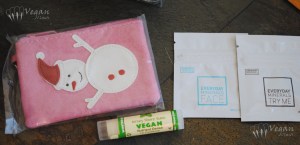
Here we have a cute little pleather coin purse by Lavishy, a tube of Spearmint Jersey Shore Sun lip balm, and two Everyday Minerals makeup samples. I’ve been using the lip balm and I love it! Nice and minty and very moisturizing and conditioning. My lips have been pretty chapped with the extreme cold weather lately – the spearmint oil in this lip balm feels all tingly (in a good way!) and it does a great job getting rid of peeling, flaking skin.

lavishy

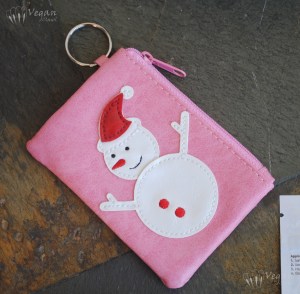
Here’s a better look at the Lavishy coin purse. Really nice textured-look pleather!

vegancuts_everydayminerals

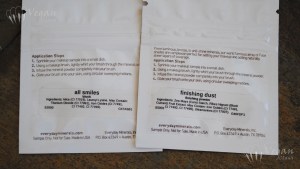
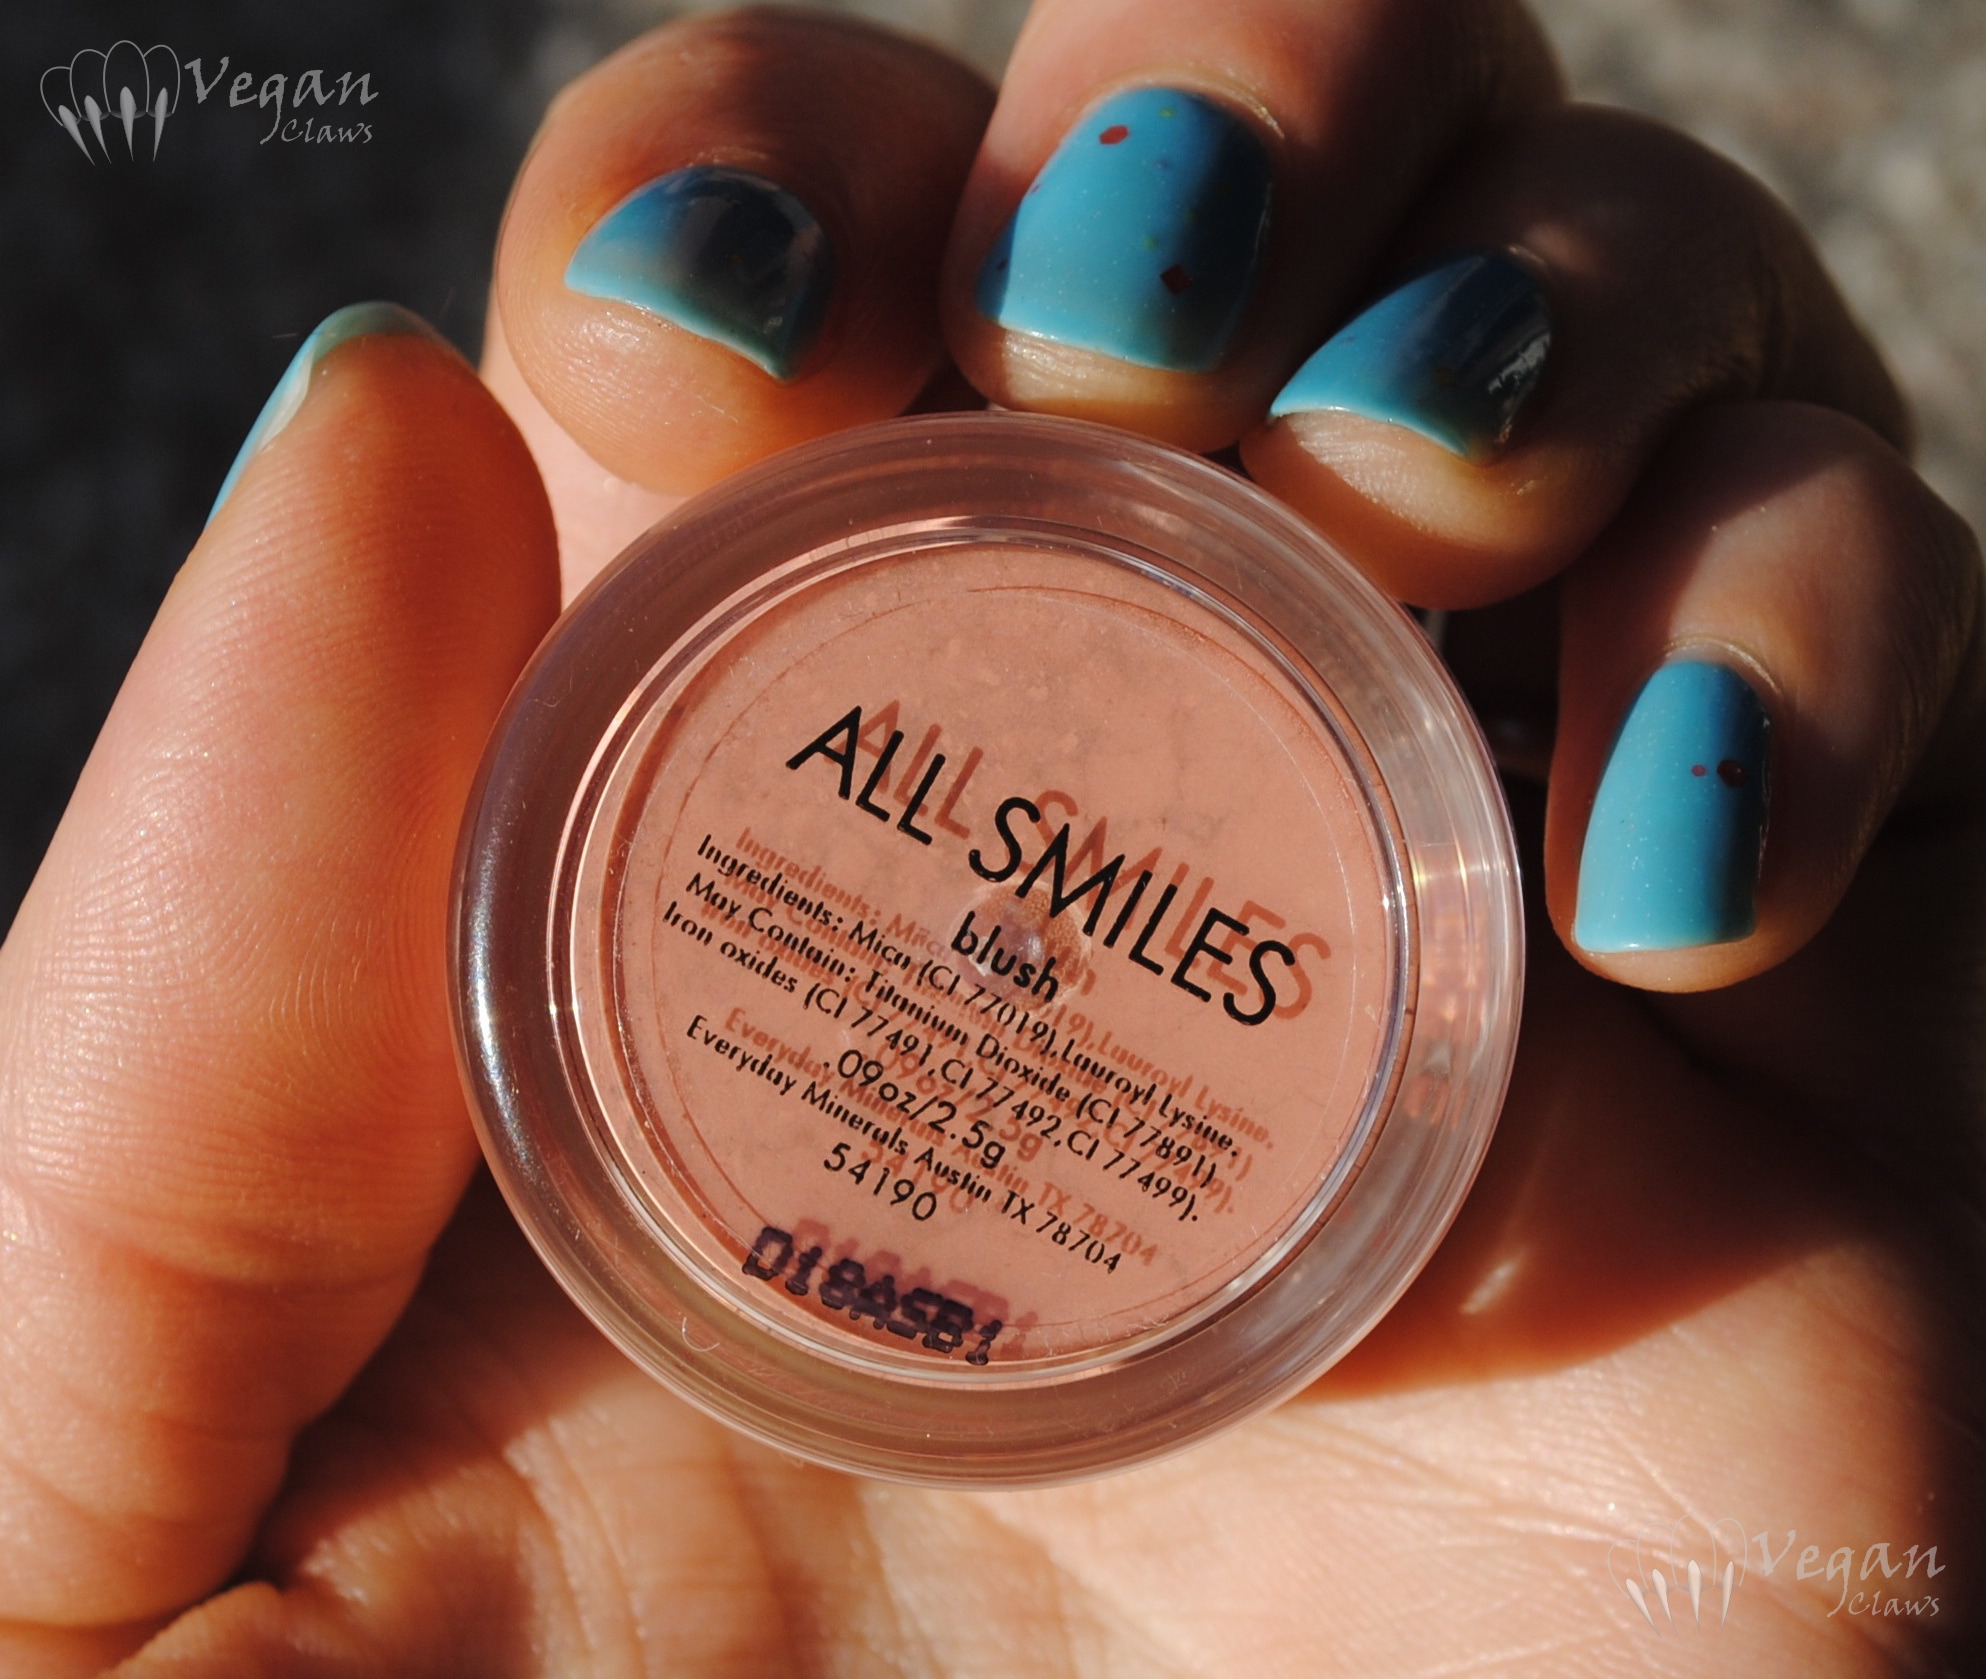
Here are the Everyday Minerals samples – All Smiles blush and Finishing Dust finishing powder. The little sample packets are recloseable at the top.

allsmiles

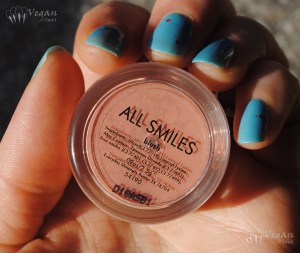
I actually already own a larger size of this blush, so I thought I’d show a photo of what it looks like! I used to have a container of Finishing Dust too, but I must have used it up because I couldn’t find it!

ferro

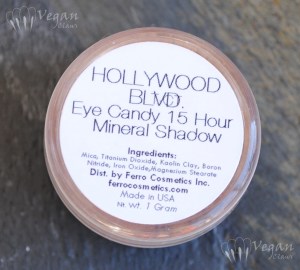
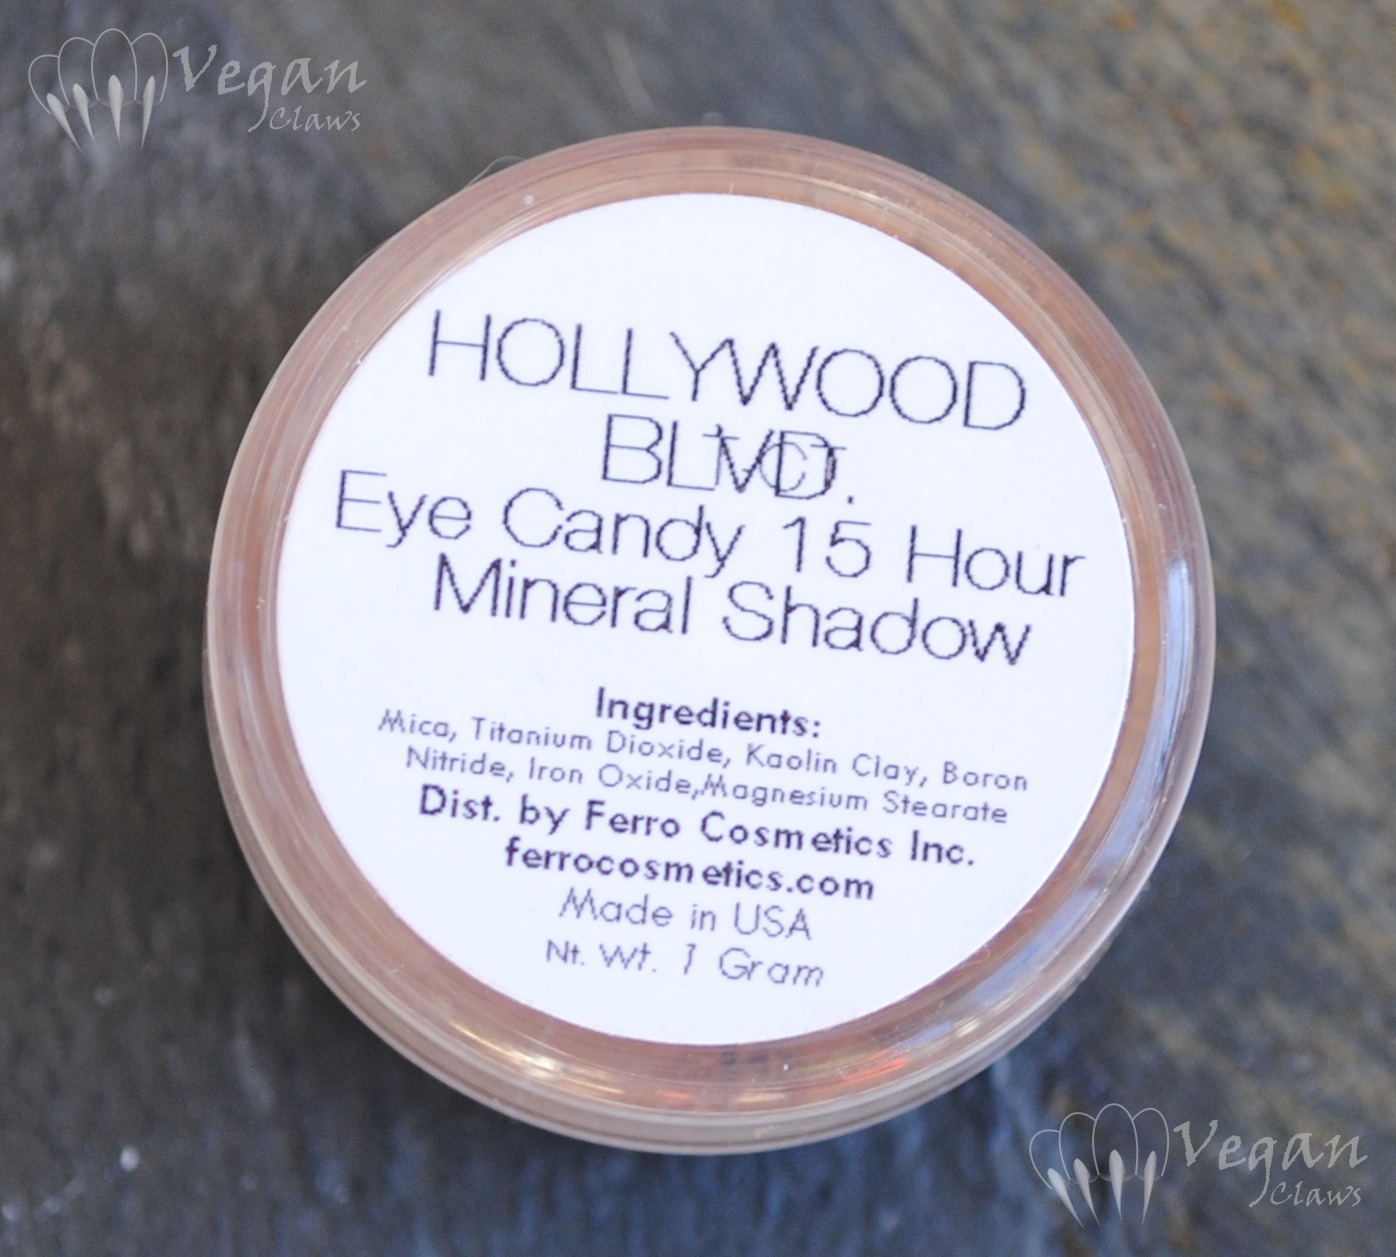
Here is the Ferro eyeshadow sample, and below is the label on the back.

ferro2

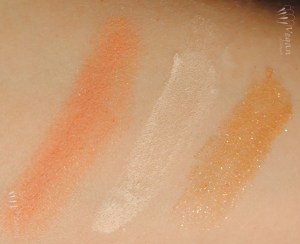
Swatches, left to right: All Smiles Blush, Finishing Dust, and Hollywood Blvd. eyeshadow. In sunlight:

swatches_sun

With flash:

swatches_flash

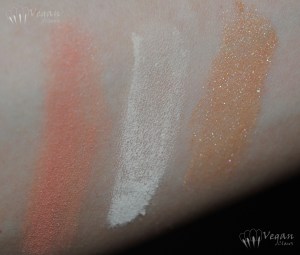
The Vegan Cuts website states that when they send makeup in the beauty box, it won’t be anything that is specific to only a narrow range of skin tones, and I think they’ve succeeded with that here! All Smiles is a coral-pink shade of blush that should look good on just about anyone. If I recall correctly, I think it’s Everyday Minerals’ most popular shade of blush. Finishing Dust, which as I’ve mentioned, I’ve used before, is a very translucent powder for setting your makeup and absorbing moisture, and doesn’t add any colour itself when applied as a finishing powder. Hollywood Blvd. eyeshadow looks like a great neutral brown tone that has some pink and green sparkle to it.

vegancuts3

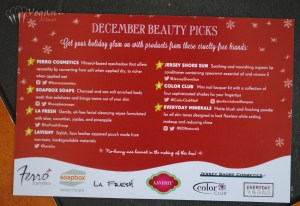
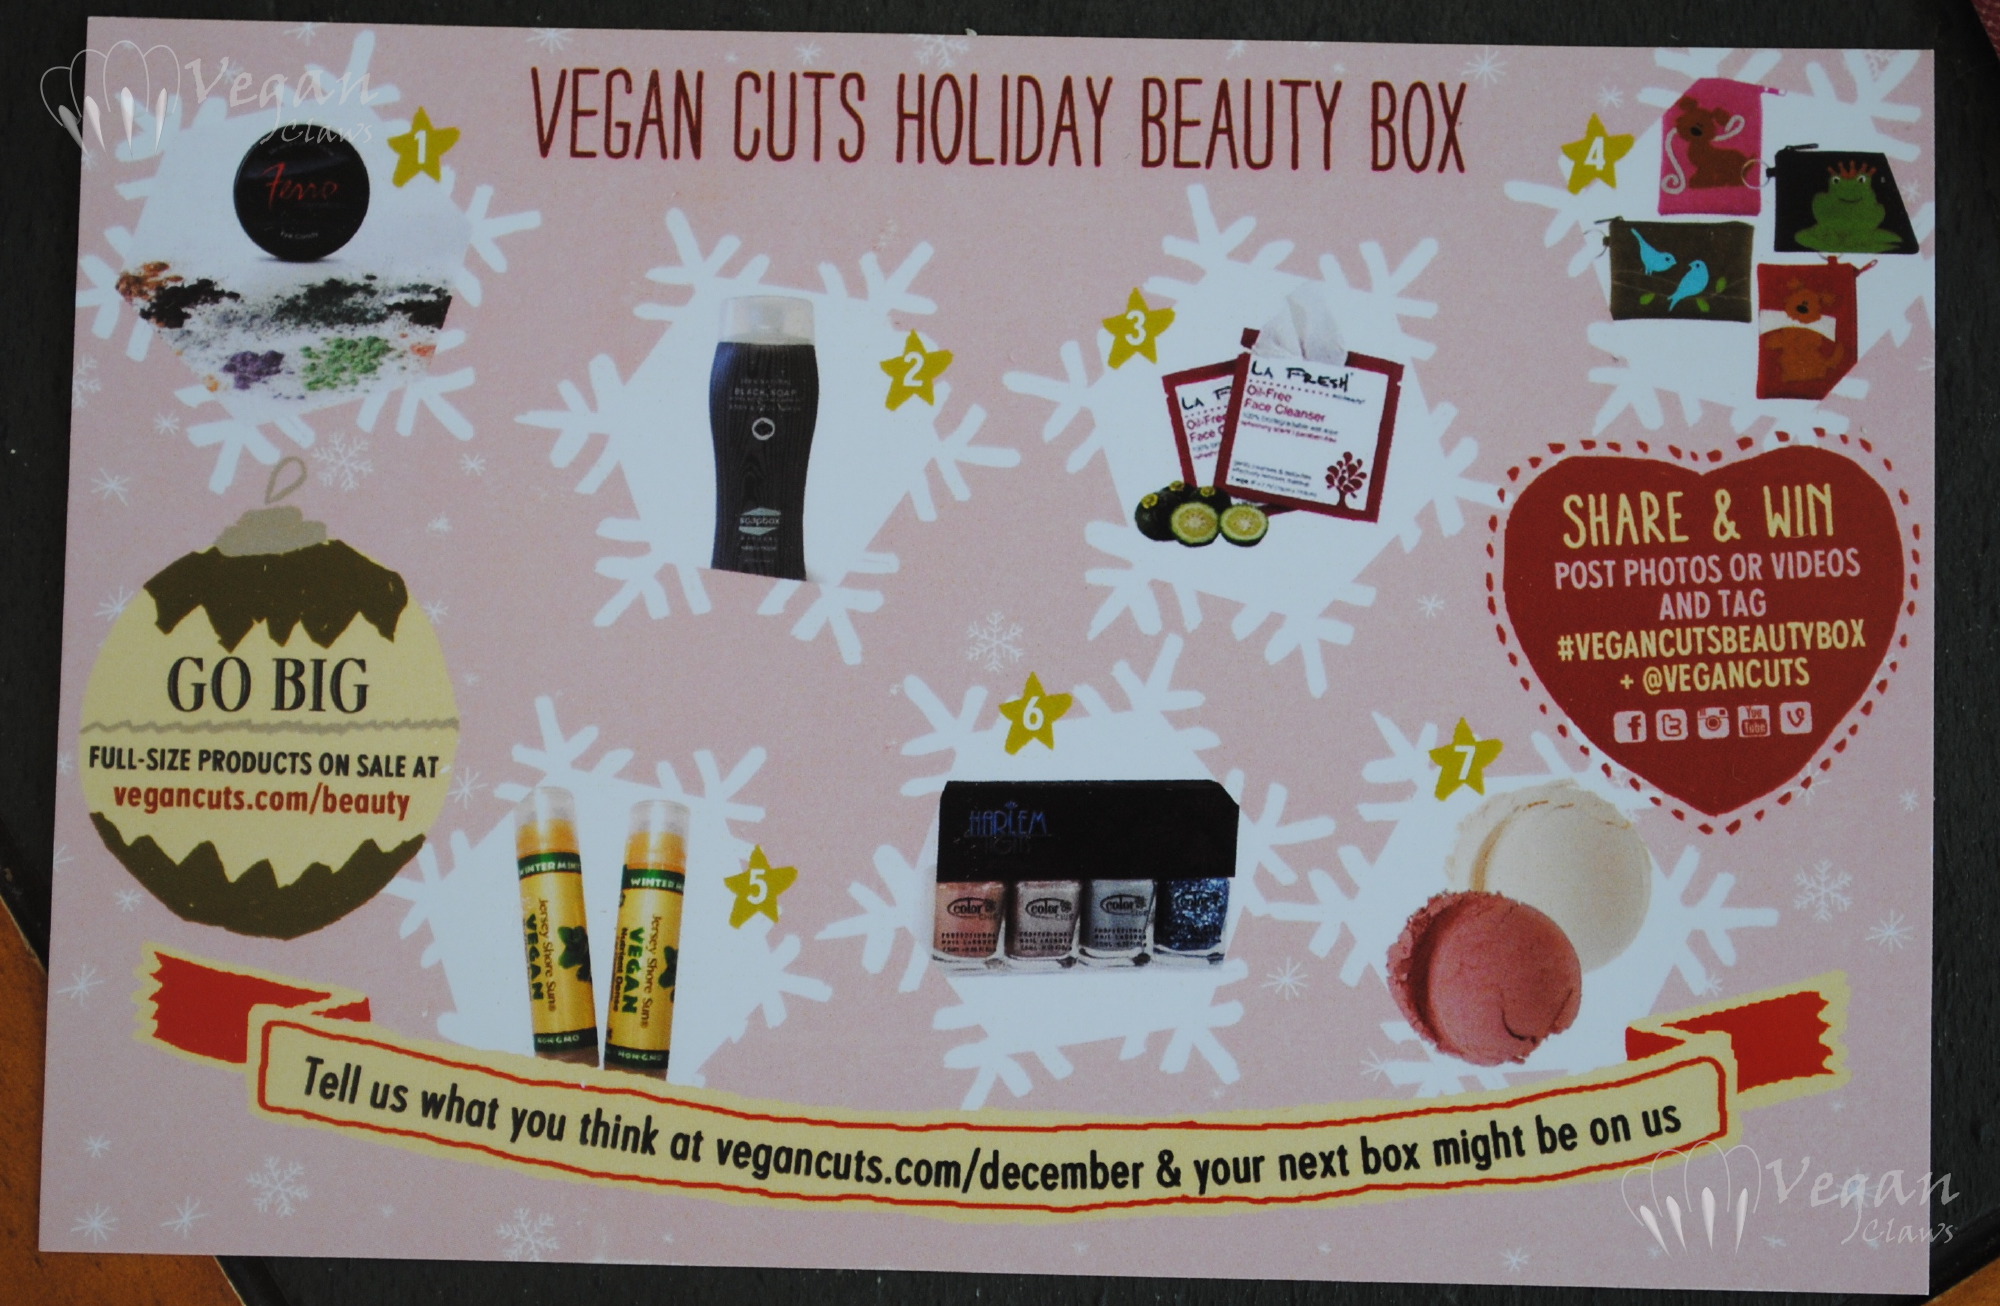
In the box, there was also a card with more information on each of the items and about Vegan Cuts.

vegancuts4

So there you have it! A subscription box service without any animal use, such a great initiative! The variety of items in the December box was great, and the items I’ve tried so far are awesome. According to the website, the January boxes ship out on January 20th, so there’s still time to sign up for them. Subscribing costs 19.95$USD per month, with varying rates for shipping depending on where you are (free shipping to the US, 8$ to Canada, and 15$ to other countries). For more info you can refer to their website here: http://vegancuts.com/beautybox

Disclosure: the products in this post (except the one noted) were provided by Vegan Cuts for my honest review.

Authority Cosmetics Swatches and Review

Today I have four polishes to show you from the relatively-new brand of vegan polishes, Authority Cosmetics. Two cremes, a slight duochrome shimmer, and a glitter topper – let’s get started with the swatches, shall we? 😀

Authority Cosmetics Disco

This great lime green creme is Disco. I used two coats.

Authority Cosmetics Disco

The formula was thick and pigmented and went on without streaks; I was really impressed!

Authority Cosmetics Disco

The glitter topper, I Heart You, has a clear pink base and is filled with small iridescent glitter and pink and red heart-shaped glitter. I applied one thick coat over Disco and wasn’t sure if it would work out with the green and pink layered, but it turned into a really great olive green shade! I think it actually ended up being my favourite combo with I Heart You! A couple of swirls of the brush generally brought out 1-3 hearts from the bottle without trouble, and there was a little placement of hearts involved to get them distributed evenly on the nail.

Authority Cosmetics Disco and I Heart You

The second shade, Paradise, is a medium bright blue creme, also thick and pigmented like Disco. In fact, this swatch shows just one thick coat.

Authority Cosmetics Paradise

I probably should have done two thinner coats instead of one thick, since I ended up getting a few tiny bubbles as it dried, but I wanted to see if it covered in a single layer.

Authority Cosmetics Paradise

The sun had gone away so this next pic is under the Ott lite:

Authority Cosmetics Paradise

Here is one coat of I Heart You over Paradise, turning it a dusty periwinkle. Sorry for the little bald spots in the glitter; I didn’t notice until I took the photos!

Authority Cosmetics Paradise with I Heart You

Authority Cosmetics Paradise with I Heart You

Last but certainly not least, the duochrome, Emerald Sky. This is a shimmery green-teal-blue subtle duochrome in a smoky, slightly blue-purple base! (These first photos in natural light are a little too blue, and the later ones under Ott and halogen light are more colour accurate.)

Authority Cosmetics Emerald Sky

The base is sheer to let the shimmer show through, and the formula is thinner than the other polishes. It builds to a nice glowy colour in just two coats though, which is what is shown here.

Authority Cosmetics Emerald Sky

Authority Cosmetics Emerald Sky

Under Ott Lite:

Authority Cosmetics Emerald Sky

With flash:

Authority Cosmetics Emerald Sky

Here it is again under Ott lite, with a layer of I Heart You on the ring finger:

Authority Cosmetics Emerald Sky with I Heart You

I also did a comparison with one coat over black versus two coats alone (bottom to top in the photos).

Authority Cosmetics Emerald Sky alone and over black

Applying over black makes the look more opaque and dark, but doesn’t really change much about the colour shift. At an extreme angle, you can see the shimmer shifts more to blue.

Authority Cosmetics Emerald Sky alone and over black

This last photo is under halogen light.

Authority Cosmetics Emerald Sky alone and over black

Authority Cosmetics is available on their website here. They have just 10 colours so far, but if they’re all like the ones I’ve reviewed here, the quality is great! I have to say I am impressed with these! 🙂

Disclosure: The polishes in this post were provided for review. Opinions expressed are my own honest opinions.

Glitter Gal – Navy I Will Navy I Won’t, Big Smoke, and Gloss Boss topcoat

Today I have swatches and reviews of a couple of Glitter Gal’s new releases to show you! For those who don’t know, they’ve just released two new collections of creme shades, a new holo, two new holo topcoats, and a colour-enhancing high-gloss topcoat!

Glitter Gal Big Smoke, Gloss Boss, Navy I Will Navy I Won't

Here are the polishes that I am reviewing today – Big Smoke, a medium-dark grey creme, the new colour-enhancing topcoat Gloss Boss, and the new blue holo called Navy I Will, Navy I Won’t.

Glitter Gal Big Smoke

Let me start with the grey creme, Big Smoke. Two coats, no topcoat, in the first photo. The formula was smooth and thinner than some creme formulas, but not too thin.

Glitter Gal Big Smoke, Gloss Boss

Then I added a layer of Gloss Boss topcoat. Super shiny, and dried quickly!

Glitter Gal Big Smoke, Gloss Boss

Nice, simple deep grey! The previous photos were with flash. Here’s one under the Ott lite without flash:

Glitter Gal Big Smoke, Gloss Boss

And now, the new holo, Navy I Will, Navy I Won’t! I’ve gotta say, the colour is great and the name is great, but I wouldn’t have put the two together! It’s a medium, saturated/almost bright blue, not a navy.

Glitter Gal Navy I Will Navy I Won't

I used two coats; the formula was great. These first two photos are without topcoat, the above with flash and below with just the Ott lite. Unfortunately I wasn’t able to photograph it in sunlight, since, well, it’s the darkest month of the year, here!

Glitter Gal Navy I Will Navy I Won't

There is a very slight teal-leaning metallic shimmer to the surface of the polish, when the light shines on it, as you can see in some of the photos.

Glitter Gal Navy I Will Navy I Won't and Gloss Boss

Gloss Boss is said to enhance holographic polish, rather than dull the effect like some topcoats tend to do. The rest of the photos include one layer of Gloss Boss, and as you can see the holo is still obvious and the polish is a lot glossier. Again, the above photo is with flash and the following is under the Ott lite.

Glitter Gal Navy I Will Navy I Won't and Gloss Boss

I’ll have to round up all the topcoats I have at some point to do a comparison on how they each affect holographic polishes!

Glitter Gal Navy I Will Navy I Won't and Gloss Boss

A couple more flash photos to show off this beauty… Check out the linear holo flame:

Glitter Gal Navy I Will Navy I Won't and Gloss Boss

These and the other new releases are available on Glitter Gal’s website: http://www.glittergal.com.au/. I’m not sure when their other distributors will get these collections in, but I imagine it’ll be soon!

Disclosure: The polishes in this post were sent for review. The opinions expressed in the review are my own honest opinions.

Glitter Gal Transfusion and comparisons

I recently got the opportunity to review one of Glitter Gal’s newer holos, Transfusion! Transfusion is a deep red-violet shade and is really gorgeous!

Glitter Gal Transfusion

Its colour is somewhere in between burgundy and purple. I used two coats and no top coat for these photos.

Glitter Gal Transfusion

The formula is great; no issues at all!

Glitter Gal Transfusion

Lovely, and unique holo shade!

Glitter Gal Transfusion

Here is a comparison to some other burgundy and purple holos I have.

Thumb to pinkie: Picture Polish Monroe (original version), Ozotic 513, Glitter Gal Transfusion, Zoya Aurora, LA Girl Sparkle Ruby

Thumb to pinkie: Picture Polish Monroe (original version), Ozotic 513, Glitter Gal Transfusion, Zoya Aurora, LA Girl Sparkle Ruby

Here we have Picture Polish Monroe (original version – the new version has much larger holo particles and is closer to LA Girl Sparkle Ruby from what I’ve seen in photos), Ozotic 513, Glitter Gal Transfusion, Zoya Aurora, LA Girl Sparkle Ruby. Two coats of each (although Sparkle Ruby could be a one-coater).

The comparison under the Ott Lite:

Thumb to pinkie: Picture Polish Monroe (original version), Ozotic 513, Glitter Gal Transfusion, Zoya Aurora, LA Girl Sparkle Ruby

Thumb to pinkie: Picture Polish Monroe (original version), Ozotic 513, Glitter Gal Transfusion, Zoya Aurora, LA Girl Sparkle Ruby

As you can see, these are all great polishes but none of the others are similar to Transfusion! I love Transfusion, and its sister polish, a warm brick-red holo shade named Hot Chili, is going on my wish list!

You can order Glitter Gal polishes directly from them here or from one of their distributors listed here.

Disclosure: Glitter Gal Transfusion was provided to me by the company for review purposes. The opinions stated are my own honest opinions.

Soulstice Santa Monica and Nevis

I’m very excited today to be able to show you two brand new polishes from Soulstice! Santa Monica and Nevis are two of four shades that have just been released. This half of the set isn’t your traditional fall colours, but they are gorgeous!

Soulstice Spa Santa Monica and Nevis

On the left we have Santa Monica, a light lavender with blue/pink duochrome glass flecks, and on the right, Nevis, a leafy green creme. The following photo shows the shimmer in Santa Monica that the previous one didn’t catch!

Soulstice Spa Santa Monica

Santa Monica is really, really pretty. It’s sheer at first, since it has a jellyish base to allow the shimmer to sparkle through. The formula was good, slightly thin but not runny. I used three coats here.

Soulstice Spa Santa Monica

Disclaimer: please note that I took these photos as the sun had just begun to set, so they appear a bit warmer than in real life! (Also, my index finger is still growing out the last of the break I had a while back, so any irregularities you might see there at the tip are not the fault of the polishes!)

Soulstice Spa Santa Monica

These next two photos at an angle show the colour shift in the shimmer better. As usual, you can click on any photo to enlarge it and get a better look at the details.

Soulstice Spa Santa Monica

Blue duochrome glass flecks, of course, mean instant love to me. 😉

Soulstice Spa Santa Monica

And here is what Santa Monica looks like in the shade:

Soulstice Spa Santa Monica

And now for Nevis! I definitely have a soft spot for this sort of green, bright and leafy and bold!

Soulstice Spa Nevis

I found the formula thin on this one, and the first coat went on streaky as a result. However, a second slightly thicker coat evened it all out!

Soulstice Spa Nevis

This shade of green looks like it’s close to Misa Good to Be Green, which I loved, and I love this! As a side note, just after I did my comparison post for Good to Be Green, I ended up with two other polishes that are a lot closer to it than the ones in my comparison photos! With this one, that makes three similar ones I have, so I’ll have to revisit that comparison in a new post!

Soulstice Spa Nevis

Here is Nevis in the shade:

Soulstice Spa Nevis

The other two shades in this release are Napa, a shimmery deep red, and St. Barts, a shimmery deep teal, that also look like they’re going to be great! I’m definitely looking forward to picking those up when Nail Polish Canada gets them in stock… For those of you in the US, the four new shades are already available from Soulstice’s web store!

Disclosure: The polishes in this post were provided to me by the company for my honest review. The opinions expressed are entirely my own.

Glitter Gal Buckled Bronze

I’ve got a gorgeous duochrome from Glitter Gal to show you today! This is one of six new duochromes they recently released, and the lovely Kerry from Glitter Gal gave me the opportunity to review it (thanks, Kerry!). This one is called Buckled Bronze and it’s got a great plum-burgundy-bronze-copper colour shift!

Here it is with the box it comes in. I really like these new Glitter Gal bottles, square and solid and stylish looking – they’ve really done a nice job on their new packaging.

Glitter Gal Buckled Bronze

These photos are of one generous coat of Buckled Bronze over one coat of Kleancolor Black; these are sheer duochromes that show their full effect over black (or another very dark colour).

Glitter Gal Buckled Bronze

No topcoat here; it dries quite glossy on its own. The formula was thin and smooth, perfect for this sort of layering polish.

Glitter Gal Buckled Bronze

As always you can click on any of these photos to get a better view.

Glitter Gal Buckled Bronze

Glitter Gal Buckled Bronze

These next two photos are with flash in addition to sunlight. Head-on, the flash shows just how nearly purple this polish appears in some lights!

Glitter Gal Buckled Bronze

And at more of an angle, the bronze tone becomes prominent:

Glitter Gal Buckled Bronze

At extreme angles, the polish even shifts to gold and green. If you click on the full size version of this next photo, you can see all the little multicoloured sparkles along with the gold-green shift – love it!

Glitter Gal Buckled Bronze

These next few photos are in indoor light.

Indirect natural light, sorry for the weird lumpy-looking reflections:

Glitter Gal Buckled Bronze

Under my Ott Lite:

Glitter Gal Buckled Bronze

Ott Lite plus flash:

Glitter Gal Buckled Bronze

Glitter Gal Buckled Bronze

And here is what the polish looks like on its own – as you can see it’s definitely sheer! Left to right, one, two, three, and four coats of Buckled Bronze. The pinkie with four coats shows how the base of the polish is kind of a smokey taupe colour.

Glitter Gal Buckled Bronze

Anyway, as you may have guessed by now, this is a great polish and I love it! The colour scheme is right up my alley. This and the other five new Glitter Gal duochromes, shown in the following company promo image, are available here on their website, or from one of their international distributors listed here.

Disclosure: This polish was provided to me by the company for my honest review. The opinions expressed here are entirely my own.

Soulstice Spa Harbour Island and Cape Cod

Soulstice Spa has released four new polish shades into their collection for spring 2012, and today I have two of them to show you, complete with comparisons to a couple other polishes I have.

The two polishes I got are Cape Cod, a light, slightly muted blue with pearly shimmer, and Harbour Island, a pale, sheer peachy-pink-nude jelly with holographic glitter in it! As a bonus, a couple of adorable kitties will be making an appearance in today’s photos! 😉 All photos are taken in direct sunlight.

These next photos are three coats of Cape Cod. At first I found the formula to be thick so I was having trouble evening out my coats but I added a little Beauty Secrets thinner and that helped a lot.

I really like this shade of blue and the fine pearly shimmer!

The shimmer has a sort of blueish glow to it in the sunlight, very cool!

This polish reminded me of Milani Antique, another light blue with the same type of finish, so I did a little comparison. Index and ring are Antique, middle and pinkie are Cape Cod, three coats each. As you can see the Milani is a couple shades darker than Cape Cod.

And here is my boy Thor checking out the comparison, haha!

Next up, Harbour Island. These photos are also three coats.

The formula was really smooth and easy to apply but it’s a sheer and the third coat adds more sparkle and reflectivity.

The base colour of this polish is pale peach with a bit of a pinkish tone.

The holo glitter does dry slightly rough, but top coat easily takes care of that (these photos include top coat).

As always you can click on any of these photos to see the sparkly holo glitter in better detail!

I can’t say that I have any other peach/nude jellies with holo glitter! But here is a comparison to the closest thing I have, LA Splash Sparkling Jellyfish. Sparkling Jellyfish, in the middle in the following photo, is significantly deeper, brighter and more pink.

And finally, Harbour Island makes a great layering polish; here it is over China Glaze V, a light orange-coral creme. Hanging out in the photo is my boy Wade! (Wade lost an eye to a severe upper respiratory infection as a kitten when he first arrived at the shelter, but it doesn’t slow him down in the slightest! Nor does it prevent him from being the alpha male in our little feline “colony”!)

The other two polishes in this release, which I don’t have (yet, at least!), are St. Tropez, a beige nude that looks to have pearly shimmer similar to Cape Cod, and Kauai, a berry pink with golden shimmer. If you’re curious about them, blogger Glazed Talons reviewed them both here. These shades are available directly through Soulstice Spa on their website; Nail Polish Canada also sells Soulstice but they don’t have these new shades in stock yet as of the time I’m posting this.

Disclosure: the Soulstice Spa polishes in this post were provided to me for review. All opinions are my own honest opinions. (The other polishes in this post were purchased by me. The cats were rescued from the street and adopted from a shelter, respectively. :P)

Color Club holos and Konad plate M86

I was recently asked by Nail Polish Canada if I’d like to review one of the new Konad stamping plates they’ve added to their selection of image plates. The three new ones, M86, M87, and M88 are all French tip designs of various types.

Konad plate M86

This is the plate I received, M86, plain French tips with a pronounced inner curve, and an across-the-nail band that resembles a frilly lace garter.

I decided to use two Color Club holographic polishes, Revvvolution and Worth the Risqué, since these are very pigmented one-coat polishes, and so, good for stamping.

As you can see in the pics, my metal scraper already left some scratches on the surface of the plate, but this is normal when using a metal scraper and it doesn’t affect the results at all.

If you’ve never used French tip Konad designs before, I will say that there is a learning curve to it. I had never used Konad French tips and I had to practise at least a half-dozen times before I got something that I felt was decent enough to photograph. What helped me a lot in the end was watching this French mani tutorial by blogger The Polished Mommy. She goes through two different methods for French tips, one of them being Konad, and part-way through the tutorial when she demonstrates rolling the stamper onto the nail tip starting at one side, I had an “aha” moment, as I’d previously been trying to stamp head-on and the tips would almost always turn out crooked. I’d definitely recommend watching it if you’re like me and trying this type of stamping design for the first time!

The base polish is two coats of Revvvolution, by the way (the second one wasn’t all that necessary but I added it just in case, since I was photographing it), and there is no top coat on these first photos.

Another thing I learned in practising was to choose the right size of design for each nail. The plate has five tip sizes, and although it seems kind of silly to me now, at first I tried to use all five of them largest to smallest from thumb to pinkie. I ended up realizing that was a mistake, and to choose the correct design for each nail based on which one’s width seemed to best match the width of the nail.

I ended up using the second-largest tip on my thumb, the second-smallest on my index, middle and ring fingers, and then the smallest on my pinkie. I was actually kind of relieved that I wasn’t using the largest one in the end, since the greater width of that one makes it a bit trickier to avoid scraping right down to the plate in the center of the design and ending up with a bald spot and having to start over. Not sure if this would be less of an issue when using an old credit card to scrape, like many people do, instead of the metal Konad scraper. The four smaller nail tips didn’t give me any trouble like that, though!

I then decided to add the lace-garter design across my nails, but of course the first one I did went on kind of crooked and with bald spots (some day I’ll get better at stamping, I swear! haha); I then applied the others haphazardly on purpose so that at least they’d all be similar! I still like the way it turned out. I also added topcoat before taking the rest of these photos.

I was really happy that Worth the Risqué works so well for stamping. These two holos are gorgeous in the sunlight!

Although at first I was getting a little frustrated when I couldn’t get the tips stamped on straight, once I watched the tutorial and practised a little more it became a lot of fun to play around with this plate! Previously I’d only ever used French tip guide stickers (well, and tried freehand once, but that didn’t turn out well enough for me to be satisfied with it) but the thing with those is that you have to make sure that the base is completely dry before applying the stickers or else removing them will remove some of the base too. So, I’m really glad to have this plate; I’ll surely be doing French tips on my manis a lot more often now!!

If you’re in Canada like me you can find this plate and others here at Nail Polish Canada. (edit: I just noticed on their site that they also ship to the US.) You can probably also find them wherever you normally get your Konad plates; I’m not sure how widely available the newly released ones are at this point. 🙂

Disclosure: the stamping plate in this post was provided to me for review. Opinions expressed are my honest opinions.

New Soulstice Spa polishes

I recently received these three new Soulstice Spa polishes, including their two new greens, for review: Telluride, LA, and Dublin. You can click on any of the photos below to see more detail in the full sized versions.

Soulstice Spa Telluride, LA, and DublinThis bottle shot unfortunately didn’t pick up the golden shimmer in Telluride, but here it is below.

Telluride

TellurideA mint green with golden shimmer, this one is unique in my collection of minty polishes – I’m sure others must exist, but I don’t have any! This one had a fairly thick formula that did give me some trouble – at one and two coats it was a bit streaky over the ridges on my nails, so I ended up using four coats to even everything out for these pictures. Next time I’ll be adding a little thinner and using an opaque base coat, so I’m sure 2 or 3 coats will do. Either way, the colour is great!

Next up is LA, a multicoloured hex glitter layering polish. Here it is by itself, three coats (please ignore the stained nails!).

Soulstice spa LA

Soulstice spa LA

There are three sizes of hex glitter in this polish, very small, small, and medium, in the colours silver, yellow, green, orange-toned red, blue, and magenta. I love that there is a noticeable amount of yellow glitter, it really makes the polish for me! The formula was good, no trouble with this one. I had to “place” the glitter a little bit to get it evenly distributed, and as with any polish of this type, I held the brush against the inside of the bottle neck for a few seconds to let some of the transparent base drain off to maximize the concentration of glitter on the nail.

Of course, there are a fair number of similar rainbow glitter polishes floating around, including the newly released one by OPI, so I’ll be doing a comparison post with a couple of those later.

Last but not least, Dublin! This is a deep, shimmery velvety green, just gorgeous. The formula was good and this one is nearly a one-coater. I used 2 coats for good measure but you could probably get away with one if you’re careful. I got a few bubbles in it, which you may be able to see in the first picture; I think that was mainly because I used Nubar Nu Nail as a base coat under it since I was planning to keep it on as my manicure after taking the photos, and didn’t let things dry long enough between coats.

Soulstice spa Dublin

I then added two layers of LA on the ring finger as an accent, and finished with Poshe top coat which completely eliminated the bubbles (love that stuff – so smooth and glassy!).

Soulstice spa Dublin

Just for fun, another photo since a piece of glitter caught the light so well!

Soulstice spa Dublin

These polishes dried fairly quickly. I really like all three shades. I asked for greens, and I’m sure not disappointed! I love minty greens, and polishes with golden shimmer, and dark greens too, so these are great. I’m really enjoying my Dublin mani so far, it’s beautiful to look at!

Disclosure: the polishes in this post were provided to me by Soulstice Spa for review. Opinions expressed are my own.